Tag: stencil

  • All I need for Christmas is endless coffee, and a great card design

    All I need for Christmas is endless coffee, and a great card design

    Alternate title: A guide to surviving errors and still ending up with a card!

    Would you like to experiment with a design like this? You’ll find a supply list below, including a link to the stencils I used from A Colorful Life Designs.  Follow the link and use discount code ChrisFan10 to save 10% on your entire order! (Master Creator Bundles are excluded as they already have a 20% discount built in.)

    Let’s get Started:

    Card Base: 5.5 x 8.5, scored and folded at 4.25

    Card Face:  5.25 x 4

    Card Face:

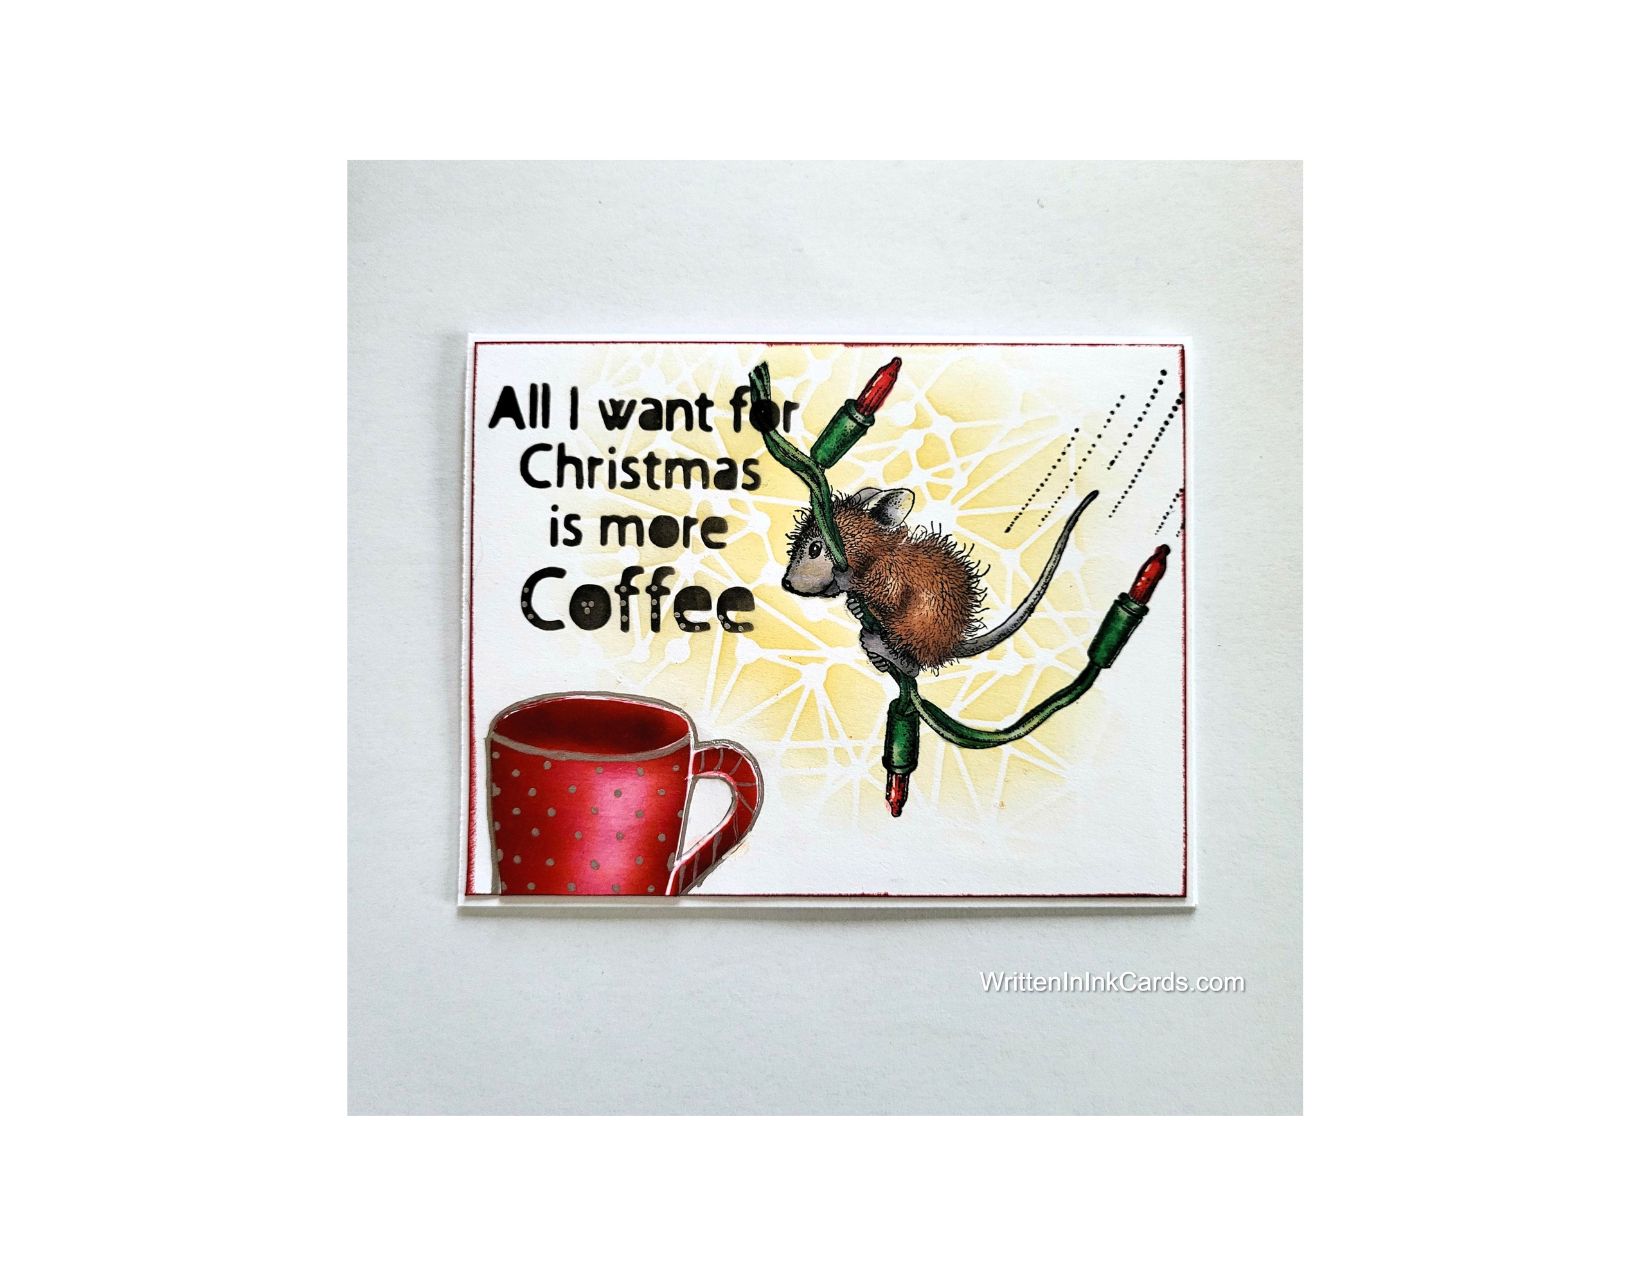
    • Using Memento black ink, I stamped the image in the upper right of the card face, and then coloured it with alcohol markers.
    • I placed the card face down on the Grip Mat and positioned the coffee cup portion of the stencil in the lower-left corner.  I masked off open areas on the stencil near the mug, then used red ink over the exposed area.
    • When I removed the stencil, I was dismayed to see that I had been too energetic with my brush between the mug and the handle—and I had ink between the two, instead of a lovely, clean page.  What to do?
    • I cut very carefully along the outline of the mug, removing it completely from the card face.  Then I laid it on a scrap piece of cardstock and traced it.  I carefully cut this piece out and then tested it in the opening on the card face.  Once I saw that I had a good fit, I glued the card face to a piece of scrap copy paper (cut down to 5.25 x 4”)  and glued the blank “mug” into the opening.
    • I used my snips to remove the paper between the mug and the handle, cutting carefully along the lines.   Once that was done, I was able to glue that piece back in place directly over the blank.
    •  I repositioned the stencil and placed the sentiment I wanted to use in the upper-left corner, then applied black ink to the open areas.
    • I put the other stencil in place:  I used yellow ink and a light hand to create the pattern around the mouse.

    Rather than grab my yellow ink pad,  I simply used the residual ink on the yellow brush.  Because I only wanted a subtle background, this worked well.  I learned this tip from my friend on YouTube – check out Amy’s Wares for some great tips.

    • I outlined the mug with silver gel pen:  while I was outlining the handle, the pen slipped and suddenly I had an unplanned streak of silver ink …. I dealt with that by adding additional lines to the handle, creating stripes.   I decided to add dots to the rest of the mug just for fun.
    • I ran the edges of the card face over my red ink pad., creating definition.

    Assembly

    • I glued the card face to the card base, centering all sides.

    Final Thoughts:

    I had coloured the mouse and lights (so adorable!) and didn’t know what I wanted to do next. A random hunt through my stencil binder resulted in my tripping over the Christmas Coffee stencil and a plan was born.  Serendipity is a wonderful thing!

    Supplies: (and links where possible)

       I have listed which products I have used, and where they may be purchased. It’s a huge marketplace and in most instances, there are multiple sources and many alternatives to choose from.

    Stencil:

    Christmas Coffee Stencil:  A Colorful Life Designs

    Connect the Dots,  A Colorful Life Designs

    Waffle Flower Grip Mat, 8.5 x 6.5, Scrapbook.com

    Stamps: Merry and Bright, House Mouse,  Spellbinders (retired)

    Ink: Stampin’ Up!

    Blending Brushes: Stampin’ Up! 

    Versafine Onyx, Simon Says Stamp

    Memento Ink: Stampin’ Up!

    Alcohol Markers:

         Stampin’ Blends: Stampin’ Up!

         Copics:  Wallacks

    Adhesive: Tombow Aqua, Michaels

    Card Base & Card Face: Accent 100 lb., Amazon

    Do you have comments or thoughts to share on this design?  Drop me a line in the Comments Section below –  I’d love to hear from you!

    You can also use the Comments Section  to be notified when I release new work.

    Connect the Dots by A Colorful Life Designs

    Christmas Coffee by A Colorful Life Designs

  • Create Your Own Snowman Card with Easy Techniques

    Create Your Own Snowman Card with Easy Techniques

    There is nothing this wee fella loves more than a good snowfall.

    Would you like to experiment with a design like this? You’ll find a supply list below, including a link to the stencil I used from A Colorful Life Designs.  Follow the link and use discount code ChrisFan10 to save 10% on your entire order! (Master Creator Bundles are excluded as they already have a 20% discount built in.)

    Let’s get Started:

    Card Base: 5.5 x 8.5, scored and folded at 4.25

    Card Face: 5.5 x 4.25 (before die cutting)

    White Cardstock for die cutting:  4 x 4

    Card Face:

    • I laid the card face on my Grip Mat and positioned the stencil.
    • I used ink that matched the cardstock across all open areas,  using a heavy hand to get a saturated result.
    • I removed the stencil and sprinkled clear embossing powder over the wet ink, immediately setting this with my heat gun.
    • I used a deckled rectangle die to cut the card face down to approximately 5.25 x 4”.

    Other:

    • I positioned the square die on the smaller piece of white cardstock and ran it through my Big Shot.
    • I looked through my Ready to Go binder and selected the wee snowman, which had already been coloured and cut out.
    • I checked my sentiment binder and selected one that worked with the design.

    Assembly

    • I glued the card face to the card base.
    • I centered the die-cut square on the card face and glued it down.
    • I added the snowman towards the bottom right.
    • I added the sentiment across the snowman.

    Final Thoughts:

    This is a fun and festive card to celebrate the season.

    When I cut out the snowman  I cut tight along the outer lines and cut off the arms  (they are so thin and delicate that  cutting them out would be very time-consuming.)   I rectified this by using a fineliner to draw them back on once I had the snowman glued to the die cut square.  I got this tip from a Jennifer McGuire video, and use it often.

    Supplies: (and links where possible)

       I have listed which products I have used, and where they may be purchased. It’s a huge marketplace and in most instances, there are multiple sources and many alternatives to choose from.

    Stencil: Christmas Words, A Colorful Life Designs

    Waffle Flower Grip Mat, 8.5 x 6.5, Scrapbook.com

    Versamark Embossing Ink: Simon Says Stamp

    Clear Embossing Powder,  Wow,  Simon Says Stamp

    Stamps: A Colorful Life Designs (retired)

    Dies: Your Next Stamp  (no longer in business)

    Ink: Stampin’ Up!

    Blending Brushes: Stampin’ Up! 

    Versafine Onyx, Simon Says Stamp

    Memento Ink: Stampin’ Up!

    Alcohol Markers:

         Stampin’ Blends: Stampin’ Up!

         Copics:  Wallacks

    Adhesive: Tombow Aqua, Michaels

    Card Base & Card Face: Accent 100 lb., Amazon

    Do you have comments or thoughts to share on this design?  Drop me a line in the Comments Section below –  I’d love to hear from you!

    You can also use the Comments Section  to be notified when I release new work

    Christmas Words by A Colorful Life Designs

  • Making Cards or Making Mischief ?  sometimes you can have both!

    Making Cards or Making Mischief ? sometimes you can have both!

    Peaceful & calm outside, but inside? Mischief and mayhem!

    Would you like to experiment with a design like this? You’ll find a supply list below, including a link to the stencils I used from A Colorful Life Designs.  Follow the link and use discount code ChrisFan10 to save 10% on your entire order! (Master Creator Bundles are excluded as they already have a 20% discount built in.)

    Let’s get Started:

    Card Base: 5.5 x 8.5, scored and folded at 4.25

    Card Face: 5.5 x 4.25

    Card Face:

    • I stamped the trees roughly in the center of the paper using Memento black ink. I coloured the trees with alcohol markers.
    • I placed the card face onto the grip mat, and then added one of the Arches stencils,  centering the opening around the trees.  
    • Using a light hand, I added blue ink in the open areas.
    • I added snow to the scene by spattering white metallic watercolour into the opening, directly over the image.
    • I removed the Arches stencil and placed the Floor Perspective stencil towards the bottom of the card face, immediately under the window.   I used brown ink across the open areas.   I wanted to continue the floor pattern across the entire width of the card face, so I moved the stencil to the right and tried to line up the pattern before applying ink again. (you can see that I was not entirely successful!)  I repeated this on the left side of the card face, extending the tiled floor there as well.
    • I protected the window image created earlier by adding the corresponding mask to cover the inked area completely.  I used a loop of low-tack tape on the back of the mask to keep it in place.  
    • Using a strip of low tack tape to mask the edge of the floor,  I added yellow ink to the top of the card face around the window.
    • I put the Sparkles stencil in place and added the same yellow ink across the exposed areas, creating a tone on tone pattern.
    • I added light grey ink to the border area between the floor and wall to create shadow.
    • I put the mask back in place over the window and traced around this with a black marker.   I used a ruler and the same black marker to create the window panes within this border.

    Other:

    • I had previously stamped and coloured the image of the dog with the string of lights:  I fussy cut around the image.  To give this just a bit more “pop”  I used a clear medium over the Christmas bulbs –  this added a bit of depth and a lot of shine.
    • I looked through my sentiment binder and found one that worked perfectly with the scene.

    Assembly

    • I glued the card face to the card base.
    • I glued the dog in place.
    • I added the sentiment across the center of the trees.

    Final Thoughts:

    Supplies: (and links where possible)

    This card involved a lot of design on the fly …. I started the process with the idea of using the Arches stencil, and no real plan. It created itself as I went along (something that happens often in my craftroom), and once I had added the floor, wallpaper and outlined the window I thought the card was done.

    When I went back and had another look the following week, I realized it still needed “something”. So I looked through my pre-coloured images and discovered the perfect final touch.

    I love it when serendipity strikes!

    Supplies:

       I have listed which products I have used, and where they may be purchased. It’s a huge marketplace and in most instances, there are multiple sources and many alternatives to choose from.

    Stencils:

    Marvellous Masks Arches,  A Colorful Life Designs

    Floor Perspective, A Colorful Life Designs

    Sparkles, A Colorful Life Designs

    Waffle Flower Grip Mat, 8.5 x 6.5, Scrapbook.com

    Versamark Embossing Ink: Simon Says Stamp

    Clear Embossing Powder,  Wow,  Simon Says Stamp

    Stamps: 

    Dog:  Christmas Fun,  Penny Black,  Amazon

    Trees: Impression Obsession (no longer in business)

    Ink: Stampin’ Up!

    Blending Brushes: Stampin’ Up! 

    Versafine Onyx, Simon Says Stamp

    Memento Ink: Stampin’ Up!

    Alcohol Markers:

         Stampin’ Blends: Stampin’ Up!

         Copics:  Wallacks

    Adhesive: Tombow Aqua, Michaels

    Card Base & Card Face: Accent 100 lb., Amazon

    Do you have comments or thoughts to share on this design?  Drop me a line in the Comments Section below –  I’d love to hear from you!

    You can also use the Comments Section  to be notified when I release new work

    Marvellous Masks Arches by A Colorful Life Designs

    Sparkles by A Colorful Life Designs

    Floor Perspective by A Colorful Life Designs

  • Create a one of a kind, elegant Thanksgiving card

    Create a one of a kind, elegant Thanksgiving card

    Would you like to experiment with a design like this? You’ll find a supply list below, including a link to the stencil I used from A Colorful Life Designs.  Follow the link and use discount code ChrisFan10 to save 10% on your entire order! (Master Creator Bundles are excluded as they already have a 20% discount built in.)

    Let’s get Started:

    Card Base: 5.5 x 8.5, scored and folded at 4.25

    Border Layer: 5.5 x 4.25

    Card Face:  5.5 x 4.25  (before cutting)

    Card Face:

    • I used a background stamp and black ink to provide additional texture on this layer.

    My standard practice with background stamps is to lay the stamp on my work surface, ink it, and then carefully lay the cardstock on top.  I cover this with a piece of scrap paper and rub the surface gently with my fingers to transfer the ink, always holding the paper absolutely still with my other hand. (The scrap paper serves to keep any excess ink off of my hands, and it is sure to transfer to the card face!)

    • I placed the card face down on the Grip Mat and positioned the stencil.  I applied a variety of embossing pastes through this, mixing the colours randomly.  
    • I removed the stencil and immediately put it in water,  and put the card face aside to dry.
    • Once the paste had dried completely, I trimmed it into three equal pieces measuring 1” x 4.75” each.
    • I put dimensional foam on the back of each of these strips.

    Other:

    • I put the border layer into an embossing folder and ran it through the Big Shot.
    • I stamped the sentiment with Versamark embossing ink, added gold embossing powder and set it with the heat gun.  I used a die to create the final size and shape.
    • Then I ran each side of this die cut lightly over the Versamark pad,  added gold embossing powder and set it with my heat gun.  This added a very fine gold edging to the die cut.

    Assembly

    • I glued the border layer to the card base,
    • I removed the backing from each strip and put them in place as shown.
    • I glued the die-cut sentiment into the middle of the card.

    Final Thoughts:

    The border layer for this actually started with a stamped image that I wasn’t happy with:  it was a new stamp, and the image hadn’t transferred as well as hoped.  Rather than waste this,  I made use of that paper and ink to create a background for this card.

    The card is so beautiful in real life – that embossing paste dries with a lovely sheen which is gorgeous with all that mixed colour.

    The use of the embossing folder on this card makes a subtle but massive difference to the end result – the additional depth and texture really elevated the card.

    Supplies: (and links where possible)

       I have listed which products I have used, and where they may be purchased. It’s a huge marketplace and in most instances, there are multiple sources and many alternatives to choose from.

    Stencil: Blowing Leaves,  A Colorful Life Designs

    Waffle Flower Grip Mat, 8.5 x 6.5, Scrapbook.com

    Versamark Embossing Ink: Simon Says Stamp

    Gold Embossing Powder,  Wow,  R&R Scrapbooking

    Stamps:   Impression Obsession (no longer in business)

    Ink: Stampin’ Up!

    Blending Brushes: Stampin’ Up! 

    Adhesive: Tombow Aqua, Michaels

    Card Base & Card Face: Accent 100 lb., Amazon

    Do you have comments or thoughts to share on this design?  Drop me a line in the Comments Section below –  I’d love to hear from you!

    You can also use the Comments Section  to be notified when I release new work.

    Blowing Leaves by A Colorful Life Designs

  • Easy Steps for Beautiful Handcrafted Cards

    Easy Steps for Beautiful Handcrafted Cards

    My wish for you this year, next year and always.

    Would you like to experiment with a design like this? You’ll find a supply list below, including a link to the stencil I used from A Colorful Life Designs.  Follow the link and use discount code ChrisFan10 to save 10% on your entire order! (Master Creator Bundles are excluded as they already have a 20% discount built in.)

    Let’s get Started:

    Card Base: 5.5 x 8.5, scored and folded at 4.25

    Copper Border Layer: 5.5 x 4.25

    Card Face: 5.25 x 4

    Card Face:

    • I laid the card face on the Grip Mat and then positioned the stencil.
    • I applied light green ink with a soft hand over all exposed areas.
    • I allowed the ink to dry ( this only took minutes, but is a critical step when working with embossing powder).
    • I put the card face into my stamp positioner and added the sentiment and the spatters using Versamark embossing ink.
    • I sprinkled copper embossing powder over the surface, and set it with my heat gun.

    Other:

    • I positioned a rounded-corner rectangular die in the center of the card face.  I added the next largest die around this. 
    • After ensuring that there was equal spacing all the way between the two dies,  I ran it through the Big Shot.   This created that copper  outline in the center of the card.

    Assembly

    • I glued the copper border layer to the card base.
    • I glued the card face on top of these, centering on all sides.
    • I put the center piece in place, carefully centering on all sides.
    • I added three small gold embellishments to finish the card.

    Final Thoughts:

    I’m a sucker for the unexpected in design,  so I love negative images.  This is an old, long retired stamp set,  but I pull it out every year to make Christmas cards.

    Supplies: (and links where possible)

       I have listed which products I have used, and where they may be purchased. It’s a huge marketplace and in most instances, there are multiple sources and many alternatives to choose from.

    Stencil: Christmas Montage,  A Colorful Life Designs

    Waffle Flower Grip Mat, 8.5 x 6.5, Scrapbook.com

    Versamark Embossing Ink: Simon Says Stamp

    Copper Embossing Powder,  Wow,  R&R Scrapbooking

    Stamps: Stampin’ Up! (retired)

    Dies:  Rounded Corner Rectangle Infinity Dies,  Hero Arts

    Ink: Stampin’ Up!

    Blending Brushes: Stampin’ Up! 

    Adhesive: Tombow Aqua, Michaels

    Card Bling:  A Colorful Life Designs

    Cream Card Base & Card Face: Recollections, 110 lb.,  Michaels 

    Do you have comments or thoughts to share on this design?  Drop me a line in the Comments Section below –  I’d love to hear from you!

    You can also use the Comments Section  to be notified when I release new work.

    Christmas Montage by A Colorful Life Designs

  • Stencils and Diecuts -making masculine cards just got easy

    Stencils and Diecuts -making masculine cards just got easy

    An elegant masculine card – ready in a snap!

    Would you like to experiment with a design like this? You’ll find a supply list below, including a link to the stencil I used from A Colorful Life Designs.  Follow the link and use discount code ChrisFan10 to save 10% on your entire order! (Master Creator Bundles are excluded as they already have a 20% discount built in.)

    Let’s get Started:

    Card Base: 5.5 x 8.5, scored and folded at 4.25

    Kraft Border: 5.5 x 4.25

    Black Card Face:  5.25 x 4

    Scrap of Kraft Cardstock: .75 x 4

    Card Face:

    • I laid the card face onto my Grip Mat , positioned the stencil and applied metallic gold ink across the exposed surfaces.
    • After allowing the gold ink to dry (it is a very saturated pigment ink) I put the card face into an embossing folder and ran it through the Big Shot to add texture.

    Other:

    • I stamped the sentiment in gold ink on a piece of black cardstock,  and then cut it down to ⅝ x 3
    • I looked through my Bits & Pieces binder and found the tree, previously cut out of kraft and waiting to be used.

    Assembly

    • I glued the black sentiment strip to the kraft strip.
    • I glued the kraft border layer to the card base, and then centered the black card face on both.
    • I glued the tree in place on the right hand side as shown.
    • I glued the sentiment strip in place over the tree, just below the center of the card.
    • I added a metallic embellishment on either side of the sentiment.

    Final Thoughts:

    This was a fast & easy card to put together; it has a very masculine feel due to the colours used.

    I love the way gold and kraft play off of each other.

    Supplies: (and links where possible)

       I have listed which products I have used, and where they may be purchased. It’s a huge marketplace and in most instances, there are multiple sources and many alternatives to choose from.

    Stencil: Fine Snowflakes,  A Colorful Life Designs

    Waffle Flower Grip Mat, 8.5 x 6.5, Scrapbook.com

    Dies:  Woodlands,  Tim Holtz, Amazon

    Ink: Lisa Horton Metallic Ink,  Glitter & Ink

    Blending Brushes: Stampin’ Up! 

    Adhesive: Tombow Aqua, Michaels

    Card Base & Card Face: Accent 100 lb., Amazon

    Do you have comments or thoughts to share on this design?  Drop me a line in the Comments Section below –  I’d love to hear from you!

    You can also use the Comments Section  to be notified when I release new work

    Fine Snowflakes by A Colorful Life Designs

  • Touch his heart with a card he is sure to treasure

    Touch his heart with a card he is sure to treasure

    Would you like to experiment with a design like this? You’ll find a supply list below, including a link to the stencil I used from A Colorful Life Designs.  Follow the link and use discount code ChrisFan10 to save 10% on your entire order! (Master Creator Bundles are excluded as they already have a 20% discount built in.)

    Let’s get Started:

    Card Base: 5.5 x 8.5, scored and folded at 4.25

    Kraft Border:  5.5 x 4.25

    Black Border:  5.25 x 4

    Kraft Card Face:  5 ⅛ x 3 7/8

    Card Face:

    • I laid the card face onto my grip mat and positioned the stencil at an angle, extending off  the right-hand side.
    • I went over the exposed areas with red ink and then added another layer of ink to the outer edges, using a darker cranberry red.  
    • I placed the card face into my stamp positioner and added the sentiment with Versafine Onyx, stamping it two or three times to achieve a dark, clear image.

    Other:

    • I used a separate scrap of kraft cardstock for the tree. After placing it in the stamp positioner, I stamped the green leaves on the tree, carefully masking off the trunk.  I stamped twice to get the depth of colour I wanted,  masking both times to protect the trunk.
    • I repeated these steps to stamp the trunk, using brown ink,  stamping twice for the desired saturation and protecting the leaves both times by masking.
    • I used the matching die to cut this out.

    Assembly

    • I glued the kraft border to the card base.
    • I added the black border and the card face on top of these, centering both times.
    • I glued the tree in place.

    Final Thoughts:

    I really like this combination:  kraft cardstock produces such a different “feel”,  and the elements in this card work well with that.

    This masculine card would work for birthdays, a graduation, a new job – almost any occasion.

    Supplies: (and links where possible)

       I have listed which products I have used, and where they may be purchased. It’s a huge marketplace and in most instances, there are multiple sources and many alternatives to choose from.

    Stencil:  Leafy Heart Frame, A Colorful Life Designs

    Waffle Flower Grip Mat, 8.5 x 6.5, Scrapbook.com

    Stamps & Die:  Rooted in Nature, Stampin’ Up!  (retired)

    Ink: Stampin’ Up!

    Blending Brushes: Stampin’ Up! 

    Versafine Onyx, Simon Says Stamp

    Adhesive: Tombow Aqua, Michaels

    Card Base & Card Face: Accent 100 lb., Amazon

    Do you have comments or thoughts to share on this design?  Drop me a line in the Comments Section below –  I’d love to hear from you!

    You can also use the Comments Section  to be notified when I release new work

    Leafy Heart Frame by A Colorful Life Designs

  • Create Stunning Autumn Themed Cards Full of  Nostalgia

    Create Stunning Autumn Themed Cards Full of Nostalgia

    memories of long, lazy summer days

    Would you like to experiment with a design like this? You’ll find a supply list below, including a link to the stencil I used from A Colorful Life Designs.  Follow the link and use discount code ChrisFan10 to save 10% on your entire order! (Master Creator Bundles are excluded as they already have a 20% discount built in.)

    Let’s get Started:

    Card Base: 5.5 x 8.5, scored and folded at 4.25

    Card Face:  5.5 x 4.25

    Card Face:

    • I sponged blue and blue-green ink across the surface of the card face.
    • I put the card face into the stamp positioner and added the image with Versafine Onyx, stamping twice to get a dark image.
    • I sprinkled clear embossing powder over the ink,  and set it with my heat gun.
    • I intensified the blue-green ink around the stamped image to create shadows and depth.
    • I used my anti-static bag liberally across the entire card face and thenI placed the card face onto my Grip Mat and positioned the stencil.  I pressed a Versamark embossing pad firmly through the openings,  repeating each area several times to ensure full coverage.
    • After removing the stencil I sprinkled the card face with gold embossing powder,  and set it with my heat gun.
    • With all of this complete,  I was able to decide on the sentiment:  I put the card face back into the stamp positioner and added the sentiment with Versafine Onyx,  again sprinkling this with clear embossing powder and setting it with the heat gun.   
    • I brushed additional blue ink around the edges of the card face to add a finishing touch.

    Assembly

    • I glued the card face to the card base.

    Final Thoughts:

    There is something about this combination that I find quite magical.  The image is beautiful,  and the gold leaves add just the right touch to this nostalgic moment.

    The sentiment is tiny,   which allows the scene to take center stage:  that works for this card IMO.

    Supplies: (and links where possible)

       I have listed which products I have used, and where they may be purchased. It’s a huge marketplace and in most instances, there are multiple sources and many alternatives to choose from.

    Stencil: Falling Leaves,  A Colorful Life Designs

    Waffle Flower Grip Mat, 8.5 x 6.5, Scrapbook.com

    Versamark Embossing Ink: Simon Says Stamp

    Clear Embossing Powder,  Wow,  Simon Says Stamp

    Gold Embossing Powder:  Wow,  R&RScrapbooking

    Stamps: Best Day Includes You,  Unity Stamps

    Ink: Stampin’ Up!

    Blending Brushes: Stampin’ Up! 

    Versafine Onyx, Simon Says Stamp

    Adhesive: Tombow Aqua, Michaels

    Card Base & Card Face: Accent 100 lb., Amazon

    Do you have comments or thoughts to share on this design?  Drop me a line in the Comments Section below –  I’d love to hear from you!

    You can also use the Comments Section  to be notified when I release new work

    Falling Leaves by A Colorful Life Designs

  • Create a Stunning Stenciled Card & Send Love

    Create a Stunning Stenciled Card & Send Love

    Would you like to experiment with a design like this? You’ll find a supply list below, including a link to the stencil I used from A Colorful Life Designs.  Follow the link and use discount code ChrisFan10 to save 10% on your entire order! (Master Creator Bundles are excluded as they already have a 20% discount built in.)

    Let’s get Started:

    Card Base: 5.5 x 8.5, scored and folded at 4.25:

    Card Face:5.5 x 4.25

    Card Face:

    • I laid the card face onto my Grip Mat,  and then positioned the stencil towards the vertical center.
    • I used a medium pink ink to cover all exposed areas, allowing variations in the depth of colour.
    • I moved the stencil down and to the right and repeated the inking,  allowing the stencilled areas to touch but not overlap.
    • I repeated this once more, positioning the stencil above the first stencilled leaf and slightly to the left.
    • I put the card face into my stamp positioner and stamped the “sending lots of love your way” with the same ink,  but stamping a couple of times to intensify the colour.
    • I left the stamp and the card face where they where,  but shifted the platform door down two spots,  and stamped again.   I repeated this twice more.
    • I cut the card face down with a stitched rectangle die  (approximately 5 x 3.75),  and then added texture by putting it into an embossing folder and running it through the Big Shot .

    Other:

    • I stamped the “sending hugs” sentiment on a scrap of cardstock,  and cut it out with a matching die.
    • I used another die from the same set to cut a slightly larger, complimentary shape from scrap cardstock.   
    • I glued these two pieces together, centering the stamped sentiment.
    • I put dimensional foam on the back of the sentiment.

    Assembly

    • I wrapped metallic gold thread around the left hand side of the card face 5X.   I used a small piece of the same thread to tie a knot around them approx ⅓ of the way down the card face.  Pulling this taut (and securing it with a dot of glue) created a sort of hourglass shape.
    • I glued the card face onto the card base, centering on all sides.
    • I put the sentiment in place over the knot in the metallic thread.

    Final Thoughts:

    I’m happy with the various textures and shapes in this design:  they came together to form a pretty card.

    Supplies: (and links where possible)

       I have listed which products I have used, and where they may be purchased. It’s a huge marketplace and in most instances, there are multiple sources and many alternatives to choose from.

    Stencil: Filigree Leaf,  A Colorful Life Designs

    Waffle Flower Grip Mat, 8.5 x 6.5, Scrapbook.com

    Ink: Stampin’ Up!

    Blending Brushes: Stampin’ Up! 

    Adhesive: Tombow Aqua, Michaels

    Cream Card Base & Card Face: 110 lb Recollections, Michaels

    Do you have comments or thoughts to share on this design?  Drop me a line in the Comments Section below –  I’d love to hear from you!

    You can also use the Comments Section  to be notified when I release new work.

    Filigree Leaf by A Colorful Life Designs

  • DIY Card Making: Using a Stencil for Unique Designs

    DIY Card Making: Using a Stencil for Unique Designs

    Would you like to experiment with a design like this? You’ll find a supply list below, including a link to the stencil I used from A Colorful Life Designs.  Follow the link and use discount code ChrisFan10 to save 10% on your entire order! (Master Creator Bundles are excluded as they already have a 20% discount built in.)

    Let’s get Started:

    Card Base: 5.5 x 8.5, scored and folded at 4.25

    Card Face:  5.5 x 4.25 (before tearing)

    Card Face:

    • I laid my card face down onto the Grip Mat and positioned the stencil.
    • I used lime green ink on one end and purple on the other. I allowed the green ink to cover about ⅔  of the surface, and took care when it met the purple not to blend them too much –  there was a big possibility of creating  “mud”.
    • I put the card face into my stamp positioner and stamped the bee with Versafine Clair. 
    • I used an embossing folder to create texture on the card face.
    • I tore off the right-hand side to create texture and visual interest.

    Other:

    • I stamped the sentiment onto a scrap of cardstock,  and used a die to cut it out.

    Assembly

    • I glued the card face to the card base, aligning snugly to the left hand edge.
    • I added dimensional tape on the back of the sentiment, and put it in place as shown.
    • I added a metallic embellishment to the right-hand end of the sentiment.

    Final Thoughts:

    I’m so happy with this compilation:  I love the stencil, the image, the colours –  and they all played together wonderfully well.

    Supplies: (and links where possible)

       I have listed which products I have used, and where they may be purchased. It’s a huge marketplace and in most instances, there are multiple sources and many alternatives to choose from.

    Stencil: Ordered Lines, A Colorful Life Designs

    Waffle Flower Grip Mat, 8.5 x 6.5, Scrapbook.com

    Stamps:  Bee:  Technique Junkies  (no longer in business)

    Die: Impression Obsession  (no longer in business)

    Ink: Stampin’ Up!

    Blending Brushes: Stampin’ Up! 

    Versafine Onyx, Simon Says Stamp

    Adhesive: Tombow Aqua, Michaels

    Card Base & Card Face: Recollections 110 lb., Michaels

    Do you have comments or thoughts to share on this design?  Drop me a line in the Comments Section below –  I’d love to hear from you!

    You can also use the Comments Section  to be notified when I release new work

    Ordered Lines by A Colorful Life Designs