Tag: stencil

  • You Can Create Stunning  Cards with this Stencil

    You Can Create Stunning Cards with this Stencil

    Would you like to experiment with a design like this? You’ll find a supply list below, including a link to the stencil I used from A Colorful Life Designs.  Follow the link and use discount code ChrisFan10 to save 10% on your entire order! (Master Creator Bundles are excluded as they already have a 20% discount built in.)

    Let’s get Started:

    Card Base: 5.5 x 8.5, scored and folded at 4.25

    Card Face:  5.5 x 4

    Holographic Cardstock:  5.5 x .25

    Transfer Foil:  6 x 4.25

    We’ve just had a big snowfall and are still digging out.  It’s safe to say that there won’t be any snowdrops peeking through for a couple of months!

    Card Face:

    • I positioned the card face down on a piece of scrap paper, placed the stencil, and secured both with Mint Tape.
    • I spread Duo Gel over all exposed areas.
    • After carefully removing the stencil,  I put it immediately into water and put the card face aside to dry.

    Duo Gel dries to be a super sticky adhesive and can ruin a stencil – mine go into a basin of water beside me until I am done the session, and can scrub them.

    Duo Gel goes on white and dries clear: the drying time depends on the thickness of the application.

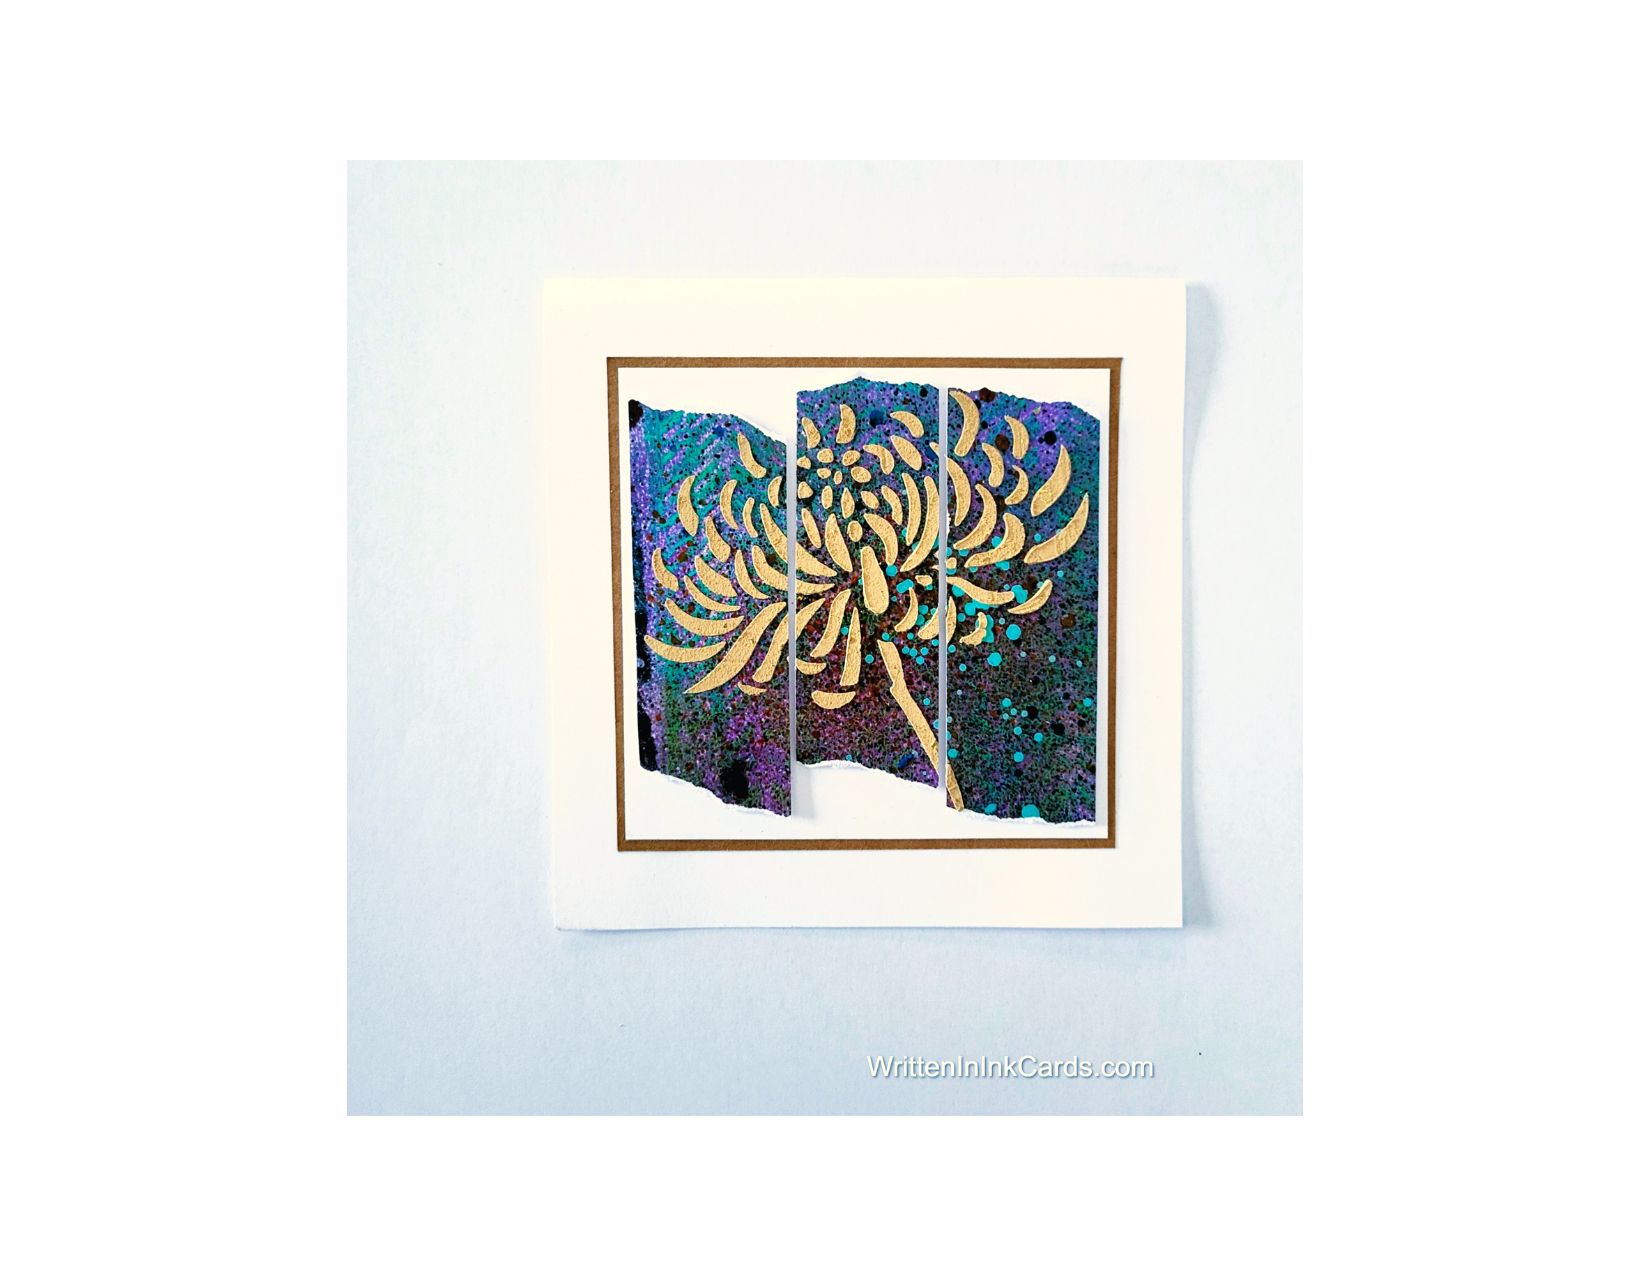
    • Once the card face was dry, I laid the transfer foil over top  (pretty side up) and ran it through the Big Shot.
    • I removed the foil:  the dried Duo Gel caused the foil to stay behind, creating the pattern.
    • I placed the card face in a texturizing embossing folder and ran it through the Big Shot.

    Other:

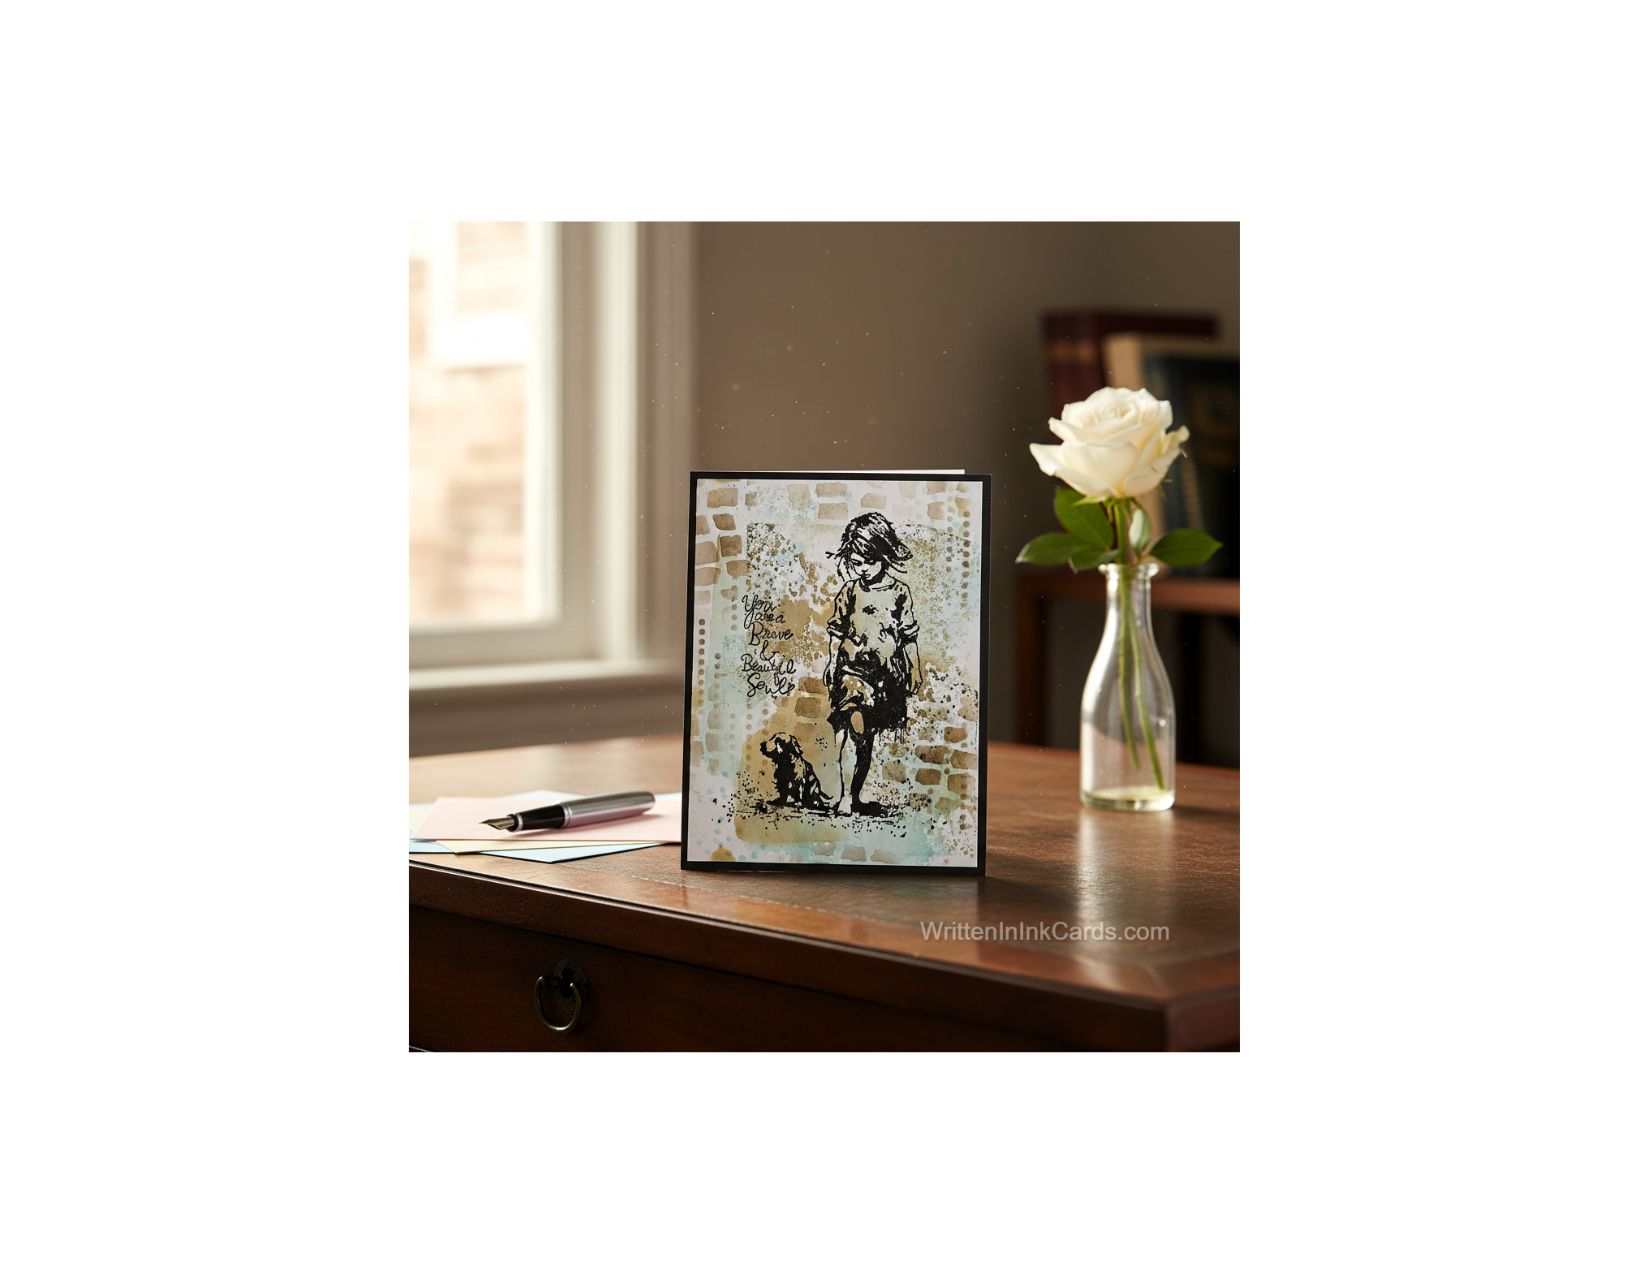
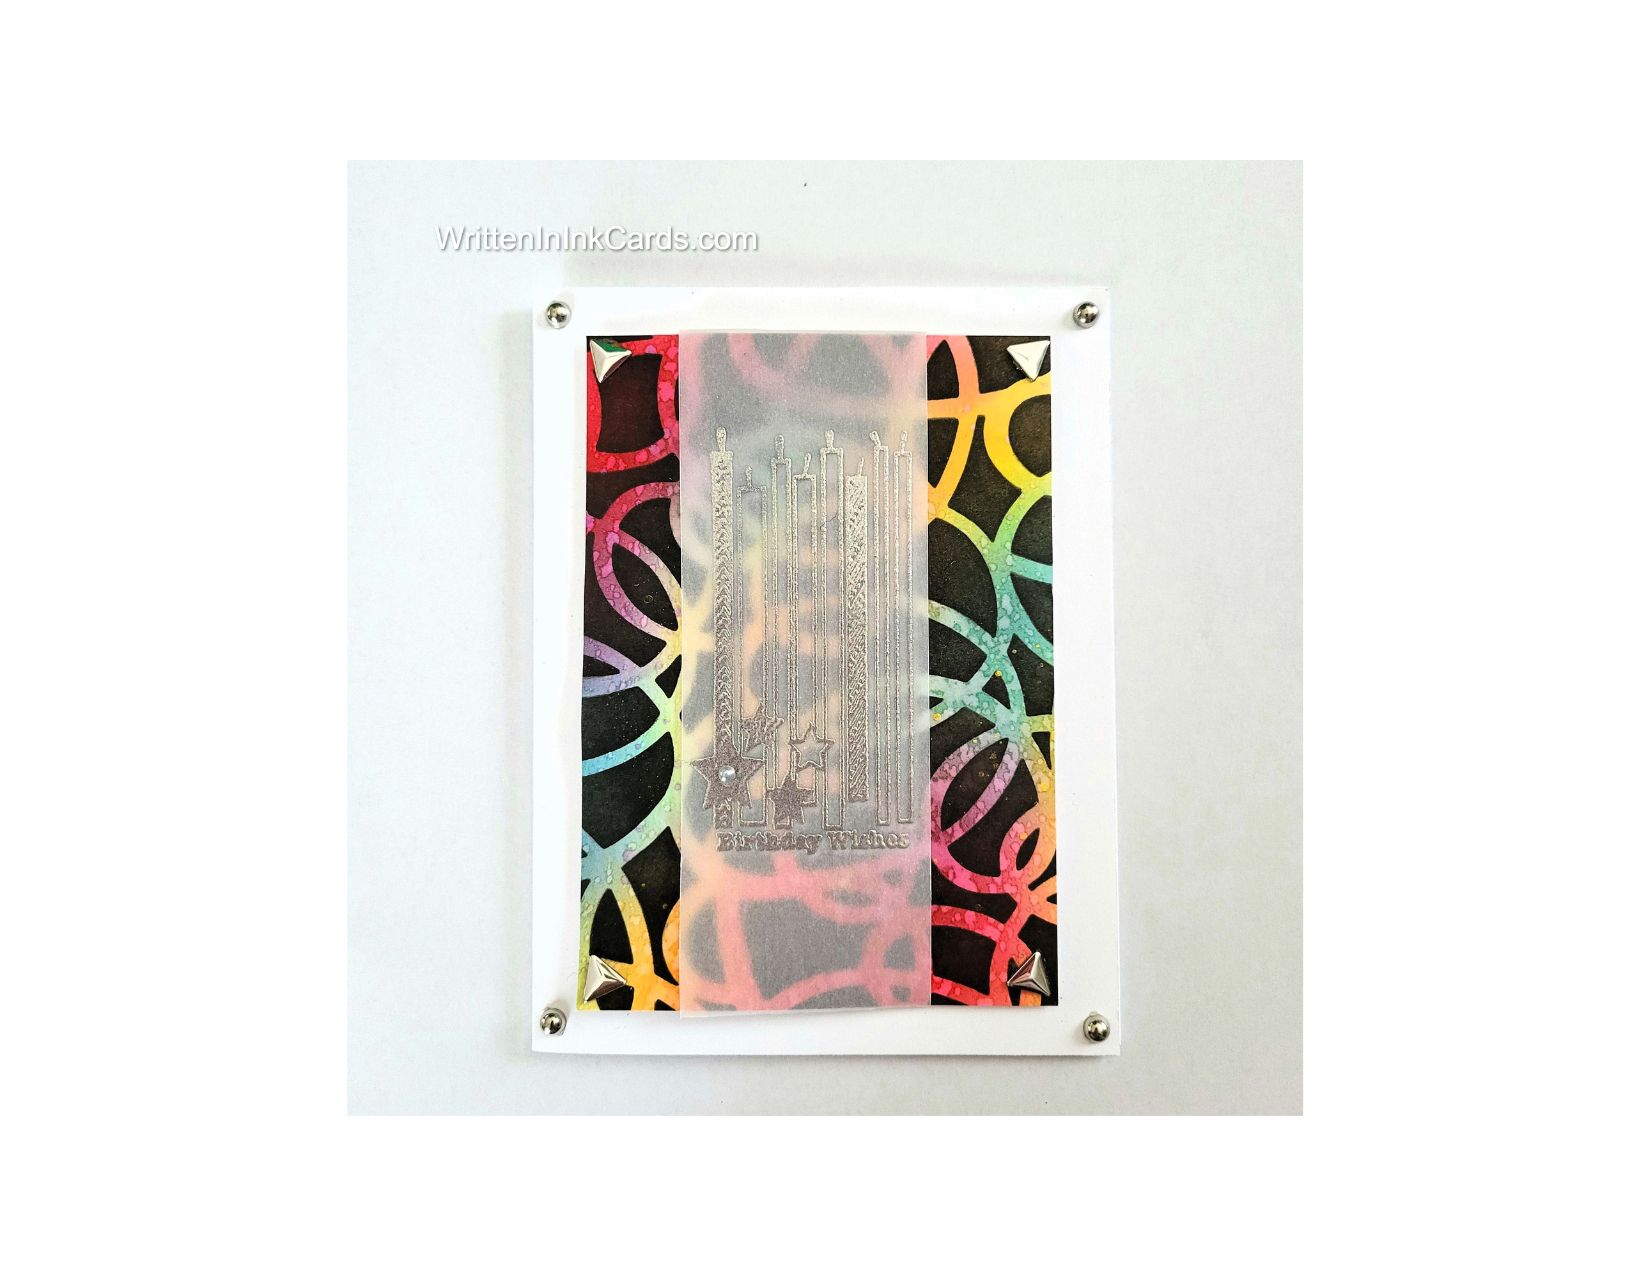
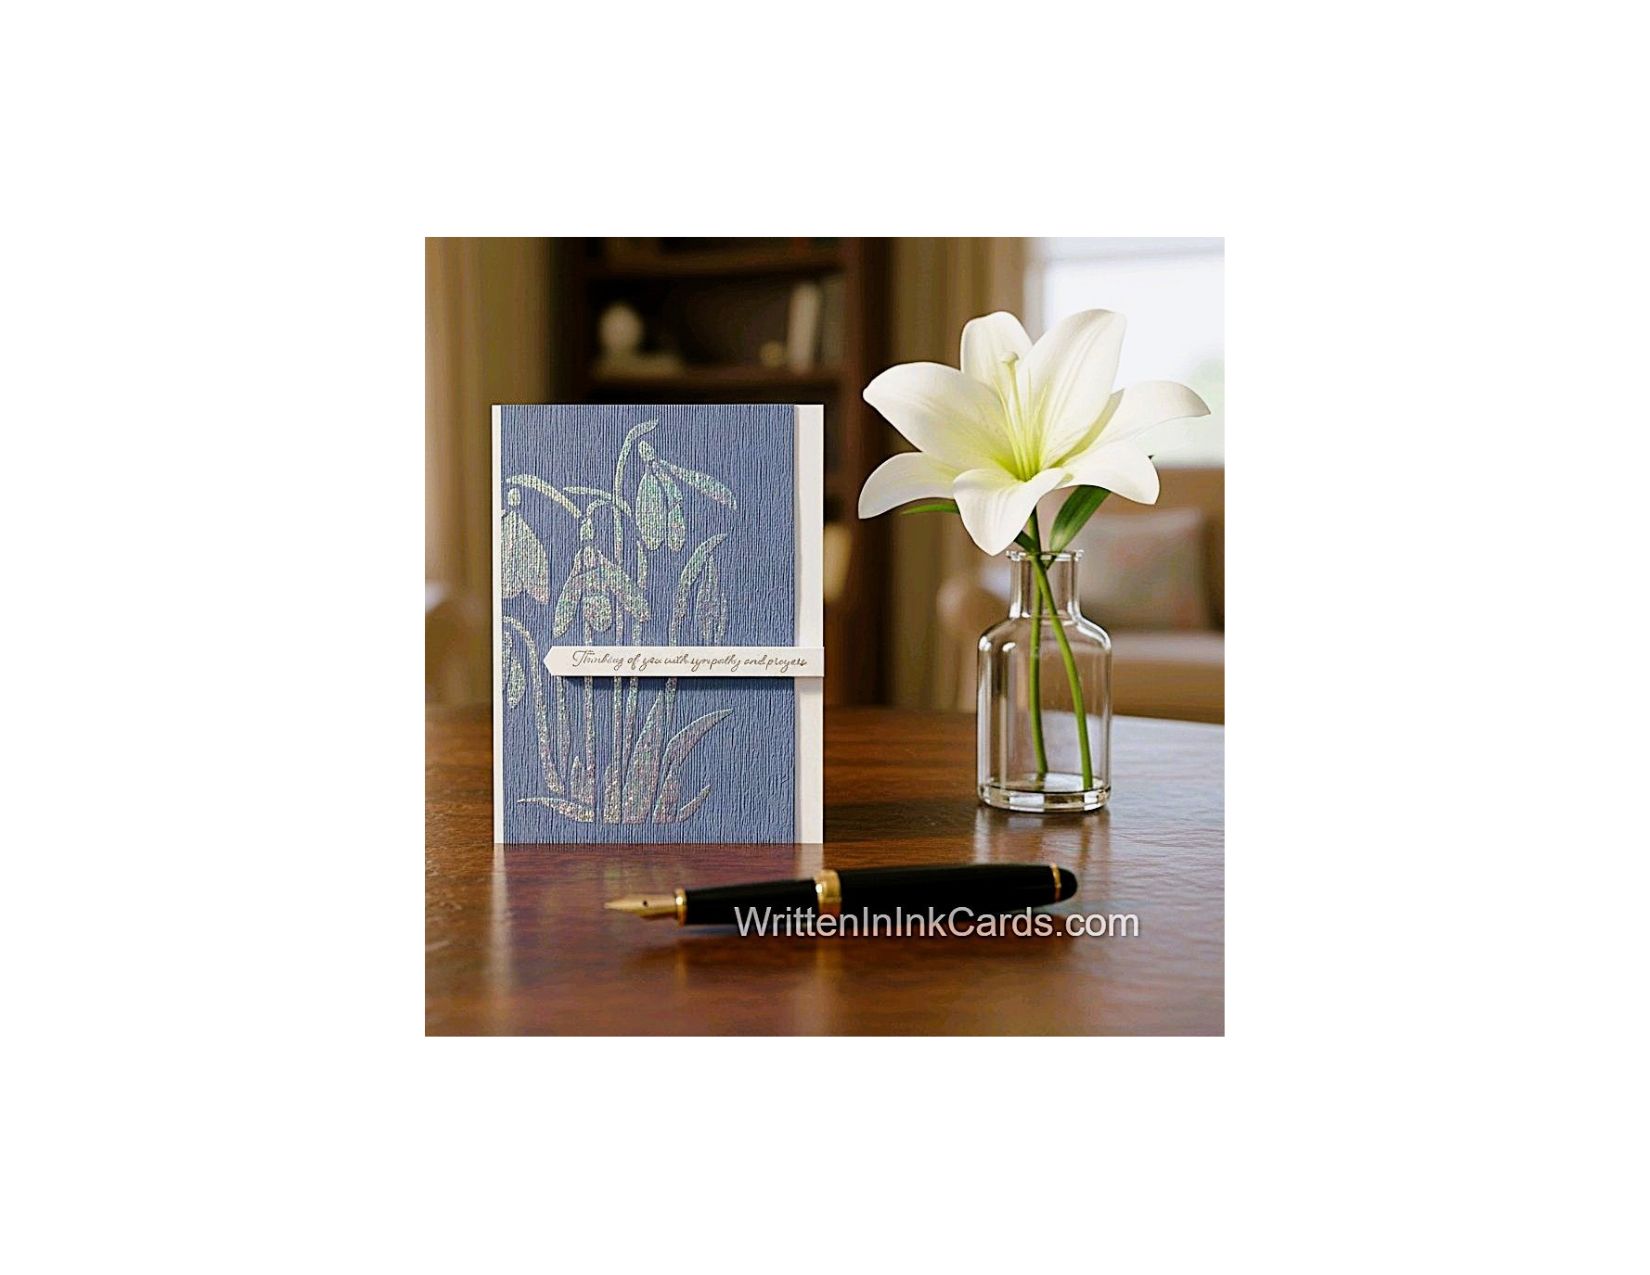
    • Although this card could be used for any occasion, I felt it particularly suited a sympathy card and pulled the appropriate sentiment from my binder.

    Assembly

    I glued the card face to the card base, leaving a ⅛” border on the left.

    I glued the strip of holographic card stock on the right, butting it snugly up against the card face.

    I added dimensional foam to the back of the sentiment and positioned it on the card face as shown.

    Final Thoughts:

    This design is simple, but nevertheless “enough”.   The foiled image has a lovely sheen with card in hand, and the texture provided just enough additional visual interest.

    Supplies: (and links where possible)

       I have listed which products I have used, and where they may be purchased. It’s a huge marketplace, and in most instances, there are multiple sources and many alternatives to choose from.

    Stencil: Snow Drops, A Colorful Life Design

    Duo Gel: Deco, Amazon

    Transfer Foil,  Prism by Spellbinders, Amazon

    Versafine Onyx, Simon Says Stamp

    Adhesive: Tombow Aqua, Michaels

    Card Base & Card Face: Accent 100 lb., Amazon 

    Do you have comments or thoughts to share on this design?  Drop me a line in the Comments Section below –  I’d love to hear from you!

    You can also use the Comments Section  to be notified when I release new work.

    Snow Drops stencil by a Colorful Life Designs

  • Make a Striking Impression with Card Crafting

    Make a Striking Impression with Card Crafting

    Would you like to experiment with a design like this? You’ll find a supply list below, including a link to the stencils I used from A Colorful Life Designs.  Follow the link and use discount code ChrisFan10 to save 10% on your entire order! (Master Creator Bundles are excluded as they already have a 20% discount built in.)

    Let’s get Started:

    Card Base: 5.5 x 8.5, scored and folded at 4.25

    Border Layer: 5.5 x 4.25

    Card Face:  5.25 x 4

    I wanted to have a play with ink smooshing – I hadn’t even remembered that technique in a long time.   I loved the result I got from the blue and brown mix, then I had to figure out how to use it.

    Card Face:

    • I pressed an acrylic block firmly into a brown ink pad and spritzed it with water.  I pressed the watery result onto the card face in several areas.
    • I repeated this process with blue ink.
    • I put the card face aside to dry.
    • Once dry, the paper was warped (caused by the watery ink smooshing).  I lightly spritzed the back of the card face with water and placed it under a weight overnight, which flattened it again.
    • I placed the card face in my stamp positioner and added the image with Versafine Onyx.
    • Moving the card face to the Grip Mat, I positioned the Chaos Squares stencil and applied brown ink randomly across the image.
    • I switched the stencils, positioned the Falling Dots over the card face, and filled in some areas with the same brown ink.
    • I returned the card face back to the stamp positioner and stamped the sentiment with Versafine Onyx.
    • I sprinkled clear embossing powder over the sentiment and used my heat gun to set it. 

     This treatment makes the sentiment more intense, and it stands out more against a busy background.

    Assembly

    • I glued the black border layer to the card base,  and then added the card face on top.

    Final Thoughts:

    I love Andy Skinner stamps,  and I’m so happy with this card.  The combination of ink smooshing and randomized stencilling works very well with this image.

    Supplies: (and links where possible)

       I have listed which products I have used, and where they may be purchased. It’s a huge marketplace and in most instances, there are multiple sources and many alternatives to choose from.

    Stencils:

    Chaos Squares:  A Colorful Life Designs

    Falling Dots: A Colorful Life Designs

    Waffle Flower Grip Mat, 8.5 x 6.5, Scrapbook.com

    Versamark Embossing Ink: Simon Says Stamp

    Clear Embossing Powder,  Wow,  Simon Says Stamp

    Stamps:  Best Friends,  Andy Skinner, Scrapbook.com

    Ink: Stampin’ Up!

    Blending Brushes: Stampin’ Up! 

    Versafine Onyx, Simon Says Stamp

    Adhesive: Tombow Aqua, Michaels

    Card Base & Card Face: Accent 100 lb., Amazon 

    Do you have comments or thoughts to share on this design?  Drop me a line in the Comments Section below –  I’d love to hear from you!

    You can also use the Comments Section  to be notified when I release new work.

    Falling Dots By A Colorful Life Designs

    Chaos Squares by A Colorful Life Designs

  • Create Stunning Cards with Love Waterfall Stencil

    Create Stunning Cards with Love Waterfall Stencil

    Would you like to experiment with a design like this? You’ll find a supply list below, including a link to the stencil I used from A Colorful Life Designs.  Follow the link and use discount code ChrisFan10 to save 10% on your entire order! (Master Creator Bundles are excluded as they already have a 20% discount built in.)

    Let’s get Started:

    Card Base: 5.5 x 8.5, scored and folded at 4.25

    Card Face:  5.25 x 4

    Card Face:

    • I placed the card face down on my Grip Mat and positioned the stencil. 
      I added soft yellow ink across all open areas.
    • After removing the stencil I placed the card face into my stamp positioner and added the crib, mobile and the shelf with teddy and blocks using Versafine Onyx.
    • I ran the edges of the card face over the versafine ink pad.

    Other:

    • I used a scrap of cardstock to stamp the sentiment with Versafine Onyx,  and cut it out with a die.

    Assembly

    • I glued the card face onto the card base, centering on all sides.
    • I glued the sentiment in place at the top of the mobile, created the illusion that the mobile was hanging from the sentiment.

    Final Thoughts:

    I love the contrast between the soft yellow and the dramatic black:  they work very well for this design.

    Looking at the card now,  I wish I had added a bit of shadow under the crib to ground it:  I didn’t think of it at the time,  but it would have been a good touch.

    Supplies: (and links where possible)

       I have listed which products I have used, and where they may be purchased. It’s a huge marketplace and in most instances, there are multiple sources and many alternatives to choose from.

    Stencil: Love Waterfall,  A Colorful Life Designs

    Waffle Flower Grip Mat, 8.5 x 6.5, Scrapbook.com

    Stamps & Die: Stampin’ Up!  (retired)

    Ink: Stampin’ Up!

    Blending Brushes: Stampin’ Up! 

    Versafine Onyx, Simon Says Stamp

    Adhesive: Tombow Aqua, Michaels

    Card Base & Card Face: Recollections 110 lb., Michaels

    Do you have comments or thoughts to share on this design?  Drop me a line in the Comments Section below –  I’d love to hear from you!

    You can also use the Comments Section  to be notified when I release new work.

    Love Waterfall by A Colorful Life Designs

  • Creative Techniques for Unique Designs using Gel Prints

    Creative Techniques for Unique Designs using Gel Prints

    Would you like to experiment with a design like this? You’ll find a supply list below, including a link to the stencil I used from A Colorful Life Designs.  Follow the link and use discount code ChrisFan10 to save 10% on your entire order! (Master Creator Bundles are excluded as they already have a 20% discount built in.)

    Let’s get Started:

    Card Base:  5.25 x 10.5, scored and folded at 5.25

    Kraft Border Layer: 4 1/8 x 4 1/8

    White Border Layer: 4  x 4  

    Card Face: 4 x 4 (before cutting)

    I have quite a supply of gel prints in my stash, each just waiting for a chance to shine.  I pulled one out for this card.

    Card Face:

    • I laid the card face (gel print) on a piece of scrap paper and positioned the stencil.  I applied embossing paste to all open areas on the stencil. 
    • I carefully removed the stencil and placed it in water immediately, as cleanup is much easier when the paste is moist.
    •  I put the card face aside to dry.
    • Once dry,  I trimmed the card face down to 3 x 3,  and then cut it into three pieces, each 3 x 1” wide. 
    • I tore the top and bottom of each piece, deliberately making the tears uneven.
    •  I applied dimensional foam to the back of each piece.

    Assembly

    • I glued the kraft border layer to the card base, and the white border layer on top of that, centering both carefully.
    • I removed the backing from the foam tape and put each piece in place taking care to leave space between each piece and on the edges as well.  
    • I also made sure that the image lined up correctly to “work” visually as I was putting the pieces in place.

    Final Thoughts:

    I had such a time with this gel print:   I loved the combination of the Sand Paste with that print, but then (as is often the case)  I couldn’t decide how to use it.  After putting it aside, looking at it again, putting it aside …. for a couple of weeks  (!)  I finally decided on the design you see here,  and I’m so happy with it.  This is one of my absolute favourite creations in a long time.

    Supplies: (and links where possible)

       I have listed which products I have used, and where they may be purchased. It’s a huge marketplace and in most instances, there are multiple sources and many alternatives to choose from.

    Stencil: Chrysanthemum Set,  A Colorful Life Designs

    Waffle Flower Grip Mat, 8.5 x 6.5, Scrapbook.com

    Cosmic Shimmer Antique Sand Paste,  Ecstasy Crafts

    Adhesive: Tombow Aqua, Michaels

    Card Base & Card Face: Accent 100 lb., Amazon  or  Recollections 110 lb., Michaels

    Do you have comments or thoughts to share on this design?  Drop me a line in the Comments Section below –  I’d love to hear from you!

    You can also use the Comments Section  to be notified when I release new work.

    Chrysanthemum Set by A Colorful Life Designs

  • Create a Unique, Masculine Valentine’s Card Using Stencils

    Create a Unique, Masculine Valentine’s Card Using Stencils

    Would you like to experiment with a design like this? You’ll find a supply list below, including a link to the stencil I used from A Colorful Life Designs.  Follow the link and use discount code ChrisFan10 to save 10% on your entire order! (Master Creator Bundles are excluded as they already have a 20% discount built in.)

    Let’s get Started:

    Card Base: 5.5 x 8.5, scored and folded at 4.25

    Kraft Border Layer: 5.25 x 4

    Card Face:  5 ⅛ x 3 ⅞

    Scraps of Kraft cardstock for die cuts

    Card Face:

    • I laid the card face down onto a piece of scrap paper and positioned the stencil.  
    • After securing these with Mint Tape, I applied DIY embossing paste across the open areas of the stencil.
    • I carefully removed the stencil and placed it in water immediately.
    • I put the card face aside to dry.

    When working with embossing paste, I prefer use a piece of scrap paper under my work,  and not risk getting the paste on my Gel Plate.

    Also, when working with embossing paste, I keep a container of water by my side to put my stencils in immediately –  these pastes are difficult to impossible to remove once dry.

    • Once the paste was dry, I put the card face into my stamp positioner and added the sentiment with Versamark embossing ink.  I sprinkled this with embossing powder and set it with my heat gun.

    Other:

    • I stamped and die-cut a small row of hearts using kraft cardstock.
    • I die-cut the larger heart from kraft cardstock.

    Assembly

    • I glued the border layer to the card base, and the card face on top of these, centering both layers.
    • I glued the row of hearts and the larger die-cut heart in place, as shown.

    Final Thoughts:

    I love black and kraft cardstock together:  this awesome stencil allowed me to combine them in a masculine card that will become my husband’s valentine card this year.   No last-minute scrambling for me –  at least not this year, LOL.

    Supplies: (and links where possible)

       I have listed which products I have used, and where they may be purchased. It’s a huge marketplace and in most instances, there are multiple sources and many alternatives to choose from.

    Stencil: Love Waterfall,  A Colorful Life Designs

    Versamark Embossing Ink: Simon Says Stamp

    Vintage Pearl Embossing Powder,  Ranger, Amazon

    Stamps/Dies: Stampin’ Up! (retired)

    Adhesive: Tombow Aqua, Michaels

    Card Base & Card Face: Accent 100 lb., Amazon 

    Do you have comments or thoughts to share on this design?  Drop me a line in the Comments Section below –  I’d love to hear from you!

    You can also use the Comments Section to be notified when I release new work.

    Love Waterfall by A Colorful Life Designs

  • Unlock Amazing Texture in Card Making

    Unlock Amazing Texture in Card Making

    Would you like to experiment with a design like this? You’ll find a supply list below, including a link to the stencil I used from A Colorful Life Designs.  Follow the link and use discount code ChrisFan10 to save 10% on your entire order! (Master Creator Bundles are excluded as they already have a 20% discount built in.)

    Let’s get Started:

    Card Base: 5.5 x 8.5, scored and folded at 4.25

    Card Face:  5 x 3.75

    Vellum:  7 x 2.5

    Card Face:

    • I laid the card face on the grip mat and applied blue, yellow and red ink randomly , covering the entire surface.
    • I spattered water generously over the surface, creating texture and depth.
    • Once this had dried, I positioned the stencil and applied black ink with a heavy hand:  the pattern was created by the areas which had been protected by the stencil, allowing the multicoloured base layer to show through.

    Other:

    • I dusted the vellum liberally with anti-static powder.
    • I stamped the image with Versamark embossing ink, sprinkled silver embossing powder, and set it with my heat gun.  

    I turned the heat gun on for approximately 1 minute before use to be certain that it was good and hot.  While embossing the vellum, I moved the heat gun constantly to prevent warping.

    Assembly

    • I wrapped the vellum around the card face and secured it with scotch tape, centering vertically.
    • I put dimensional foam on the back of the card face, and put it in place in the center of  the card base.
    • I added a silver pearl to each corner of the card face,  and a triangular metallic embellishment to each corner of the card base.

    Final Thoughts:

    I love the bits of texture created by the water spatter,  and the interest provided by the use of different colours in the background.

    The use of vellum softened the contrast and bold colours of the background.

    Supplies: (and links where possible)

       I have listed which products I have used, and where they may be purchased. It’s a huge marketplace and in most instances, there are multiple sources and many alternatives to choose from.

    Stencil: Scribble Mask,  A Colorful Life Designs

    Waffle Flower Grip Mat, 8.5 x 6.5, Scrapbook.com

    Versamark Embossing Ink: Simon Says Stamp

    Silver Embossing Powder,  Wow,  R&R Scrapbooking

    Stamps: Candles, Stars & Birthday Wishes , Unity Stamps (retired)

    Ink: Stampin’ Up!

    Blending Brushes: Stampin’ Up! 

    Versafine Onyx, Simon Says Stamp

    Adhesive: Tombow Aqua, Michaels

    Card Base & Card Face: Accent 100 lb., Amazon  or  Recollections 110 lb., Michaels

    Do you have comments or thoughts to share on this design?  Drop me a line in the Comments Section below –  I’d love to hear from you!

    You can also use the Comments Section  to be notified when I release new work.

    Scribble Mask by A Colorful Life Designs

  • Using Foil and Ink Techniques for Cards for beautiful results

    Using Foil and Ink Techniques for Cards for beautiful results

    Would you like to experiment with a design like this? You’ll find a supply list below, including a link to the stencil I used from A Colorful Life Designs.  Follow the link and use discount code ChrisFan10 to save 10% on your entire order! (Master Creator Bundles are excluded as they already have a 20% discount built in.)

    Let’s get Started:

    Card Base: 5.5 x 8.5, scored and folded at 4.25

    Gold Foil Border Layer: 5.5 x 4.25

    Card Face:  5.25 x 4

    Transfer Foil:  5.5 x 4.25

    Card Face:

    • I laid my card face down on the Grip Mat and positioned the stencil.
    • I used medium-brown ink randomly across the exposed areas, varying pressure to control depth and skipping some areas completely.
    • Leaving the stencil in place,  I spread Duo Gel over some of the inked areas, allowing partial coverage even within some of the openings.
    • I removed the stencil and placed it in water immediately.   I set the card face down to dry (the gel is dry when it becomes transparent).
    • When the gel was dry, I placed the transfer foil on top and ran it through the Big Shot.
    • I removed the foil, and the dried gel (which had become an adhesive) left the foil on the card face.
    • I placed the card face in my stamp positioner and used brown ink to stamp the trees on the left of the card face.
    • I used a darker brown ink and stamped the deer in front of the trees.  I stamped a couple of times to ensure that it was intense enough to grab attention.
    • I used a corner chomper punch on each corner of the card face.

    Other:

    • I grabbed the sentiment you see from my binder.

    Assembly

    • I glued the foil border layer to the card base,  and then centered the card face on top of that.
    • I applied dimensional foam to the back of the sentiment and added it as shown.

    Final Thoughts:

    I couldn’t decide if I liked this for a few days:  it sat on my desk as I considered it.  It bothered me that I had lost part of the deer’s face due to the foiling,  and I needed to decide if it was “too much”.  In the end, I decided that I still liked this card –  I like the play between foil and inked surfaces,  and between coloured and uncoloured parts of the surface.

    Supplies: (and links where possible)

       I have listed which products I have used, and where they may be purchased. It’s a huge marketplace and in most instances, there are multiple sources and many alternatives to choose from.

    Stencil: Triangle Fade,  A Colorful Life Designs

    Waffle Flower Grip Mat, 8.5 x 6.5, Scrapbook.com

    Versamark Embossing Ink: Simon Says Stamp

    Clear Embossing Powder,  Wow,  Simon Says Stamp

    Stamps: Natures Beauty & Winter Wood, both Stampin’ Up  (retired)

    Ink: Stampin’ Up!

    Blending Brushes: Stampin’ Up! 

    Duo Gel:  Decofoil, R&R Scrapbooking

    Transfer Foil: Decofoil, R&R Scrapbooking

    Adhesive: Tombow Aqua, Michaels

    Card Base & Card Face: Accent 100 lb., Amazon  or  Recollections 110 lb., Michaels

    Do you have comments or thoughts to share on this design?  Drop me a line in the Comments Section below –  I’d love to hear from you!

    You can also use the Comments Section  to be notified when I release new work.

    Triangle Fade by A Colorful Life Designs

  • Create a Festive Card with Glitter Embossing Techniques

    Create a Festive Card with Glitter Embossing Techniques

    Would you like to experiment with a design like this? You’ll find a supply list below, including a link to the stencil I used from A Colorful Life Designs.  Follow the link and use discount code ChrisFan10 to save 10% on your entire order! (Master Creator Bundles are excluded as they already have a 20% discount built in.)

    Let’s get Started:

    Card Base: 5.5 x 8.5, scored and folded at 4.25

    Border Layer: 5.5 x 4.25

    Card Face: 5.5 x 4

    Card Face:

    • I stamped the tree with Memento Black ink and used alcohol markers to colour it.
    • I outlined the elements on the tree with gray ink to make them stand out from the background.
    • I placed the stencil over the image and pressed my Versamark embossing ink pad firmly over all exposed areas,  going over each area more than once to ensure good coverage.
    • I sprinkled white glitter embossing powder over the surface and set it with my heat gun.

    Other:

    • I looked through my sentiments binder and chose one that fit the mood of the piece and was the correct size.

    Assembly

    • I glued the holographic border layer to the card base, and then glued the card face on top, centering vertically.
    • I added the sentiment as shown,  and then added a small silver pearl to both ends of the sentiment.

    Final Thoughts:

    This is a fun image with a contemporary feel:  after I had coloured it I had a hard time deciding how to finish it off.  In the end, a bit of sparkly snow was the perfect finishing touch.

    Supplies: (and links where possible)

       I have listed which products I have used, and where they may be purchased. It’s a huge marketplace and in most instances, there are multiple sources and many alternatives to choose from.

    Stencil: Falling Snow,  A Colorful Life Designs

    Waffle Flower Grip Mat, 8.5 x 6.5, Scrapbook.com

    Versamark Embossing Ink: Simon Says Stamp

    White Glitter Embossing Powder, Stampin’ Up!

    Stamps: Christmas Town Tree,  Colorado Craft Co.

    Memento Ink: Stampin’ Up! (retired)

    Alcohol Markers:

         Stampin’ Blends: Stampin’ Up!

         Copics:  Wallacks

    Adhesive: Tombow Aqua, Michaels

    Holographic Cardstock:  Reflections,  Michaels

    Card Base & Card Face: Accent 100 lb., Amazon  or  Recollections 110 lb., Michaels

    Do you have comments or thoughts to share on this design?  Drop me a line in the Comments Section below –  I’d love to hear from you!

    You can also use the Comments Section  to be notified when I release new work.

    Falling Snow by a Colorful Life Designs

  • Create Stunning Cards with Stencils & Embossing Paste

    Create Stunning Cards with Stencils & Embossing Paste

    Would you like to experiment with a design like this? You’ll find a supply list below, including a link to the stencil I used from A Colorful Life Designs.  Follow the link and use discount code ChrisFan10 to save 10% on your entire order! (Master Creator Bundles are excluded as they already have a 20% discount built in.)

    Let’s get Started:

    Card Base: 5.5 x 8.5, scored and folded at 4.25

    Card Face:  5.5 x 4

    Focal Image Strip:  5.5 x 1.75”

    Sentiment strip: .25” x 4

    Card Face:

    • I laid the card face onto the Grip Mat and positioned the Diamond Lattice stencil.  
    • I applied brown ink across all exposed areas, allowing variation in tone to provide depth and visual interest.
    • I applied DIY embossing paste randomly over the card face.  I carefully removed the stencil and put the card face aside to dry.  

    When I use embossing paste the stencil goes into water immediately to prevent the paste from drying on the stencil. This makes clean-up much faster and easier.

    • Once the paste had dried, I used the Grunge Dots stencil to add dots here and there in the remaining inked portions of the pattern.

    Other:

    • I placed the Focal Image strip into my stamp positioner and added the leaves with dark brown ink,  stamping several times to get an intense image.
    • I sprinkled clear embossing powder over the image,  setting it with my heat gun.
    • Next I placed the narrow sentiment strip in the stamp positioner and stamped the sentiment with the same dark brown ink,  again stamping multiple times to get intense colour.
    • I sprinkled this with clear embossing powder too, and set it with my heat gun.

    Although I used a dye based ink for both of these,  stamping several times created enough saturation that the ink was wet enough for me to use the embossing powder successfully. Stamping only once wouldn’t have worked, as the ink would have dried too quickly.

    Assembly

    • I glued the card face onto the card base, and then added the strip with the leaves, centering both vertically.
    • I put dimensional foam on the back of the sentiment and then added it to the card face, centering horizontally.

    Final Thoughts:

    The combination of ink and embossing paste work well with this design,  and the addition of the dots provided additional depth and visual interest.

    Supplies: (and links where possible)

       I have listed which products I have used, and where they may be purchased. It’s a huge marketplace and in most instances, there are multiple sources and many alternatives to choose from.

    Stencil: 

    Diamond Lattice,  A Colorful Life Designs

    Grunge Dots,  A Colorful Life Designs

    Waffle Flower Grip Mat, 8.5 x 6.5, Scrapbook.com

    Versamark Embossing Ink: Simon Says Stamp

    Clear Embossing Powder,  Wow,  Simon Says Stamp

    Stamps: Falling Hearts,  Unity Stamps  (retired)

    Ink: Stampin’ Up!

    Blending Brushes: Stampin’ Up! 

    Adhesive: Tombow Aqua, Michaels

    Card Base & Card Face: Accent 100 lb., Amazon

    Do you have comments or thoughts to share on this design?  Drop me a line in the Comments Section below –  I’d love to hear from you!

    You can also use the Comments Section  to be notified when I release new work.

    Diamond Lattice by A Colorful Life Designs

    Grunge Dots by A Colorful Life Designs

  • Beautiful Multi-Color Stenciling for Card Making

    Beautiful Multi-Color Stenciling for Card Making

    Would you like to experiment with a design like this? You’ll find a supply list below, including a link to the stencil I used from A Colorful Life Designs.  Follow the link and use discount code ChrisFan10 to save 10% on your entire order! (Master Creator Bundles are excluded as they already have a 20% discount built in.)

    Let’s get Started:

    Card Base: 5.25 x 10.5, scored and folded at 5.25

    Card Face:  5 x 5

    Sentiment Strip:  5 x 1.5”

    Card Face:

    • I laid the card face on a piece of scrap paper and positioned the stencil (this is a 6 x 9 stencil,  so there are options how how to place it – even on a 5 x 5 card face), and secured it with Mint Tape.
    • Using small blending and shading brushes,   I applied colours to the stencil.  I used orange on the  center of the flowers , then, moved to a dark red, then to pink.  I finished the background with soft beige.
    • I spattered the card face using metallic gold watercolour.
    • I ran all edges over a Versafine Onyx ink pad, adding definition to the card face.

    Other:

    • I placed the strip of card stock into the stamp positioner and added the sentiment with Versafine Onyx.  I ran the two horizontal edges of the strip over the black ink pad.

    Assembly

    • I glued the card face onto the card base, centering on all sides.
    • I added dimensional foam to the back of the card strip and centered it horizontally on the card face.

    Final Thoughts:

    This is a really pretty stencil to play with,  and the options for colour are endless –  everything from monochromatic to full colour, as I have chosen here.

    I’m really happy with the result of this multi-colour stencilling,  but it was absolutely necessary to use smaller brushes to control colour placement.

    Supplies: (and links where possible)

       I have listed which products I have used, and where they may be purchased. It’s a huge marketplace and in most instances, there are multiple sources and many alternatives to choose from.

    Stencil: Lace Close Up, A Colorful Life Designs

    Waffle Flower Grip Mat, 8.5 x 6.5, Scrapbook.com

    Stamps:  Technique Junkies  (no longer in business)

    Ink: Stampin’ Up!

    Blending Brushes: Sampler Pack, Waffle Flower, R&R Scrapbooking

    Versafine Onyx, Simon Says Stamp

    Adhesive: Tombow Aqua, Michaels

    Card Base & Card Face: Accent 100 lb., Amazon

    Do you have comments or thoughts to share on this design?  Drop me a line in the Comments Section below –  I’d love to hear from you!

    You can also use the Comments Section  to be notified when I release new work.

    Lace Close Up by A Colorful Life Designs