Tag: stencil

  • Fast, Distinctive and Contemporary makes a great holiday card

    Fast, Distinctive and Contemporary makes a great holiday card

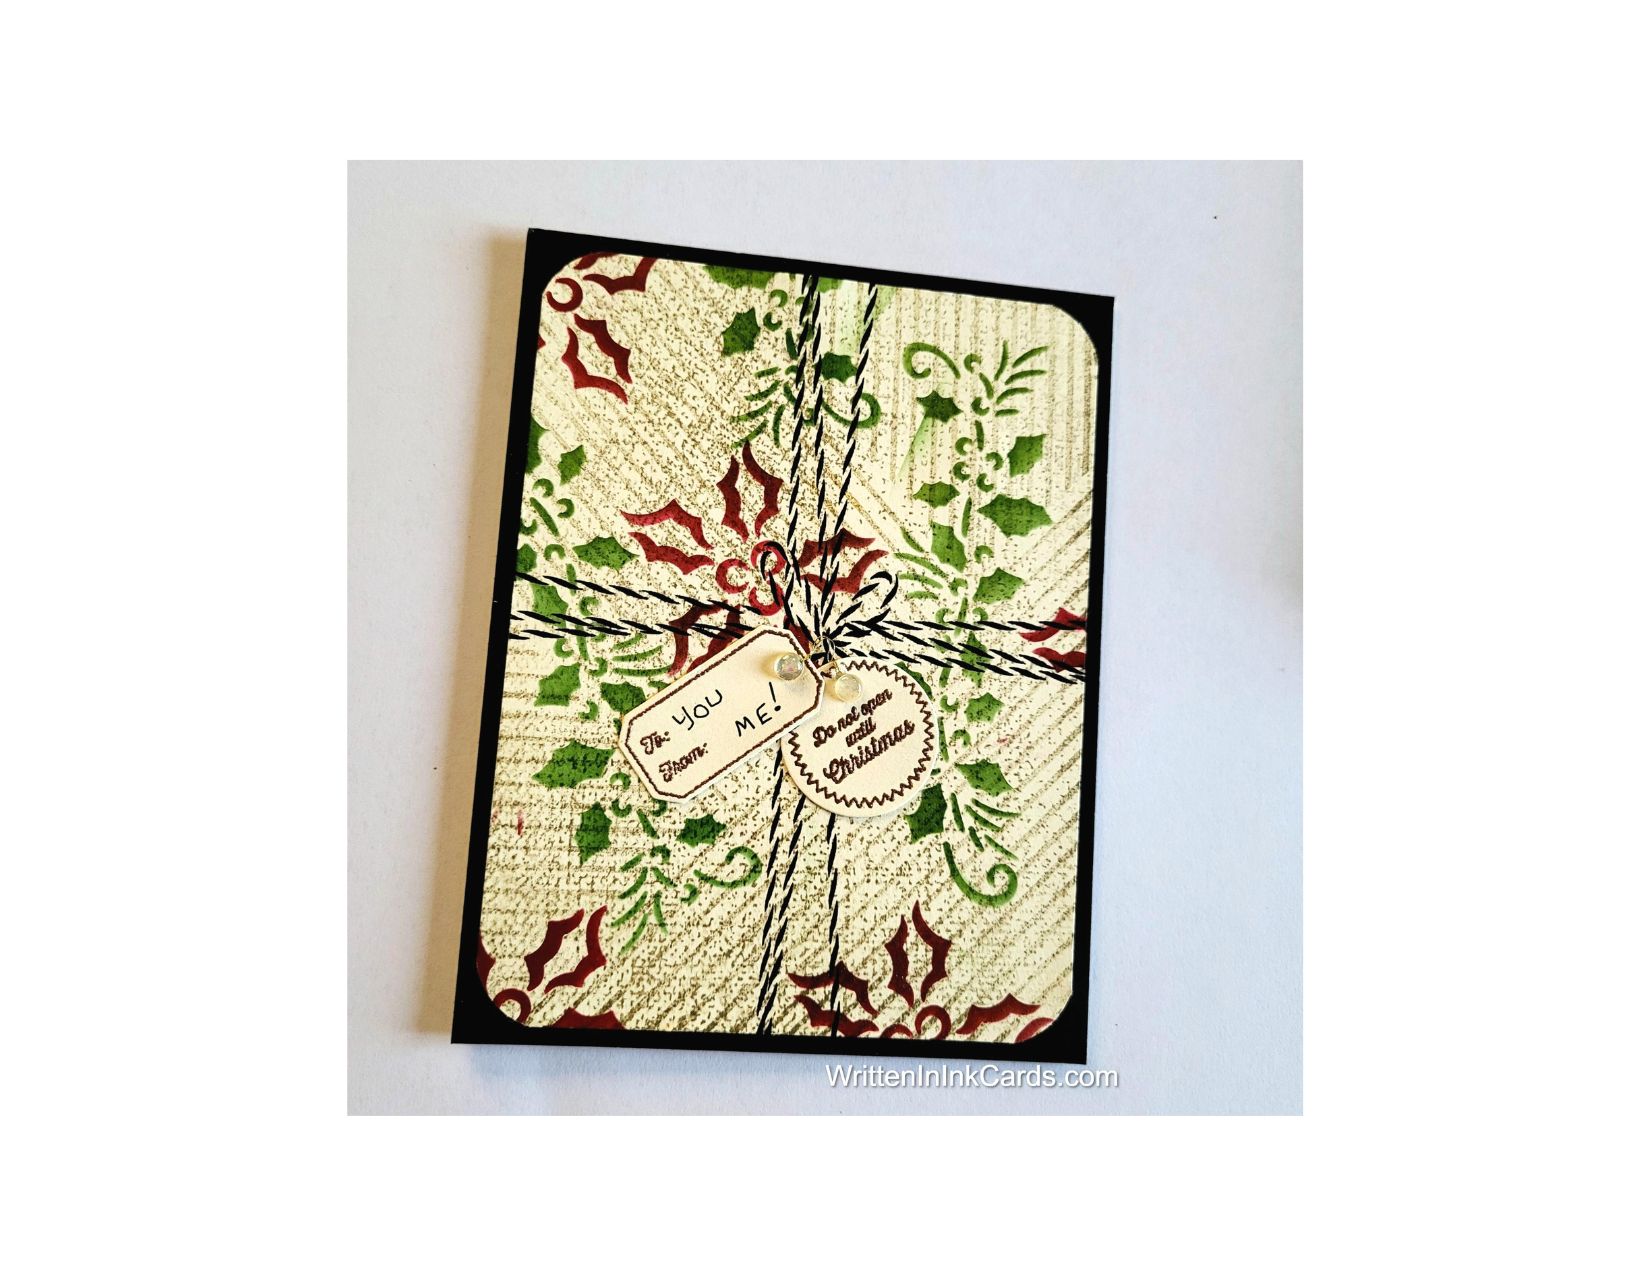
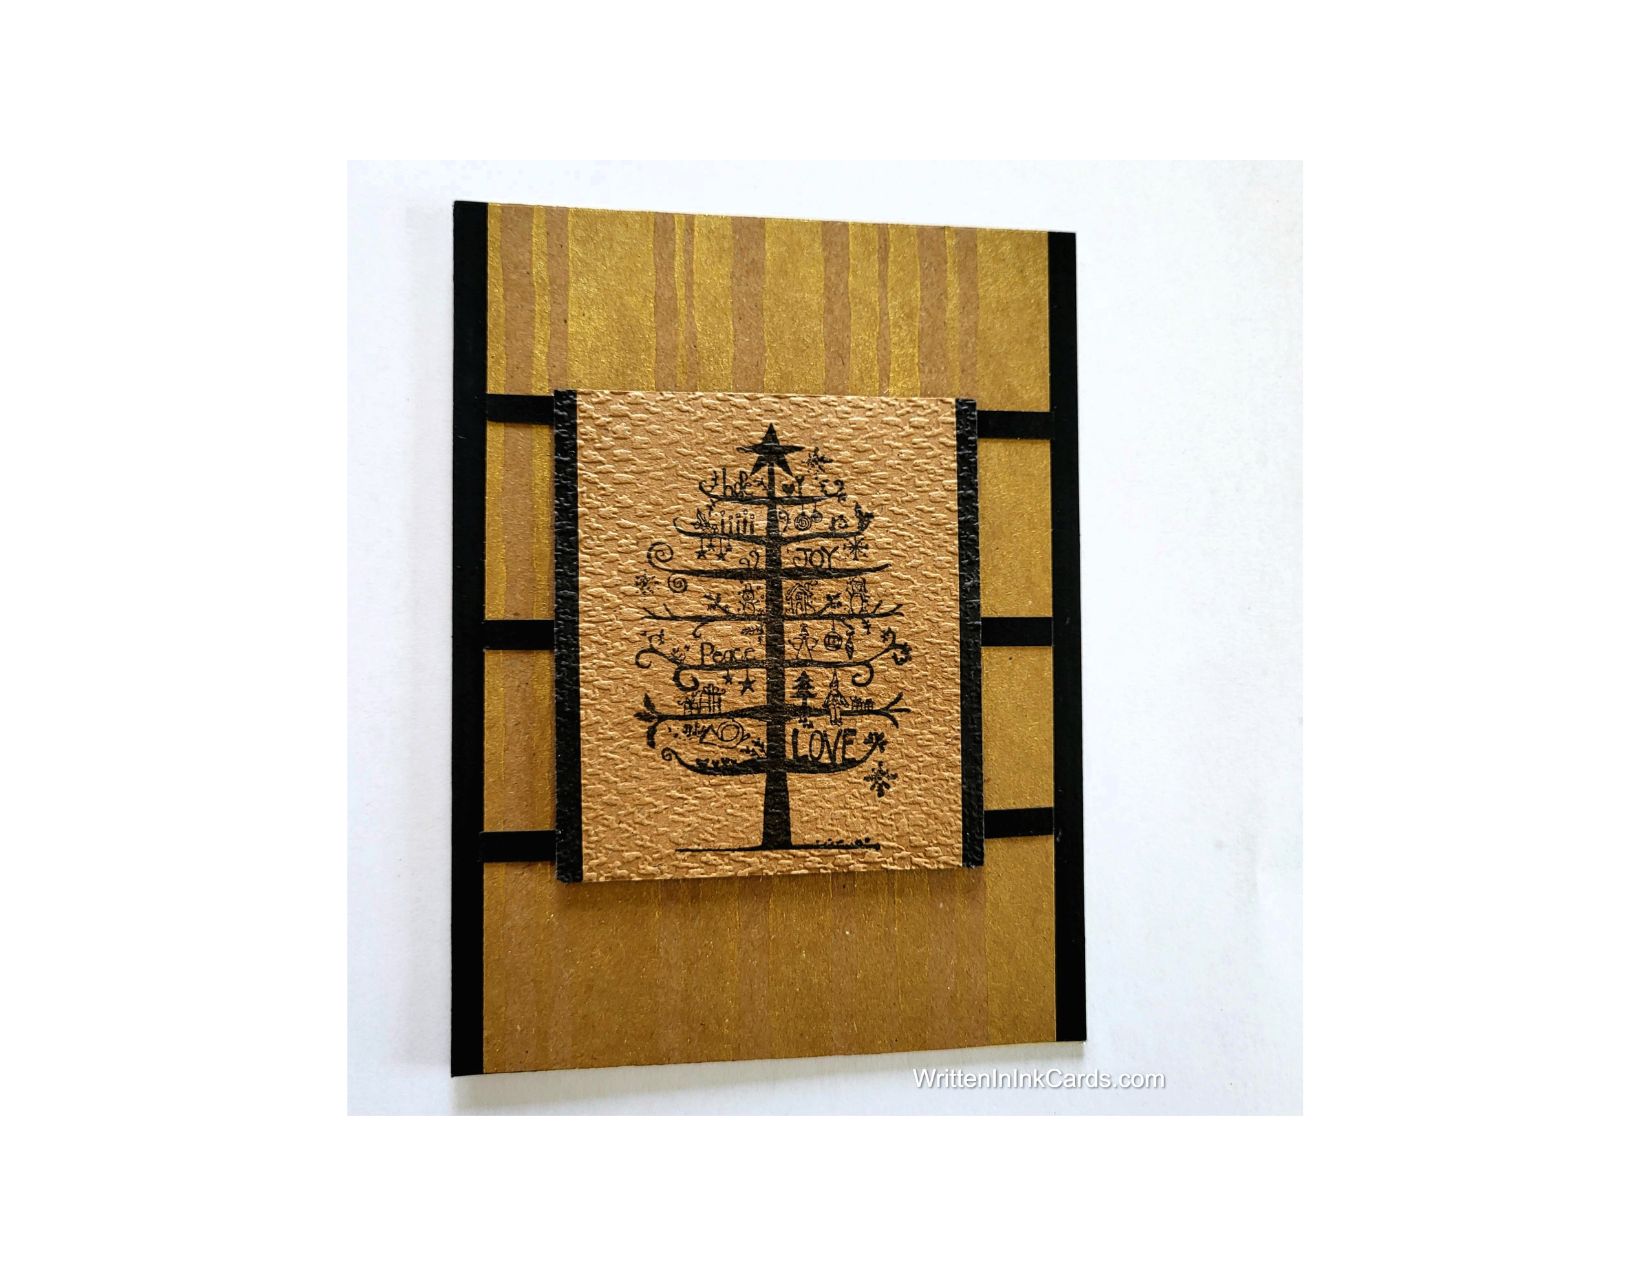
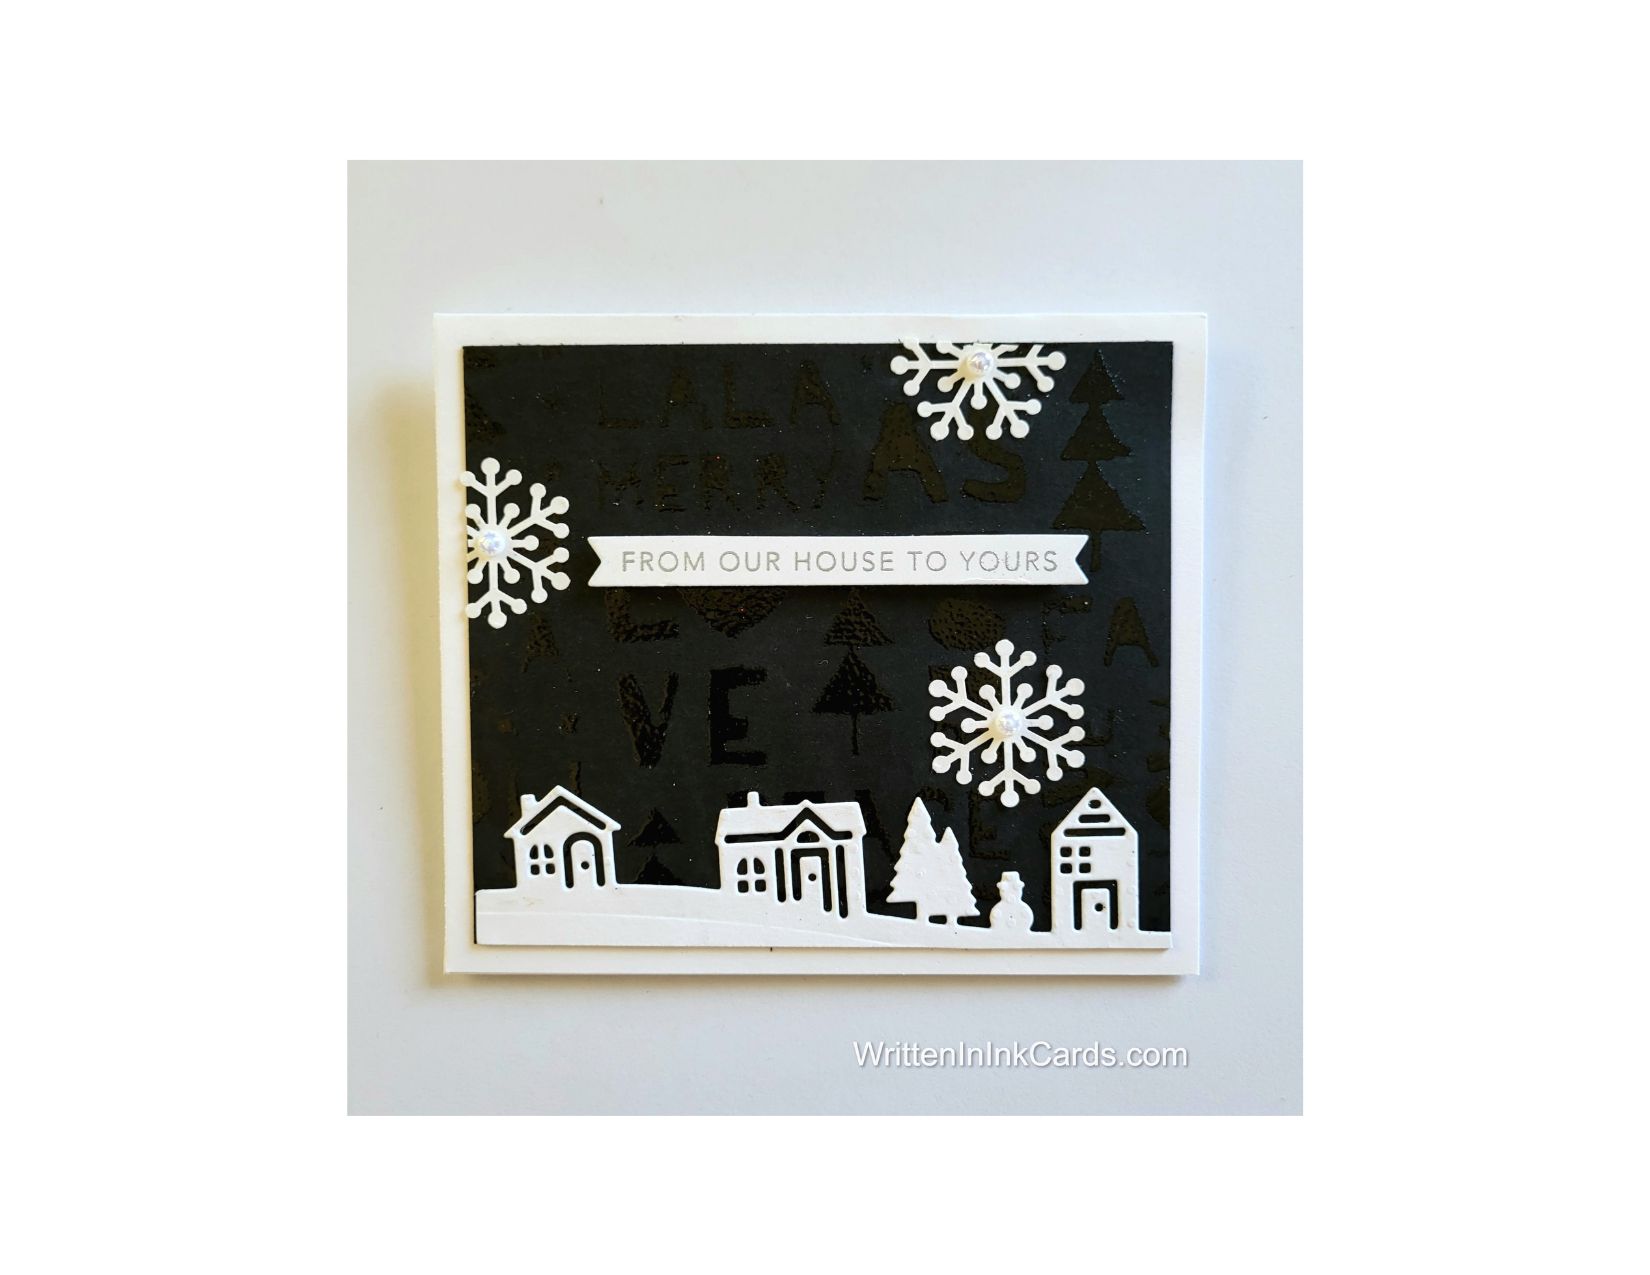
    Black is an unusual choice for a holiday card, but so distinctive!

    Would you like to experiment with a design like this? You’ll find a supply list below, including a link to the stencil I used from A Colorful Life Designs.  Follow the link and use discount code ChrisFan10 to save 10% on your entire order! (Master Creator Bundles are excluded as they already have a 20% discount built in.)

    Let’s get Started:

    Card Base: 5.5 x 8.5, scored and folded at 4.25

    Card Face:  5 ⅛ x 3 7/8

    Card Face:

    • I laid the black card face onto the Grip Mat and positioned the stencil.  
    • I pressed my Versamark embossing ink pad firmly into the openings, moving as needed and covering the entire surface twice to ensure good coverage.
    • After removing the stencil I sprinkled clear embossing powder over the card face, setting it with my heat gun.

    Other:

    • I looked through my “someday” binder, and struck gold with both the houses and the snowflakes.  
    • Then I looked through my sentiment binder and selected the one you see in the photo –  it worked well with the design.

    Assembly

    • I glued the strip with the houses to the bottom of the card face.
    • I glued the sentiment into (approximately) the center of the card face.
    • I added the snowflakes to the sky as shown, then placed a pearl in the center of each snowflake.
    • I glued the card face to the card base, centering on all sides.

    Final Thoughts:

    I love a card that has a hidden surprise, as this one does.  Seen from the front, it’s a simple scene of houses in snowfall; however, when you tilt it just slightly, the light catches the clear heat embossing, revealing the stencilled pattern.

    Supplies: (and links where possible)

       I have listed which products I have used, and where they may be purchased. It’s a huge marketplace and in most instances, there are multiple sources and many alternatives to choose from.

    Stencil: Christmas Montage,  A Colorful Life Designs

    Waffle Flower Grip Mat, 8.5 x 6.5, Scrapbook.com

    Versamark Embossing Ink: Simon Says Stamp

    Clear Embossing Powder,  Wow,  Simon Says Stamp

        Adhesive: Tombow Aqua, Michaels

    Card Base & Card Face: Accent 100 lb., Amazon

    Do you have comments or thoughts to share on this design?  Drop me a line in the Comments Section below –  I’d love to hear from you!

    You can also use the Comments Section  to be notified when I release new work.

    Christmas Montage by A Colorful Life Designs

  • How to Use Stencils for Beautiful Holiday Card Designs

    How to Use Stencils for Beautiful Holiday Card Designs

    Would you like to experiment with a design like this? You’ll find a supply list below, including a link to the stencil I used from A Colorful Life Designs.  Follow the link and use discount code ChrisFan10 to save 10% on your entire order! (Master Creator Bundles are excluded as they already have a 20% discount built in.)

    Let’s get Started:

    Card Base: 5.5 x 8.5, scored and folded at 4.25

    Black Border Layer: 5.5 x 4.25

    Card Face:  5.25 x 4

    Card Face:

    • I laid the card face onto my grip mat and positioned the stencil with the ivy swag where I wanted it.  I used a small blending brush and green ink over this part of the stencil, being careful to avoid ink in other open areas on the stencil.   
    • I moved the stencil and added ivy to other sections of the card face randomly.
    • I wiped the stencil down to remove the green ink.  I added the poinsettias with red ink, switching to the small brush designated for that colour.
    • The stencilling was complete,  but I wanted more detail in the background,  so I added two different backgrounds stamps with light brown ink.

    To use a background stamp:

    It can be difficult to get a good impression with a background stamp – there’s a lot of area to cover. I get good results with this method – I’m quite certain I saw it on Youtube, but cannot remember who to give credit to.

    I lay the stamp on my work surface and ink it up thoroughly, going over it more than once to be certain I’ve got good coverage.

    I lay my card face directly on this, carefully lining up the edges so that it’s straight. I hold it down with one hand to be certain that it doesn’t move.

    I place a piece of copy paper over the card face very carefully, not allowing any movement.

    I run my fingers or palm over the copy paper, switching hands as necessary – one holding everything still and the other transferring ink.

    When I’m satisfied I remove the copy paper and then the card face, careful not to smudge.

    I use the copy paper to keep ink off of my hands – it will inevitably transfer to the card face! (The stamps are larger than the card face, so there is exposed ink.)

    This method allows me to vary pressure or skip over parts of the image if I don’t want solid inking.

    I often use a slightly larger piece of cardstock than I need: if I don’t get it quite straight, I can trim it down and fix that.

    • With the background complete I put the card face into my stamp positioner and added the bakers twine and bow images using Versafine Onyx ink.
    • I used a corner rounder punch on each corner.

    Other:

    • I looked through my sentiment binder and found these wee gift tags which had been created and saved for future use …  it saves so much time to have things like this ready and waiting.

    Assembly

    • I glued the black border layer to the card base, and then centered the card face on top of these.
    • I added the tiny gift tags as shown.

    Final Thoughts:

    I think this card face would have been good with only one background stamp rather than two: if I recreate the design I will try that.

    I was trying for the look of a retro Christmas gift with this card –  not as successfully as hoped,  but it’s a fun card anyway.

    Supplies: (and links where possible)

       I have listed which products I have used, and where they may be purchased. It’s a huge marketplace and in most instances, there are multiple sources and many alternatives to choose from.

    Stencil: Retro Candy Canes,  A Colorful Life Designs

    Waffle Flower Grip Mat, 8.5 x 6.5, Scrapbook.com

    Stamps:

    Rustic Linen,  Altenew

    Woven Stripes,  Altenew

    Handmade Twine Bows, Picket Fence

    Bakers Twine, Picket Fence, Scrapbook.com

    Ink: Stampin’ Up!

    Small Blending Brushes:  Waffle Flower, Scrap n’ Stamp

    Versafine Onyx, Simon Says Stamp

    Adhesive: Tombow Aqua, Michaels

    Cream Card Base & Card Face: Recollections 100 lb.,  Michaels

    Do you have comments or thoughts to share on this design?  Drop me a line in the Comments Section below –  I’d love to hear from you!

    You can also use the Comments Section  to be notified when I release new work.

    Retro Candy Canes by A Colorful Life Designs

  • Master Card Design: Using Stencils for Unique Creations

    Master Card Design: Using Stencils for Unique Creations

    Would you like to experiment with a design like this? You’ll find a supply list below, including a link to the stencils I used from A Colorful Life Designs.  Follow the link and use discount code ChrisFan10 to save 10% on your entire order! (Master Creator Bundles are excluded as they already have a 20% discount built in.)

    Let’s get Started:

    Card Base: 5.5 x 8.5, scored and folded at 4.25

    Card Face:  5 ⅛ x 3 7/8

    Card Face:

    • I laid the card face onto my grip mat and positioned the postage stamp mask, centering it carefully. I inked around the outside edges with a heavy hand and dark blue ink.
    • I placed the corresponding stencil around the mask, then removed the mask (exposing the center of the cardstock while protecting the sectionalready inked).
    • I put the Angular Trees stencil over the Postage Stamp stencil and added the three trees in shades of green, using a smaller brush and masking as necessary to prevent colours from mixing.
    • After removing the Angular Trees stencil, I placed the Tree Edger #5 mask at the top of the opening and added purple ink with a light hand.  Then I added blue ink, pulling it down from the top and in from the sides.  When I removed the mask, I had created a white mountain range and a night sky.
    • Leaving the Postage Stamp stencil in place, I positioned the Tree Line Edger #3 stencil so the bottom of the trees was slightly below the halfway mark. Masking off the Angular trees as necessary, I added blue ink, making the trees very intense at the top but allowing the colour to fade as it moved down the tree.
    • I used a piece of torn paper and a soft hand with the same blue ink to create the look of snow and shadows on the ground.
    • My final stencil was the Christmas Postmark:  I positioned it at an angle over the scene and added it with dark gray ink.
    • I inked up a tiny bird stamp with red ink and positioned it on the snow.
    • I used a light hand and the residual ink on my light blue brush over the white mountain range at the top of the card face – this softened the area, removing the stark contrast.
    • I used a white gel pen to add snow to the scene.

    Assembly

    I glued the card face in the center of the card base.

    Final Thoughts:

    I am so happy with this card:  each step was an experiment and could have gone wrong,  but in this instance everything worked together to create the result I was hoping for.

    Supplies: (and links where possible)

       I have listed which products I have used, and where they may be purchased. It’s a huge marketplace and in most instances, there are multiple sources and many alternatives to choose from.

    Stencils:

    Angular Trees,  A Colorful Life Designs

             Tree Line Edger #5, A Colorful Life Designs

    Tree Line Edger #3, A Colorful Life Designs

    Marvellous Masks Postage Stamps: A Colorful Life Designs

    Christmas Postmark: A Colorful Life Designs

    Waffle Flower Grip Mat, 8.5 x 6.5, Scrapbook.com

    White Gel Pen: Arteza, Amazon

    Ink: Stampin’ Up!

    Blending Brushes: Stampin’ Up! 

    Blending Brushes:  Waffle Flower Sampler Pack, Scrap & Stamp

    Adhesive: Tombow Aqua, Michaels

    Card Base & Card Face: Accent 100 lb., Amazon

    Do you have comments or thoughts to share on this design?  Drop me a line in the Comments Section below –  I’d love to hear from you!

    You can also use the Comments Section  to be notified when I release new work.

    Angular Trees by A Colorful Life Designs

    Tree Line Edger #5 by A Colorful Life Designs

    Tree Line Edger #3 by A Colorful Life Designs

    Marvellous Masks Postage Stamp by A Colorful Life Designs

    Christmas Postmark by A Colorful Life Designs

  • Create Stunning Snowflake Cards with This Simple Design

    Create Stunning Snowflake Cards with This Simple Design

    Would you like to experiment with a design like this? You’ll find a supply list below, including a link to the stencil I used from A Colorful Life Designs.  Follow the link and use discount code ChrisFan10 to save 10% on your entire order! (Master Creator Bundles are excluded as they already have a 20% discount built in.)

    Let’s get Started:

    Card Base: 5.5 x 8.5, scored and folded at 4.25

    Green Border Layer: 5.5 x 4

    Card Face:  5.5 x 5.25 (before tearing)

    Scraps of holographic cardstock

    Card Face:

    • I laid the card face on my Grip Mat and positioned the stencil.  I added green ink around the snowflakes as well as the edges –  leaving the center white.
    • I tore the un-inked edge of the cardstock at approximately 3”  and used my scissors to roughen the edges.

    Other:

    • I die cut a snowflake from the holographic cardstock, as well as a 5.5 x .25” strip.
    • I stamped the sentiment on a scrap of cardstock and fussy cut around it.

    Assembly

    • I glued the green border layer to the card base, centering vertically.
    • I added the card face on top of this, lining it up with the green layer on the left-hand side (this did not allow any of the green to show,  but since I had added green ink to the edges of the card face, that wasn’t necessary.
    • I slipped the narrow holographic strip under the right-hand edge of the card face.
    • I added the sentiment as shown.
    • I added three small green gems to the white border on the right,  and a larger green gem to the center of the snowflake.

    Final Thoughts:

    I really like the combination of this lovely stencil with the soft green –  the result of this mixture is a very pretty card.

    Supplies: (and links where possible)

       I have listed which products I have used, and where they may be purchased. It’s a huge marketplace and in most instances, there are multiple sources and many alternatives to choose from.

    Stencil: Split Snowflake, A Colorful Life Designs

    Waffle Flower Grip Mat, 8.5 x 6.5, Scrapbook.com

    Ink: Stampin’ Up!

    Blending Brushes: Stampin’ Up! 

    Versafine Onyx, Simon Says Stamp

    Adhesive: Tombow Aqua, Michaels

    Holographic Cardstock:Recollections, Michaels

    Card Base & Card Face: Accent 100 lb., Amazon

    Do you have comments or thoughts to share on this design?  Drop me a line in the Comments Section below –  I’d love to hear from you!

    You can also use the Comments Section  to be notified when I release new work.

    Split Snowflake by A Colorful Life Designs

  • Make a Retro Christmas Card with Vintage Design

    Make a Retro Christmas Card with Vintage Design

    Would you like to experiment with a design like this? You’ll find a supply list below, including a link to the stencils I used from A Colorful Life Designs.  Follow the link and use discount code ChrisFan10 to save 10% on your entire order! (Master Creator Bundles are excluded as they already have a 20% discount built in.)

    Let’s get Started:

    Card Base: 5.5 x 8.5, scored and folded at 4.25

    Red Border Layer: 5.5 x 4.25

    Kraft Card Face:  5.5 x 4.25 (before die cutting)

    Card Face:

    • I laid the card face onto my grip mat and positioned the postage stamp stencil. Using a soft hand, I added brown ink just inside the border areas.
    • Leaving this stencil in place, I added the Vintage Santa stencil to the mix, positioning the section with Santa in the bottom-left corner and allowing the image to extend slightly beyond the paper.  I  applied cranberry red ink after masking off all adjacent open areas.
    • I used the same cranberry ink and one of the presents to create a row of gifts up the right-hand side of the card, repositioning each time.  The gift overlapped the right-hand edge of the first stencil, allowing a partial image.
    • I used a rectangular deckled-edge die to cut the card face down to the finished size.  I applied metallic gold paint to the edges of this.
    • I inserted the card face into an embossing folder and ran it through the Big Shot.
    • I touched the raised surfaces of the paper with a brown ink pad, using a very soft hand.

    Other:

    • I looked through my sentiment binder and selected three small die-cut images, previously created on the same Kraft cardstock and embossed in gold.

    Assembly

    • I glued the border layer to the card base, and then centered the card face on top.
    • I added the three small die cuts as shown.

    Final Thoughts:

    My goal here was to create the feeling of an heirloom Christmas card, treasured for years.  The vintage images were paired with the other ways I’ve marked the paper – and I think I succeeded 🙂

    Supplies: (and links where possible)

       I have listed which products I have used, and where they may be purchased. It’s a huge marketplace and in most instances, there are multiple sources and many alternatives to choose from.

    Stencils:

    Retro Santa, A Colorful Life Designs

    Marvellous Masks Postage Stamp: A Colorful Life Designs

    Waffle Flower Grip Mat, 8.5 x 6.5, Scrapbook.com

    Ink: Stampin’ Up!

    Blending Brushes: Stampin’ Up! 

    Adhesive: Tombow Aqua, Michaels

    Card Base & Card Face: Accent 100 lb., Amazon

    Do you have comments or thoughts to share on this design?  Drop me a line in the Comments Section below –  I’d love to hear from you!

    You can also use the Comments Section to be notified when I release new work.

    Retro Santa by A Colorful Life Designs

  • Crafting a Unique Christmas Card with Non-Traditional Colors

    Crafting a Unique Christmas Card with Non-Traditional Colors

    Would you like to experiment with a design like this? You’ll find a supply list below, including a link to the stencil I used from A Colorful Life Designs.  Follow the link and use discount code ChrisFan10 to save 10% on your entire order! (Master Creator Bundles are excluded as they already have a 20% discount built in.)

    Let’s get Started:

    Card Base: 5.5 x 8.5, scored and folded at 4.25

    Pink Border Layer: 5 ⅜ x 4 1/8

    Card Face:  5.25 x 4

    As this is a 6 x 9 stencil,  it was too big to use on my Grip Mat.

    Card Face:

    I laid the card face on my work surface, positioned the stencil and applied pink ink across all exposed areas.  

    Grabbing a smaller brush and a darker pink,  I added deeper colour to the center of the roses and randomly to the swirls.

    Using a shading brush, I added purple ink to the dots in the pattern.

    I cut the paper in half, creating two card fronts,  and selected one for this card.

    I added Fairy Wings Nuvo drops to the purple dots,  and set the card face aside to dry.

    Other:

    I looked through my sentiment binder and found this large Merry Christmas, perfect for this design.

    I cut a small strip of pink card stock (the same colour as that used for the border layer)  4 x .5

    Assembly

    I glued the pink border layer to the card base,  and the (now dry) card face on top of this, centering it on all sides.

    I glued the sentiment strip to the pink cardstock strip, then glued these to the card face approximately ⅔ of the way down.

    I added three small, translucent white gems to the sentiment strip, as shown.

    Final Thoughts:

    The shading and Nuvo drops add so much to this card design: the additional depth and visual interest make a huge difference.

    I enjoy using non-traditional colours in Christmas card design,  and I’m happy with this one!

    Supplies: (and links where possible)

       I have listed which products I have used, and where they may be purchased. It’s a huge marketplace, and in most instances, there are multiple sources and many alternatives to choose from.

    Stencil: Rose Swirl, A Colorful Life Designs

    Waffle Flower Grip Mat, 8.5 x 6.5, Scrapbook.com

    Versamark Embossing Ink: Simon Says Stamp

    Clear Embossing Powder,  Wow,  Simon Says Stamp

    Nuvo Drops: Fairy Wings, Embellish Away

    Ink: Stampin’ Up!

    Blending Brushes: Stampin’ Up! 

    Versafine Onyx, Simon Says Stamp

    Adhesive: Tombow Aqua, Michaels

    Card Base & Card Face: Accent 100 lb., Amazon

    Do you have comments or thoughts to share on this design?  Drop me a line in the Comments Section below –  I’d love to hear from you!

    You can also use the Comments Section  to be notified when I release new work.

    Rose Swirl by A Colorful Life Designs

  • Crafting Beautiful Cards: Foiling with Stencils

    Crafting Beautiful Cards: Foiling with Stencils

    make a card that makes them say “WOW!”

    Would you like to experiment with a design like this? You’ll find a supply list below, including a link to the stencil I used from A Colorful Life Designs.  Follow the link and use discount code ChrisFan10 to save 10% on your entire order! (Master Creator Bundles are excluded as they already have a 20% discount built in.)

    Let’s get Started:

    Card Base: 5.5 x 8.5, scored and folded at 4.25

    Card Face:  5.25 x 4

    When I work with Duo Gel or embossing pastes I don’t use my Grip Mat –  purely a personal preference in the interest of protecting the surface of the mat.

    Card Face:

    • I put my card face on a sheet of scrap paper, positioned the stencil and fastened it in place with Mint Tape.  
    • I spread Duo Gel over the entire surface and then carefully removed the stencil.  The stencil is immediately immersed in water to prevent the gel from drying on the surface.
    • I put the card face aside to dry.  Duo Gel is dry when it is completely clear –  I usually leave it for two or three hours before coming back to it.
    • I don’t have running water near my craft room, so when working with this gel or pastes I have a container of water on the floor beside me so I can immerse the stencils immediately.  I usually do several of these at a time when I settle down to work with either gel or paste.
    • Once the card face had dried I laid a piece of transfer foil on top and ran it through the Big Shot.
    • The pressure from the machine caused the pretty part of the foil to stick to the Duo Gel,  so when I removed the sheet,  the silver stayed behind on the stencilled pattern.

    Other:

    • I used a scrap of heavy white cardstock to cut out the snowflake.
    • I looked through my sentiment binder and selected one that would work for this card.

    Assembly

    • I put dimensional foam on the back of my card face,  and then centered it on the card base.
    • I glued the snowflake to the card face as shown. (I allowed a little extra time for the liquid glue to grab on the foiled surface.)
    • I glued the sentiment across the center of the snowflake.
    • I added rhinestones to the top and bottom of the snowflake.

    Final Thoughts:

    If you’ve never tried foiling with stencils and duo gel,  I recommend it!  It’s a lot of fun  with gorgeous results –  just be certain to buy transfer foil for this purpose and you’re good to go.

    This was a really fast card to make,  but it was time consuming to figure out how to use the panel.  The foiling is gorgeous, and really packs a punch.  I tried several ideas, put it aside for a while, tried a few more …. And finally decided on the design that you see in the photo.

    Supplies: (and links where possible)

       I have listed which products I have used, and where they may be purchased. It’s a huge marketplace and in most instances, there are multiple sources and many alternatives to choose from.

    Stencil: Snowflake Net, A Colorful Life Designs

    Waffle Flower Grip Mat, 8.5 x 6.5, Scrapbook.com

    Versamark Embossing Ink: Simon Says Stamp

    Clear Embossing Powder,  Wow,  Simon Says Stamp

    Duo Gel: Deco Foil,  R& R Scrapbooking

    Transfer Foil: Shattered Glass, Deco Foil, R&R Scrapbooking

    Die: Recollections, Michaels  (retired)

    Ink: Stampin’ Up!

    Adhesive: Tombow Aqua, Michaels

    Card Base & Card Face: Accent 100 lb., Amazon

    Do you have comments or thoughts to share on this design?  Drop me a line in the Comments Section below –  I’d love to hear from you!

    You can also use the Comments Section  to be notified when I release new work.

    Snowflake Net by A Colorful Life Designs

  • How to Make a Gorgeous Card with Dotted Wreath Stencil

    How to Make a Gorgeous Card with Dotted Wreath Stencil

    Would you like to experiment with a design like this? You’ll find a supply list below, including a link to the stencil I used from A Colorful Life Designs.  Follow the link and use discount code ChrisFan10 to save 10% on your entire order! (Master Creator Bundles are excluded as they already have a 20% discount built in.)

    Let’s get Started:

    Card Base: 5.5 x 8.5, scored and folded at 4.25

    Border Layer: 5.5 x 4.25

    Cranberry Card Face: 5.25 x 5.25

    Card Face:

    • I laid my card face on a piece of scrap paper and positioned the stencil.  I applied green embossing paste through the stencil, then removed the stencil very carefully so I didn’t smudge the paste.
    • The stencil went into water immediately,  and the card face was put aside to dry.
    • Once dry the card face was cut in half, and became 5.25 x 2.75.
    • I also cut ⅛” off the top and bottom of this piece.

    Other:

    • I glued the card face (or rather, half of it!)  to the kraft border layer on the left, ensuring equal spacing on the top, bottom and left-hand sides.
    • I placed this newly created combination into my stamp positioner and stamped the reindeer image with Versamark embossing ink.  I stamped several times to get a good impression.
    • I removed this from the stamp positioner, added copper embossing powder, and set it with my heat gun.
    • I drew a narrow line snugly against the right-hand edge of the cranberry cardstock,  added copper embossing powder and set it with my heat gun.  

    This was necessary because of the raised cranberry layer:  no ink transferred immediately beside it,  so I used the embossing pen to draw a line and fill in the narrow gap.

    • I stamped the sentiment on a scrap of cardstock in cranberry ink and cut it with a die.
    • I die cut a tiny bow out of the same cardstock.

    Assembly:

    • I glued the sentiment to the card face, allowing part of it to hang off the left-hand edge.  I cut this off flush.
    • I glued the card face to the card base.
    • I added the tiny bow to the reindeer as shown.

    Final Thoughts:

    I wasn’t at all sure about this design when I tried it,  but I quite like it in the end.

    This is such a great stencil to play with –  and I still  have half of it to work into a card.

    Supplies: (and links where possible)

       I have listed which products I have used, and where they may be purchased. It’s a huge marketplace and in most instances, there are multiple sources and many alternatives to choose from.

    Stencil: Dotted Wreath : A Colorful Life Designs

    Waffle Flower Grip Mat, 8.5 x 6.5, Scrapbook.com

    Versamark Embossing Ink:  Ecstasy Crafts

    Embossing Pen: Versamark, Ecstasy Crafts

    Copper Embossing Powder: Wow,  R&R Scrapbooking

    Embossing Paste: Later Gater, Simon Hurley,  R&R Scrapbooking

    Stamps:  Cheerful Prancing, Unity Stamps  (retired,  but there are still similar stamps     available!)

    Dies: 

         Sentiment: Stampin’ Up! (retired)

         Bow Topper:  Scrapbook.com

    Ink: Stampin’ Up!

    Adhesive: Tombow Aqua, Michaels

    Card Base & Card Face: Accent 100 lb., Amazon

    Do you have comments or thoughts to share on this design?  Drop me a line in the Comments Section below –  I’d love to hear from you!

    You can also use the Comments Section  to be notified when I release new work.

    Dotted Wreath by A Colorful Life Designs

  • Create Stunning a Card for Your Special Guy

    Create Stunning a Card for Your Special Guy

    Would you like to experiment with a design like this? You’ll find a supply list below, including a link to the stencil I used from A Colorful Life Designs.  Follow the link and use discount code ChrisFan10 to save 10% on your entire order! (Master Creator Bundles are excluded as they already have a 20% discount built in.)

    Let’s get Started:

    Card Base: 5.25 x 10.5,  scored at 5.25

    Border Layer: 5 x 5

    Card Face:  5 x 5

    Frame: 5 x 5 (before die cutting)

    I had stamped and coloured this image, then set it aside in my “someday” pile.  This stencil gave me the perfect opportunity (and the inspiration)  to put this handsome fellow to use.

    Card Face:

    • I laid the card face down on the Grip Mat and positioned the stencil.  I applied brown ink with a light, careful hand – avoiding the pre-coloured figure.
    • Using the frame die as a guide,  I cut the card face down to a size slightly smaller than the finished frame would be.

    Other:

    • I put the border layer onto the Grip Mat and positioned the stencil once again.  I used the same brown ink with a heavier hand on this piece, covering all exposed areas.
    • Next, I worked on the piece for the frame: I started with white cardstock, positioned the die, and ran it through the Big Shot.
    • After removing the cardstock from the die, I used a medium brown ink over the entire frame, allowing a random variation in the depth of tone. 
    • I finished this off by bringing in a dark brown ink and using it here and there on the frame, increasing the variation in tone.
    • I selected a sentiment from my Sentiment binder (I love having them ready and waiting when I need one).

    Assembly

    • I glued the border layer to the card base, centering it on all sides.
    • I glued the frame on top of the cut-down card face.
    • I glued this new combination on top of the border layer, centering carefully.
    • I put dimensional foam on the back of the sentiment, and put it in place as shown.

    Final Thoughts:

    This is so far from my first thoughts about how to use this stencil – but how perfect is this for a masculine card?

    I’m really happy with the way this turned out.

    Supplies: (and links where possible)

       I have listed which products I have used, and where they may be purchased. It’s a huge marketplace and in most instances, there are multiple sources and many alternatives to choose from.

    Stencil: Close Up Branches, A Colorful Life Designs

    Waffle Flower Grip Mat, 8.5 x 6.5, Scrapbook.com

    Stamps: Zeke Guy,  Unity Stamps

    Dies: Oval Woodgrain Frame,  Hero Arts, Amazon

    Ink: Stampin’ Up!

    Blending Brushes: Stampin’ Up! 

    Versafine Onyx, Simon Says Stamp

    Memento Ink: Stampin’ Up!

    Alcohol Markers:

         Stampin’ Blends: Stampin’ Up!

         Copics:  Wallacks

    Adhesive: Tombow Aqua, Michaels

    Card Base & Card Face: Accent 100 lb., Amazon

    Do you have comments or thoughts to share on this design?  Drop me a line in the Comments Section below –  I’d love to hear from you!

    You can also use the Comments Section  to be notified when I release new work.

    Close Up Branches by A Colorful Life Designs

  • Make a Christmas card with a masculine twist

    Make a Christmas card with a masculine twist

    Would you like to experiment with a design like this? You’ll find a supply list below, including a link to the stencil I used from A Colorful Life Designs.  Follow the link and use discount code ChrisFan10 to save 10% on your entire order! (Master Creator Bundles are excluded as they already have a 20% discount built in.)

    Let’s get Started:

    Card Base: 5.5 x 8.5, scored and folded at 4.25

    Black Border Layer: 5.5 x  4.25

    Card Face:  5.5 x 4

    Scrap of Kraft Cardstock 3 x 2

    Small Black border layer: 3 x 2 3/16

    Black Strips:  4 x 3/19  (three of them)

    This stencil has long strands which are unsecured between the top and bottom – a recipe for unwanted movement while applying ink. Before starting I sprayed the back of the stencil with Pixie Spray, and waited about 30 seconds before proceeding.

    Card Face:

    • I laid the card face on my Grip Mat and positioned the stencil.  I applied metallic gold ink across the exposed areas.

    Other:

    • I placed the scrap of kraft cardstock into my stamp positioner and added the tree with Versafine Onyx.  I stamped a couple of times to ensure a very bold image.
    • Once the ink had dried,  I placed this in an embossing folder and ran it through the Big Shot.

    Assembly

    • I glued the black border to the card base.
    • I glued the card face to the border layer, centering vertically.
    • I glued the three narrow strips to the card face, evenly spaced.
    • I glued the embossed/stamped layer to the smaller black border, centering vertically.
    • I put dimensional foam on the back of this smaller piece,  and positioned it in the center of the card face.

    Final Thoughts:

    This is clearly a masculine card:  this is determined by the shapes and colours used.  There is nothing in the design or the focal image that indicates that this has to be for a male… and yet that is the only real choice.

    Supplies: (and links where possible)

       I have listed which products I have used, and where they may be purchased. It’s a huge marketplace and in most instances, there are multiple sources and many alternatives to choose from.

    Stencil: Drizzled Lines,  A Colorful Life Designs

    Waffle Flower Grip Mat, 8.5 x 6.5, Scrapbook.com

    Stamps:  Christmas Tree of Hope, Joy and Love, Unity Stamps (retired)

    Lisa Horton Metallic Gold Ink: Glitter & Ink

    Blending Brushes: Stampin’ Up! 

    Versafine Onyx, Simon Says Stamp

    Adhesive: Tombow Aqua, Michaels

    Card Base & Card Face: Accent 100 lb., Amazon

    Do you have comments or thoughts to share on this design?  Drop me a line in the Comments Section below –  I’d love to hear from you!

    You can also use the Comments Section  to be notified when I release new work.

    Drizzled Lines by A Colorful Life Designs