Your cart is currently empty!
Tag: stencil
-

Stencilling + Paper Piecing on a DIY Card? A fast & easy technique.

Would you like to experiment with a design like this? You’ll find a supply list below, including a link to the stencil I used from A Colorful Life Designs. Follow the link and use discount code ChrisFan10 to save 10% on your entire order! (Master Creator Bundles are excluded as they already have a 20% discount built in.)
Let’s get Started:
Card Base: 5.5 x 8.5, scored and folded at 4.25
Black Border Layer: 5.5 x 4.25
Card Face: 5.5 x 4.25, copy paper
Patterned Paper
Card Face:
I decided to use this stencil with patterned paper instead of ink, creating a very different look.
- I laid the stencil on the green plaid paper and traced the lines to create the suit jacket, and cut out the pieces
- I traced the bow tie onto the orange patterned paper and cut out the pieces.
This stencil is approximately 5.5 x 5.5, and my card was going to be 5.5 x 4.25 – I had to make the suit jacket smaller somehow. Rather than cut the extra width off the sides, I overlapped the two pieces on the copy paper. This gave me a smaller V, which worked well with that width.
- I glued the two pieces of the suit in place, overlapping as necessary.
- I glued the bow tie in place, allowing it to extend onto the green plaid.
Other:
- I stamped the sentiment with Versafine Onyx and cut it out with a die.
Assembly
- I glued the black border layer to the card base, and then glued the copy paper layer on top of both.
- I added foam tape to the back of the sentiment and put it in place.
- I glued a tiny white button to the “shirt”.
- I traced around the button and the pieces of the bow tie with a black fineliner, providing more definition.
Final Thoughts:
I used papers to create a sort of quirky/geeky feel for this suit – I love the result. Different papers will produce very different results.
I don’t often do paper piecing, but it’s so much fun.
Supplies: (and links where possible)
I have listed which products I have used, and where they may be purchased. It’s a huge marketplace and in most instances, there are multiple sources and many alternatives to choose from.
Stencil: The Tux, A Colorful Life Designs
Versafine Onyx, Simon Says Stamp
Adhesive: Tombow Aqua, Michaels
Card Base & Card Face: Accent 100 lb., Amazon
Do you have comments or thoughts to share on this design? Drop me a line in the Comments Section below – I’d love to hear from you!
You can also use the Comments Section to be added to the list, and notified when I release new work.
The Tux by A Colorful Life Designs

-

Unlock Your Creativity with simple DIY Grunge Card Techniques

Would you like to experiment with a design like this? You’ll find a supply list below, including a link to the stencil I used from A Colorful Life Designs. Follow the link and use discount code ChrisFan10 to save 10% on your entire order! (Master Creator Bundles are excluded as they already have a 20% discount built in.)
I do love a bit of grunge from time to time!
Let’s get Started:
Card Base: 5.5 x 8.5, scored and folded at 4.25
Border Layer: 5.5 x 4.25
Card Face: 5.25 x 4
Card Face:
- I laid the card face on my Grip Mat and then positioned the stencil, going over it with a brayer to ensure good contact with the mat.
- Next I applied a mixture of light teal and purple inks over the exposed areas.
- I was really happy with the result, and then(because I was in an experimental mood) I cut the card face in half, and glued them to a piece of copy paper, reversing the order.
- I put this reconfigured card face into my stamp positioner and added the focal image in the center, using Versafine Onyx.
- The focal image is from a grunge set, and to further develop that theme, I stamped a few different sentiments onto the background, using grey ink and second-generation stamping.
- I ran each edge of the card face over the teal ink pad used on the stencil, tilting the paper slightly to allow the colour to bleed in just a bit.
Other:
- I grabbed my sentiment binder and pulled out three that worked with the mood of this piece. This binder contains sentiments that have been created in advance and saved for future need. It’s a great time saver!
- I put dimensional foam on the back of each strip.
Assembly
- I glued the black border layer onto the card base, and then centered the card face on top of these.
- I removed the backing from each of the three sentiments, and laid them lightly on the card face where I wanted them.
- I took a length of purple metallic thread, wrapped it loosely around my fingers and then secured it under each sentiment strip, lifting each slightly to slide the thread underneath and then pushing it down to hold the thread and secure it to the card face.
- I used an assortment of card bling to finish the card, gluing it randomly across the finished card face.
Final Thoughts:
- I like the reversed stencil image: if I had been planning on this when I started, it would have been easy to get this look by stencilling just half of the image on each outside edge. Cutting the card face down the middle left a visible line, which will be avoided if I redo this design.
- The metallic thread isn’t very visible in the image, but it adds a subtle bit of loveliness in real life.
- I do love a grungy card! My biggest issue with this style is that I don’t know when to stop, and the card gets muddy – how did I do this time?
Supplies: (and links where possible)
I have listed which products I have used, and where they may be purchased. It’s a huge marketplace and in most instances, there are multiple sources and many alternatives to choose from.
Stencil: Swirl Band, A Colorful Life Designs
Waffle Flower Grip Mat, 8.5 x 6.5, Scrapbook.com
Stamps:
Studio Light Inspire and Create Grunge Collection (retired)
Polka Dot Blossoms Sayings, Tim Holtz, Amazon
Card Bling: A Colorful Life Designs
Ink: Stampin’ Up!
Blending Brushes: Stampin’ Up!
Versafine Onyx, Simon Says Stamp
Adhesive: Tombow Aqua, Michaels
Card Base & Card Face: Accent 100 lb., Amazon
Do you have comments or thoughts to share on this design? Drop me a line in the Comments Section below – I’d love to hear from you!
You can also use the Comments Section to be added to the list, and notified when I release new work.
Swirl Band by A Colorful Life Designs – remember, use the code to save!

-

Show your love, create an elegant sympathy card

Would you like to experiment with a design like this? You’ll find a supply list below, including a link to the stencil I used from A Colorful Life Designs. Follow the link and use discount code ChrisFan10 to save 10% on your entire order! (Master Creator Bundles are excluded as they already have a 20% discount built in.)
Let’s get Started:
Card Base: 5.5 x 8.5, scored and folded at 4.25
Card Face: 5 x 3.75
Three small scraps of white cardstock
Silver Cardstock: ⅛ x 5
Card Face:
- I began by spraying the back of this delicate stencil with Pixie Spray and waiting for (about) 30 seconds before using it.
- Then I laid the card face on my Grip Mat and positioned the stencil on the bottom of the card face – approximately ⅔ of the stencil was on the paper.
- I applied Versafine Onyx over the exposed areas, using firm pressure and building up ink until I had a bold, dramatic graphic.
Other:
- I put the first scrap of cardstock into my stamp positioner and stamped the flowers several times to get an intense black image. I used the matching die to cut this out.
- Using the second piece of scrap and the stamp positioner once again I stamped the sentiment a couple of times. I fussy cut this, using my snips.
- I die cut the white bow, and coloured it with an embossing pen. I sprinkled on silver embossing powder and set it with my heat gun.
Assembly
- I glued the card face to the card base.
- I glued the die-cut bouquet in place and then added the silver bow as shown.
- I added the sentiment to the card face.
- I glued the narrow silver strip along the top of the card face.
Final Thoughts:
This was an interesting design to create – the asymmetry in the design makes it interesting, as well as the still minimalistic feel. I think it works well as a sympathy card.
Initially the bow was going to remain white – I changed my mind partway through the design (as I often do).
I like to keep two or three sympathy cards on hand – experience has taught me that creating them upon need is very difficult.
Supplies: (and links where possible)
I have listed which products I have used, and where they may be purchased. It’s a huge marketplace and in most instances, there are multiple sources and many alternatives to choose from.
Stencil: Swirl Band , A Colorful Life Designs
Waffle Flower Grip Mat, 8.5 x 6.5, Scrapbook.com
Versamark Embossing Pen:
Silver Embossing Powder: Wow,
Stamp/Die: Floral Impressions, Hero Arts
Blending Brushes: Stampin’ Up!
Versafine Onyx, Simon Says Stamp
Adhesive: Tombow Aqua, Michaels
Card Base & Card Face: Accent 100 lb., Amazon
Do you have comments or thoughts to share on this design? Drop me a line in the Comments Section below – I’d love to hear from you!
You can also use the Comments Section to be added to the list, and notified when I release new work.
Swirl Band by A Colorful Life Designs

-

A (quick & easy) gorgeous, inspirational handmade card.

Would you like to experiment with a design like this? You’ll find a supply list below, including a link to the stencil I used from A Colorful Life Designs. Follow the link and use discount code ChrisFan10 to save 10% on your entire order! (Master Creator Bundles are excluded as they already have a 20% discount built in.)
Let’s get Started:
Card Base: 5.5 x 8.5, scored and folded at 4.25
Border Layer: 5.5 x 4.25
Card Face: 5.5 x 4 (subtle patterned paper)
Card Face:
- This stencil is delicate, with long “strands” – so before I started, I sprayed the back with Pixie Spray.
- Next I laid the card face on my Grip Mat, and then positioned the stencil. (I always allow approximately 30 seconds to allow the Pixie Spray to start working.)
- I applied yellow ink across all exposed areas, building up intensity in the top left and bottom right corners.
- After removing the stencil I put the card face into my stamp positioner and added the dancer with dark yellow ink, stamping a couple of times to create enough contrast with the background.
- I removed that stamp and added the sentiment, I stamped this three times with Versafine Onyx to achieve a crisp, intense result.
When I want to add a sentiment directly to the card face, and need to be certain that it’s straight : I add a layer of acetate on top of the card face and stamp on that. I make minor adjustments as necessary , cleaning the acetate and restamping until I’m satisfied. Then I remove the acetate and stamp directly onto the card face. This has saved a lot of work from hitting the trash!
- I added spatter to the card face, using the reinker for the darker yellow.
Assembly
- I glued the black border layer to the card base, and then centered the card face on top of these.
Final Thoughts:
I love this elegant ballerina image, and also the combination of the two stamps with this stencil. They all play together so very well!
Although I used a subtle patterned paper for this, the design would also work on regular cardstock.
Supplies: (and links where possible)
I have listed which products I have used, and where they may be purchased. It’s a huge marketplace and in most instances, there are multiple sources and many alternatives to choose from.
Stencil: Glittering Hearts, A Colorful Life Designs
Waffle Flower Grip Mat, 8.5 x 6.5, Scrapbook.com
Versamark Embossing Ink: Simon Says Stamp
Clear Embossing Powder: Wow, R&R Scrapbooking
Stamps: Dancer and Sentiment – Technique Junkies (no longer in business)
Ink: Stampin’ Up!
Blending Brushes: Stampin’ Up!
Versafine Onyx, Simon Says Stamp
Adhesive: Tombow Aqua, Michaels
Card Base & Card Face: Accent 100 lb., Amazon
Do you have comments or thoughts to share on this design? Drop me a line in the Comments Section below – I’d love to hear from you!
You can also use the Comments Section to be added to the list, and notified when I release new work.
Glittering Hearts by A Colorful Life Designs

-
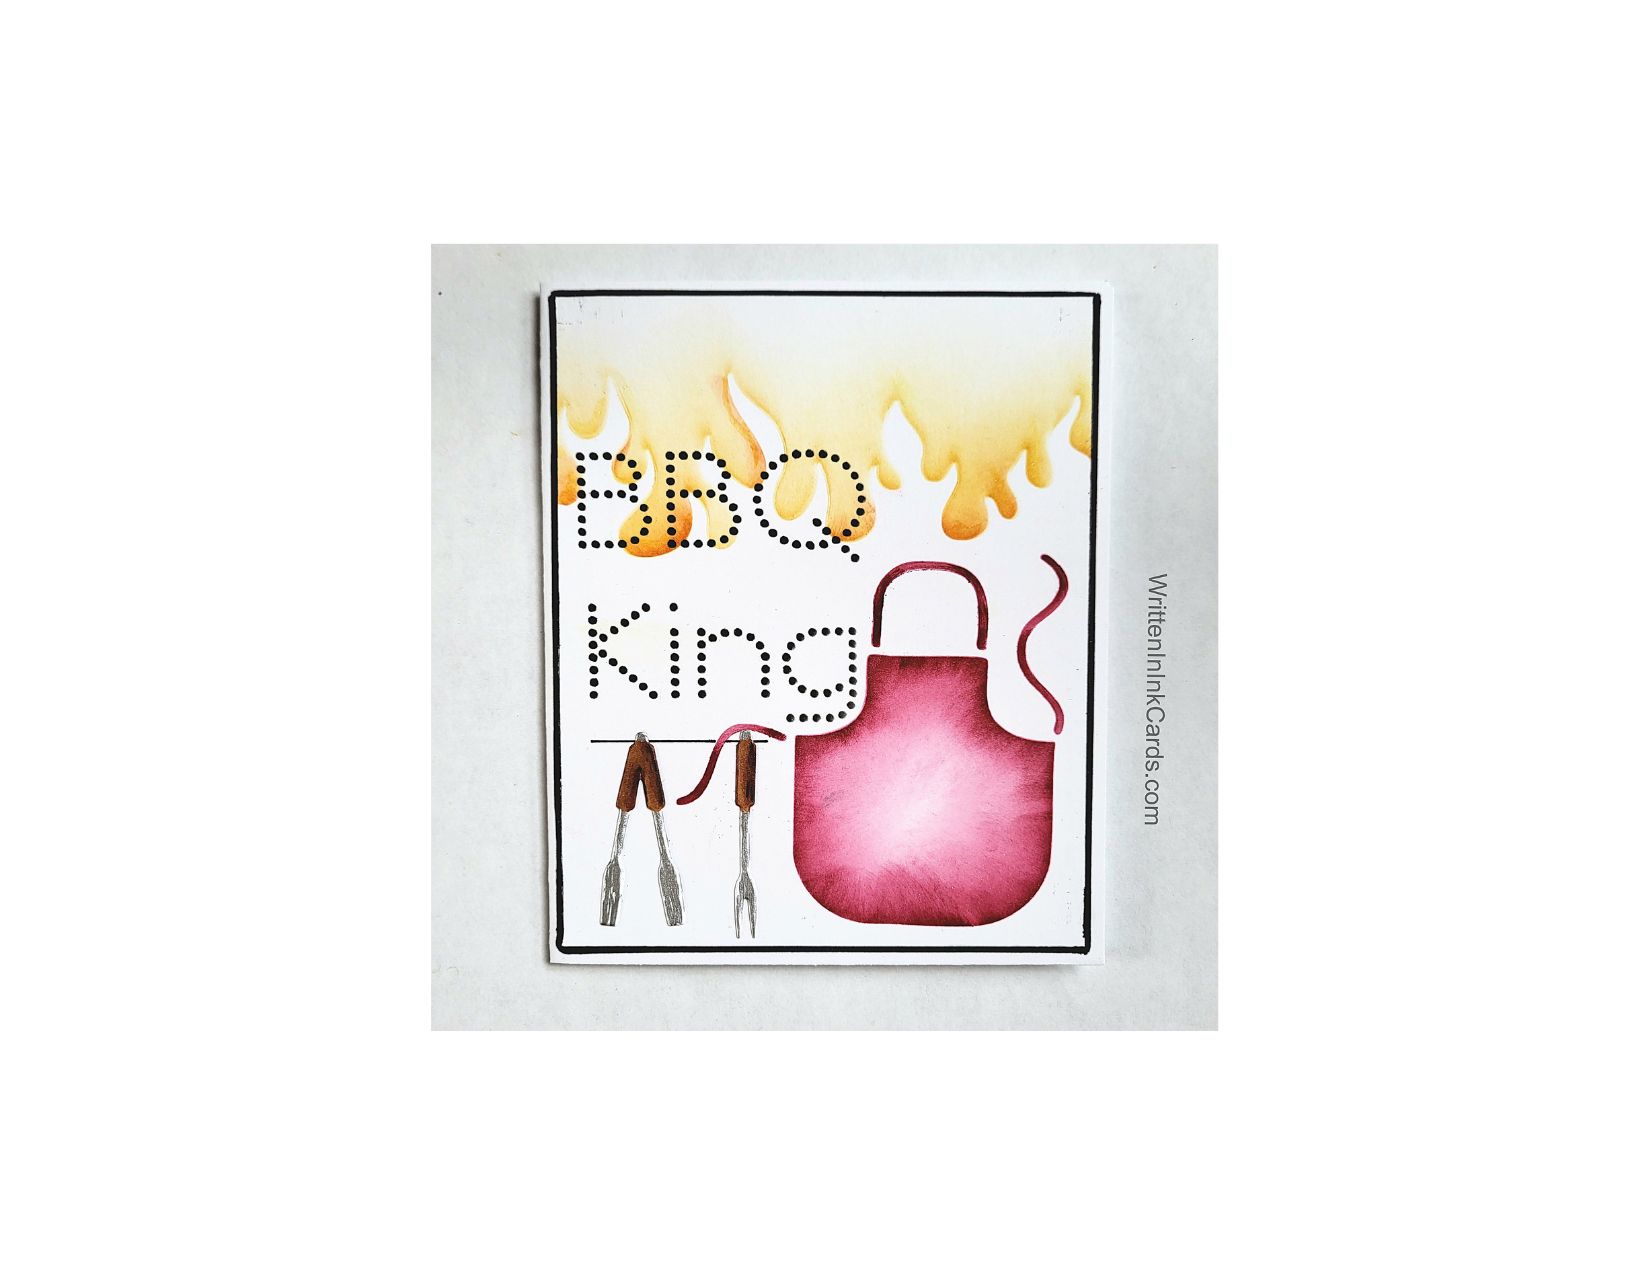
Celebrating the King of the Cookout with a DIY card

Would you like to experiment with a design like this? You’ll find a supply list below, including a link to the stencil I used from A Colorful Life Designs. Follow the link and use discount code ChrisFan10 to save 10% on your entire order! (Master Creator Bundles are excluded as they already have a 20% discount built in.)
Let’s get Started:
Card Base: 5.5 x 8.5, scored and folded at 4.25
Card Face: 5.25 x 4
Card Face:
After laying the card face on my Grip Mat, I positioned the stencil towards the top of the panel. I was using the section of the stencil which creates flames, and I masked off any nearby openings.
I brushed soft yellow ink over the exposed area, and then (using a detail brush) I added touches of red to the base of the flames to provide visual interest.
I rotated the stencil to allow the apron to appear in the bottom right of my card face. After once again masking off nearby areas I applied red ink. I used a full sized brush for the main part of the apron, and a detail brush for the strings.
I repositioned the stencil again, this time to feature the dotty words. After (you guessed it!) masking nearby areas I applied black ink to create the fun font.
Other:
I die cut the BBQ tools from white cardstock.
I used alcohol markers to colour the handles.
I used an embossing pen to colour the metallic parts of the tools, sprinkled some silver embossing powder over this and set it with my heat gun.
Assembly
I glued the card face to the card base.
I used a ruler and a black marker to create a fine black border around the card face. (There are two advantages to this: it saves a piece of cardstock, and I can draw a very fine line which is perfectly centered.)
I used a ruler and a fineliner to draw a black line on the card face where shown, and then glued the BBQ tools onto this.
Final Thoughts:
A fun “guy” card – I haven’t decided if this will be for Father’s Day or a birthday. My guy is truly a BBQ King, he produces amazing results from the grill.
Supplies: (and links where possible)
I have listed which products I have used, and where they may be purchased. It’s a huge marketplace and in most instances, there are multiple sources and many alternatives to choose from.
Stencil: Kiss The Cook, A Colorful Life Designs
Waffle Flower Grip Mat, 8.5 x 6.5, Scrapbook.com
Embossing Pen: Ranger, Amazon
Silver Embossing Powder: Wow, R&R Scrapbooking
Dies: Apron of Love, Stampin’ Up! (retired)
Fineliner: Amazon
Ink: Stampin’ Up!
Blending Brushes: Stampin’ Up!
Detail Brushes: Scrap n’ Stamp
Versafine Onyx, Simon Says Stamp
Adhesive: Tombow Aqua, Michaels
Card Base & Card Face: Accent 100 lb., Amazon
Do you have comments or thoughts to share on this design? Drop me a line in the Comments Section below – I’d love to hear from you!
You can also use the Comments Section to be added to the list, and notified when I release new work.

-
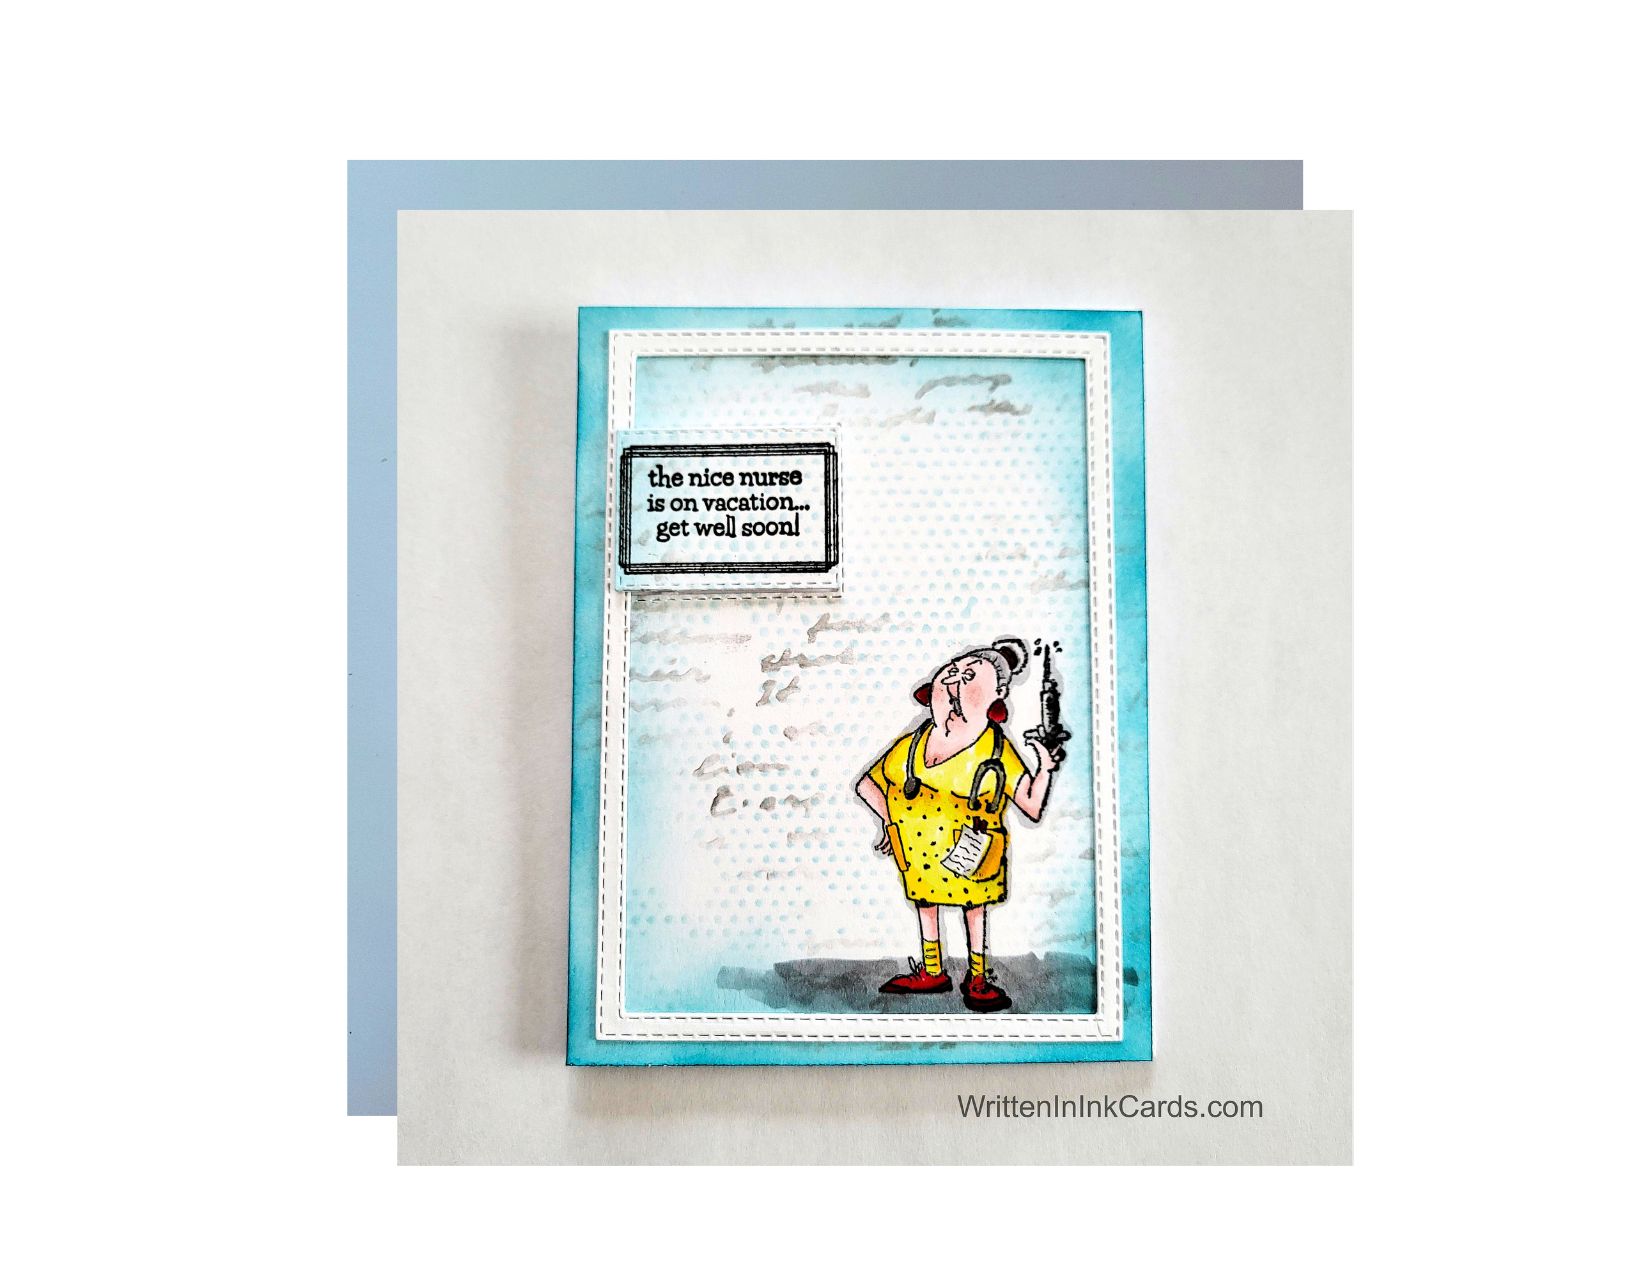
Share a smile with a DIY Cheeky Get Well Card

Would you like to experiment with a design like this? You’ll find a supply list below, including a link to the stencil I used from A Colorful Life Designs. Follow the link and use discount code ChrisFan10 to save 10% on your entire order! (Master Creator Bundles are excluded as they already have a 20% discount built in.)
Let’s get Started:
Card Base: 5.5 x 8.5, scored and folded at 4.25
Card Face: 5.5 x 4.25
White Frame: 5.25 x 4 (outer dimensions)
Card Face:
- I began by stamping the image onto the card face with black Memento ink and colouring it in using alcohol markers.
- Laying the card face down on my Grip Mat and positioning the Scripty stencil. I applied black ink randomly, using a light hand. I took care to avoid the image during this process.
- Removing that stencil, I replaced it with the Grunge Dots stencil and applied a medium blue ink across the exposed areas, once again avoiding the image.
- I brushed the same blue ink on the borders, allowing it to fade as it moved away from the edge. The stencilling was visible through this ink and took on the appearance of texture, which I liked.
- Finally, I traced around the image of the nurse using a soft grey alcohol marker. This helped to separate her from the background, making her stand out.
Other:
- I placed two consecutively sized rectangular dies on a piece of white cardstock, securing them with Mint Tape. I ran these through the Big Shot: this created the frame.
- I stamped the sentiment and used a smaller rectangular die to cut it down to the correct size.
Assembly
- I glued the card face to the card base.
- I put glue on the back of the frame, but then blotted some of it off on scrap paper before putting it in place on the card face. (This ensured that no glue seeped out from under the frame.)
- I glued the sentiment in place as shown.
Final Thoughts:
I love a good cheeky image, and this one (both image and sentiment) from Art Impressions is awesome.
Supplies: (and links where possible)
I have listed which products I have used, and where they may be purchased. It’s a huge marketplace and in most instances, there are multiple sources and many alternatives to choose from.
Stencils:
Script, A Colorful Life Designs
Grunge Dots, A Colorful Life Designs
Waffle Flower Grip Mat, 8.5 x 6.5, Scrapbook.com
Versamark Embossing Ink: Simon Says Stamp
Clear Embossing Powder: Wow, R&R Scrapbooking
Stamps: Get Well, Art Impressions
Ink: Stampin’ Up!
Blending Brushes: Stampin’ Up!
Versafine Onyx, Simon Says Stamp
Memento Ink: Stampin’ Up!
Alcohol Markers:
Stampin’ Blends: Stampin’ Up!
Copics: Wallacks
Adhesive: Tombow Aqua, Michaels
Card Base & Card Face: Accent 100 lb., Amazon
Do you have comments or thoughts to share on this design? Drop me a line in the Comments Section below – I’d love to hear from you!
You can also use the Comments Section to be added to the list, and notified when I release new work.
-
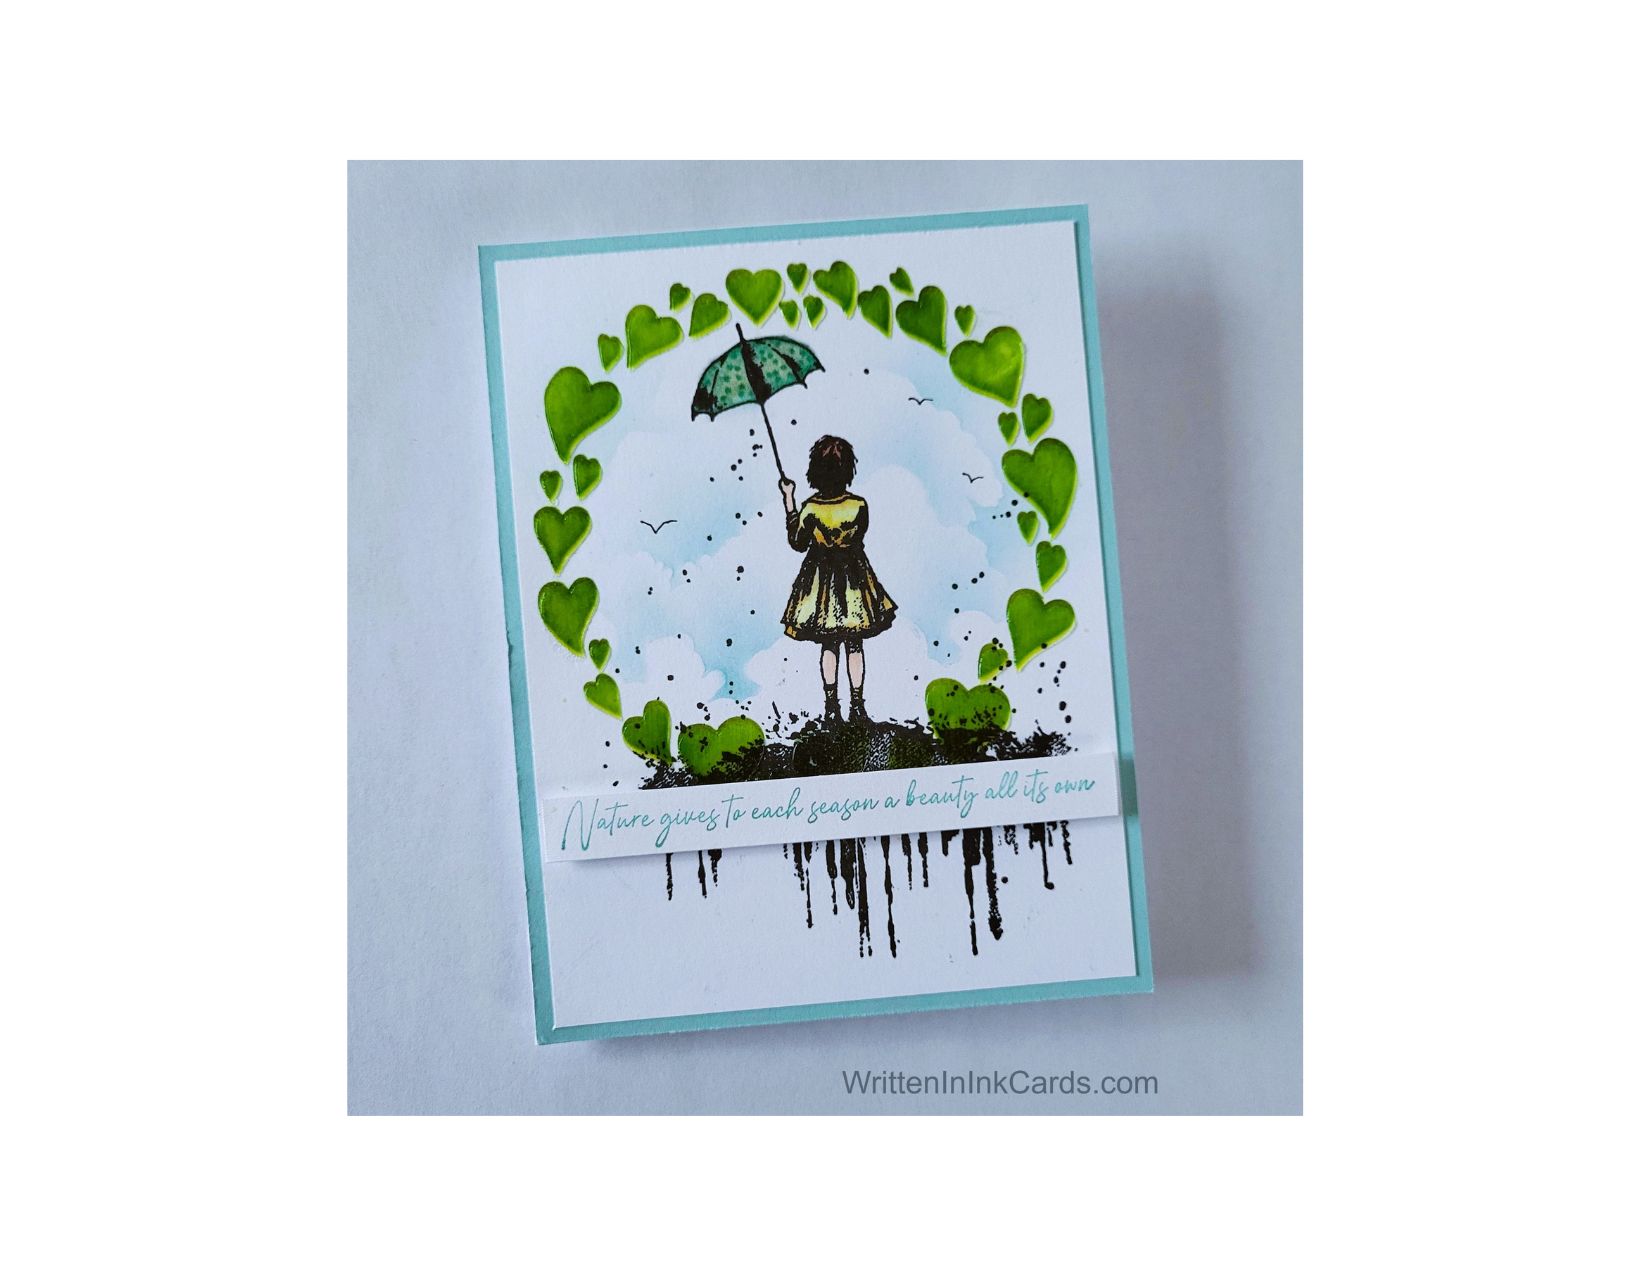
Elevate Your Card Making with Easy Stenciling Techniques

Would you like to experiment with a design like this? You’ll find a supply list below, including a link to the stencils I used from A Colorful Life Designs. Follow the link and use discount code ChrisFan10 to save 10% on your entire order! (Master Creator Bundles are excluded as they already have a 20% discount built in.)
A couple of simple stencilling techniques is a great way to make your card stand out.
Let’s get Started:
Card Base: 5.5 x 8.5, scored and folded at 4.25
Border Layer: 5.5 x 4.25
Card Face: 5.25 x 4
Card Face:
- I placed the card face onto my Grip Mat, and then positioned the stencil. I applied bright green ink to the exposed areas. As I had used a heavy hand, I had to put this aside until the ink was dry.
- With the ink completely dry, I put the stencil back in place but moved it slightly down and to the right. This stencilling technique created the illusion of a shadow for each of the hearts.
- I added translucent gel over the exposed areas, carefully removing the stencil once this was complete and putting it into water immediately. I set the card face aside to dry once again.
- Once the gel had dried, I put the card face into my stamp positioner and added the image in the center of the hearts with Versafine Onyx and sprinkled it with clear embossing powder. I set this with my heat gun.
- I coloured the image with alcohol markers.
- I used the cloud edger stencil and blue ink to create the sky, being careful to stay inside the hearts. This stencilling technique created a scene in a very specific part of the card, and is very effective.
- I added the birds using a black fineliner.
Other:
- I put a piece of scrap cardstock into the stamp positioner and stamped the sentiment two or three times with the same blue ink. (I had used a soft blue, and I needed to stamp several times to allow the sentiment to have enough presence.)
- I trimmed the sentiment down to a narrow strip and added dimensional tape on the back.
Assembly
- I glued the border layer to the card base and then centered the card face on top of these.
- I positioned the sentiment as shown.
Final Thoughts:
I quite like this offbeat combination of elements.
If I were to recreate this card, I would select a different colour for the umbrella: I don’t feel that it works well with the other colours in the scene. Do you ever regret a colour choice when it’s too late to do anything about it?
Supplies: (and links where possible)
I have listed which products I have used, and where they may be purchased. It’s a huge marketplace and in most instances, there are multiple sources and many alternatives to choose from.
Stencils:
Cloud Edger: A Colorful Life Designs
Happy Thoughts Wreath: A Colorful Life Designs
Waffle Flower Grip Mat, 8.5 x 6.5, Scrapbook.com
Stamps: I’ll be Your Umbrella, Andy Skinner, Amazon
Ink: Stampin’ Up!
Blending Brushes: Stampin’ Up!
Versafine Onyx, Simon Says Stamp
Clear Embossing Powder: Wow, R&R Scrapbooking
Black Fine Liners: Amazon
Alcohol Markers:
Stampin’ Blends: Stampin’ Up!
Copics: Wallacks
Adhesive: Tombow Aqua, Michaels
Card Base & Card Face: Accent 100 lb., Amazon
Do you have comments or thoughts to share on this design? Drop me a line in the Comments Section below – I’d love to hear from you!
You can also use the Comments Section to be added to the list, and notified when I release new work.
-
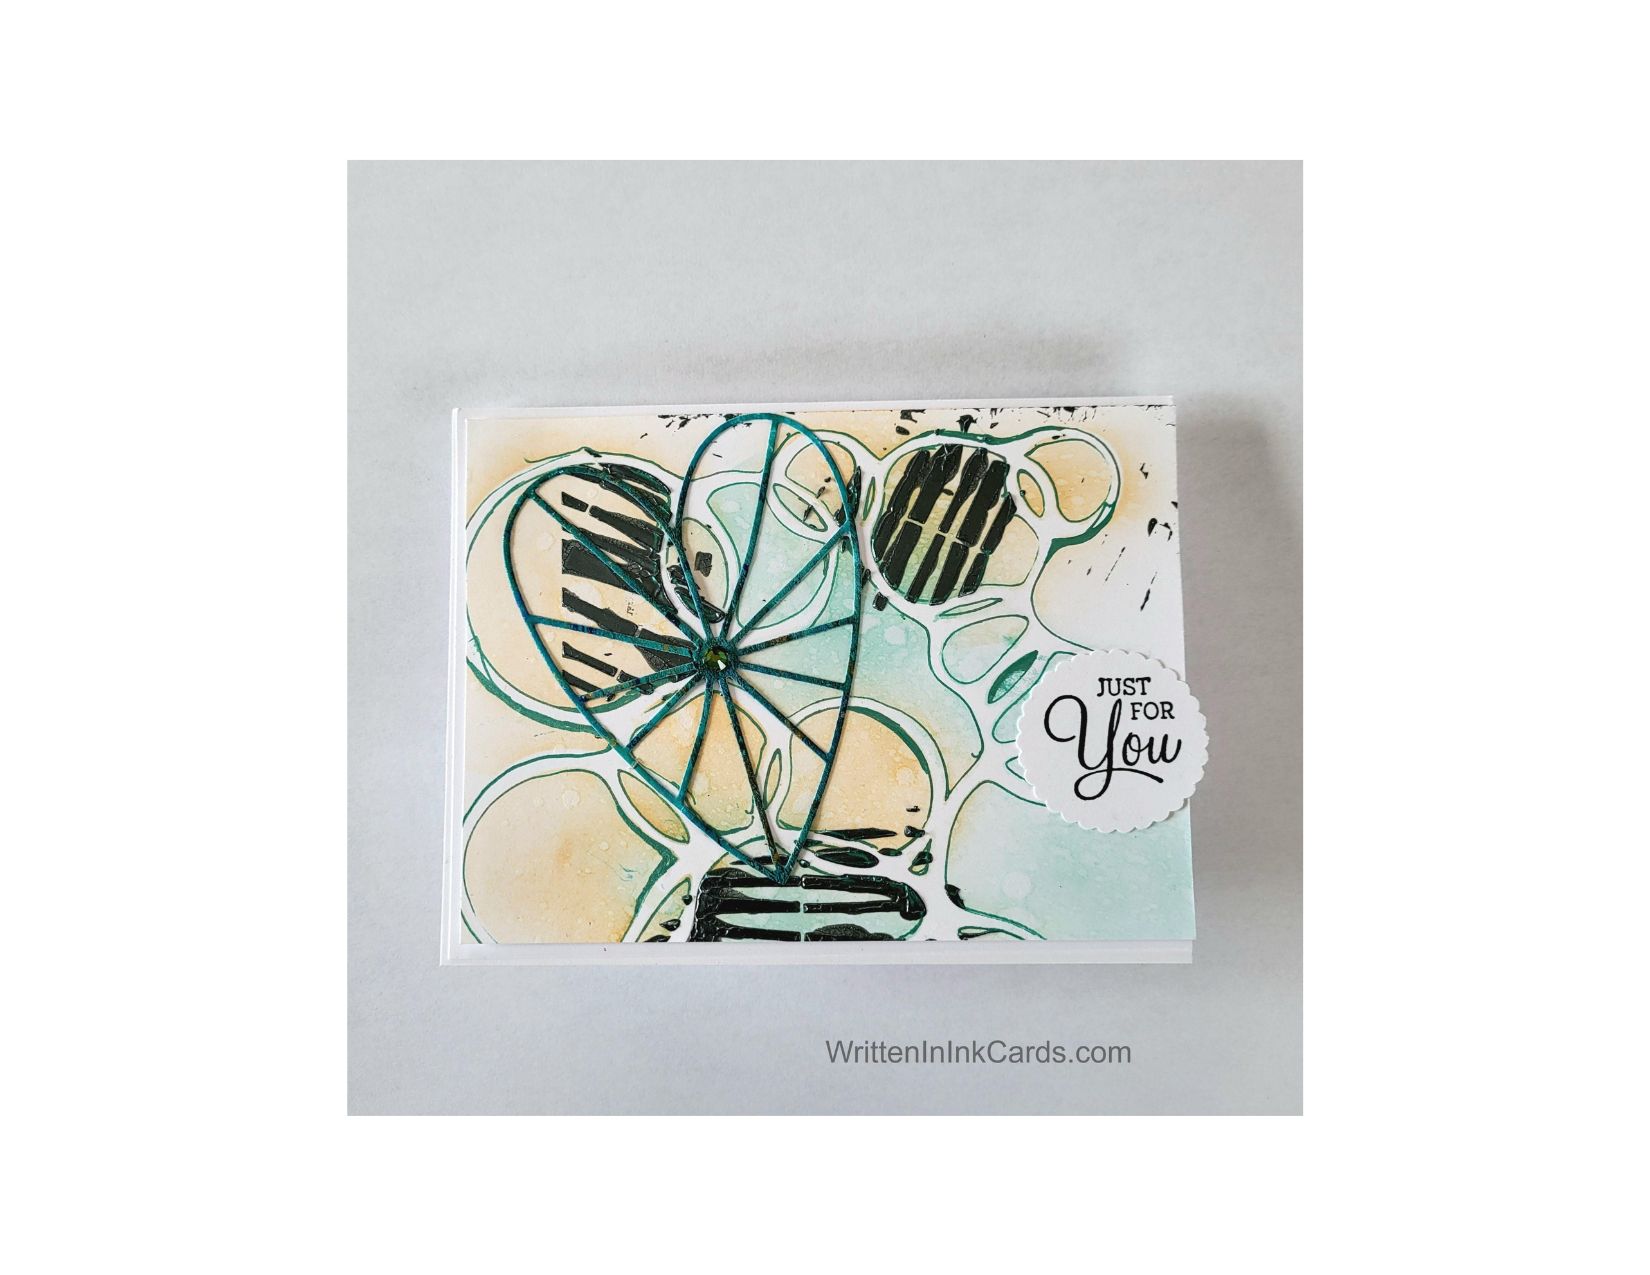
Get Messy! a Simple DIY Card Tutorial with Stencils

Would you like to experiment with a design like this? You’ll find a supply list below, including a link to the stencils I used from A Colorful Life Designs. Follow the link and use discount code ChrisFan10 to save 10% on your entire order! (Master Creator Bundles are excluded as they already have a 20% discount built in.)
Don’t be afraid to get messy during your design process! The results are usually unexpected, but awesome.
Let’s get Started:
Card Base: 5.5 x 8.5, scored and folded at 4.25
Card Face: 5.25 x 4
Card Face:
- First things first: I laid the card face on my Grip Mat, positioned the stencil and applied a random mixture of blue and yellow ink.
- I left the stencil in place and traced the outline with a teal gel pen.
- I added some spatter with water to create additional depth and visual interest.
- Time to get a little messy. I placed the Broken Lines stencil on top of the first one and added slate grey embossing paste selectively over exposed areas. I immediately removed both stencils (carefully!) and put them into water.
- I set the card face aside to dry.
Other:
- I looked through my binders for inspiration and found the heart and the sentiment.
Assembly
- I glued the card face to the card base, centering on all sides.
- I glued both the heart and sentiment in place as shown.
- I added a small coloured rhinestone in the center of the heart.
Final Thoughts:
This is a fun card, with a bit of grunge provided by the embossing paste.
This stencil is 6 x 9, so the card face was cut in half to yield this result.
Supplies: (and links where possible)
I have listed which products I have used, and where they may be purchased. It’s a huge marketplace and in most instances, there are multiple sources and many alternatives to choose from.
Stencils:
So Many Bubbles: A Colorful Life Designs
Broken Lines: A Colorful Life Designs
Waffle Flower Grip Mat, 8.5 x 6.5, Scrapbook.com
Versamark Embossing Ink: Simon Says Stamp
Clear Embossing Powder: Wow, R&R Scrapbooking
Metallic Gel Pens: Sakura, Amazon
Embossing Paste: Stormy, TCW, Glitter and Ink
Ink: Stampin’ Up!
Blending Brushes: Stampin’ Up!
Versafine Onyx, Simon Says Stamp
Adhesive: Tombow Aqua, Michaels
Card Base & Card Face: Accent 100 lb., Amazon
Do you have comments or thoughts to share on this design? Do you like to add a bit of grunge to a design, or are you more of a clean and simple designer? Drop me a line in the Comments Section below – I’d love to hear from you!
You can also use the Comments Section to be added to the list, and notified when I release new work.
-
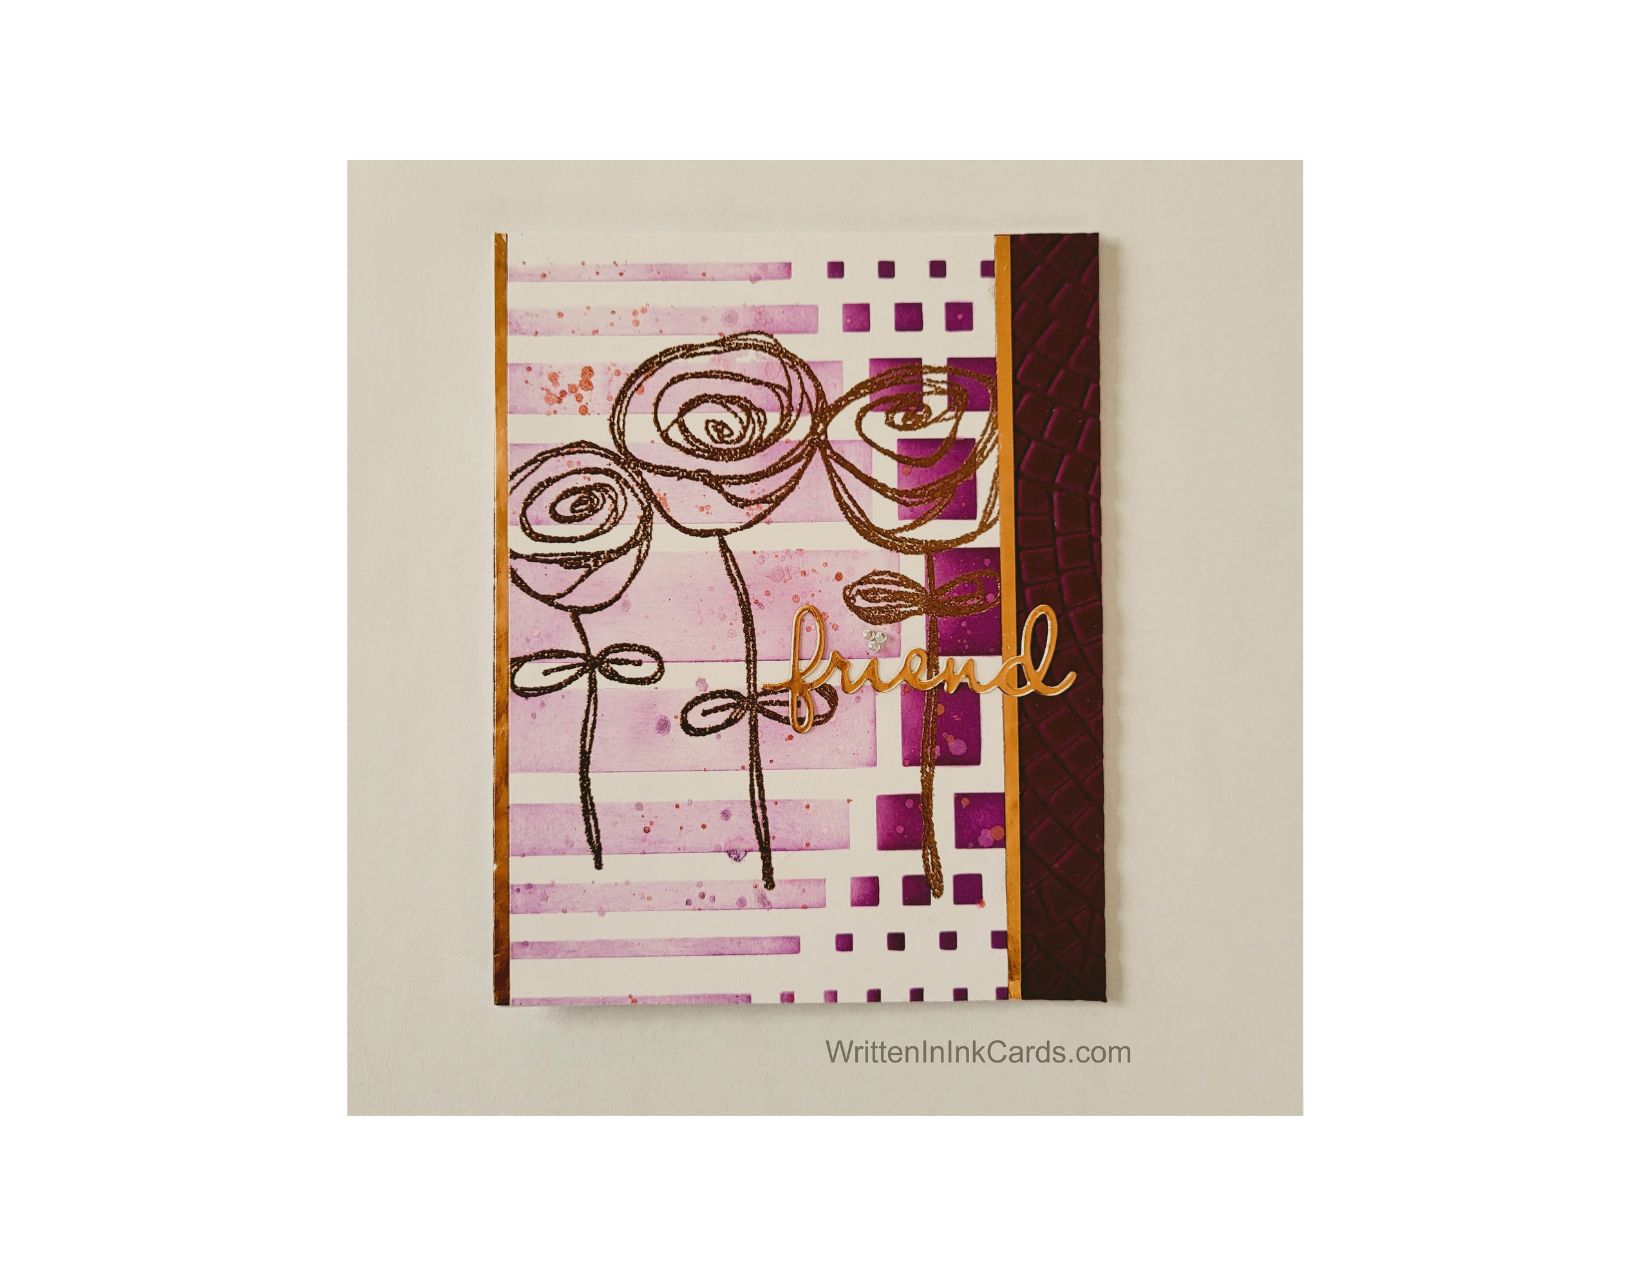
Unique Floral Card Tutorial for Crafters


The copper embossing powder is so pretty – have a look at the close up.
Would you like to experiment with a design like this? You’ll find a supply list below, including a link to the stencil I used from A Colorful Life Designs. Follow the link and use discount code ChrisFan10 to save 10% on your entire order! (Master Creator Bundles are excluded as they already have a 20% discount built in.)
Let’s get Started:
Card Base: 5.5 x 8.5, scored and folded at 4.25
Border Layer: 5.5 x 4.25
Card Face: 5.5 x 3.25
Copper Strips: 5.5 x ⅛” (x 2)
Card Face:
- I laid the card face down on my Grip Mat and positioned the stencil.
- I masked off the right side of the stencil and applied mauve ink to the left-hand side (the side with the longer rectangles).
- I moved the mask to protect the section just inked and applied a darker, more reddish purple to the exposed areas.
- I spattered the card face with pink and purple metallic watercolour paint.
- After allowing this to dry, I placed the card face into my stamp positioner and stamped the floral image with Versamark embossing ink.
- I removed the card face, sprinkled copper embossing powder over the ink, and set it with my heat gun.
Other:
- I put the border layer into an embossing folder and ran it through my Big Shot to create texture.
- I looked through my sentiment binder and discovered the “friend” ready and waiting: it had been created from metallic copper cardstock.
- I cut the two narrow strips of copper cardstock.
Assembly
- I glued the embossed border layer to the card base.
- I glued one of the narrow copper strips snugly along the left-hand border.
- I glued the card face beside this, butting up against the narrow strip.
- I glued the second strip of copper along the right edge of the card face.
- I added the “friend” to the card face, as shown.
Final Thoughts:
I love this colour combination, and I’m also really happy with the mixture of textures and tonalities in this card.
Supplies: (and links where possible)
I have listed which products I have used, and where they may be purchased. It’s a huge marketplace and in most instances, there are multiple sources and many alternatives to choose from.
Stencil: Ordered Lines, A Colorful Life Designs
Waffle Flower Grip Mat, 8.5 x 6.5, Scrapbook.com
Versamark Embossing Ink: Simon Says Stamp
Copper Embossing Powder: Wow, Scrap n’ Stamp
Stamps: Technique Junkies (no longer in business)
Ink: Stampin’ Up!
Blending Brushes: Stampin’ Up!
Metallic Watercolour: Amazon
Adhesive: Tombow Aqua, Michaels
Card Base & Card Face: Accent 100 lb., Amazon
Do you have comments or thoughts to share on this design? Drop me a line in the Comments Section below – I’d love to hear from you!
You can also use the Comments Section to be added to the list, and notified when I release new work.
-
FUN, FABULOUS & PERFECT FOR THAT SOMEONE SPECIAL

Would you like to experiment with a design like this? You’ll find a supply list below, including a link to the stencils I used from A Colorful Life Designs. Follow the link and use discount code ChrisFan10 to save 10% on your entire order! (Master Creator Bundles are excluded as they already have a 20% discount built in.)
Let’s get Started:
Card Base: 4.25 x 11, scored and folded at 5.5
Border Layer: 4.25 x 5.5
Card Face: 4 ⅛ x 5 ⅜
The visible cardstock in this design is Naturals by Stampin’ Up!. It is no longer available, but I have a supply and use it occasionally.
Card Face:
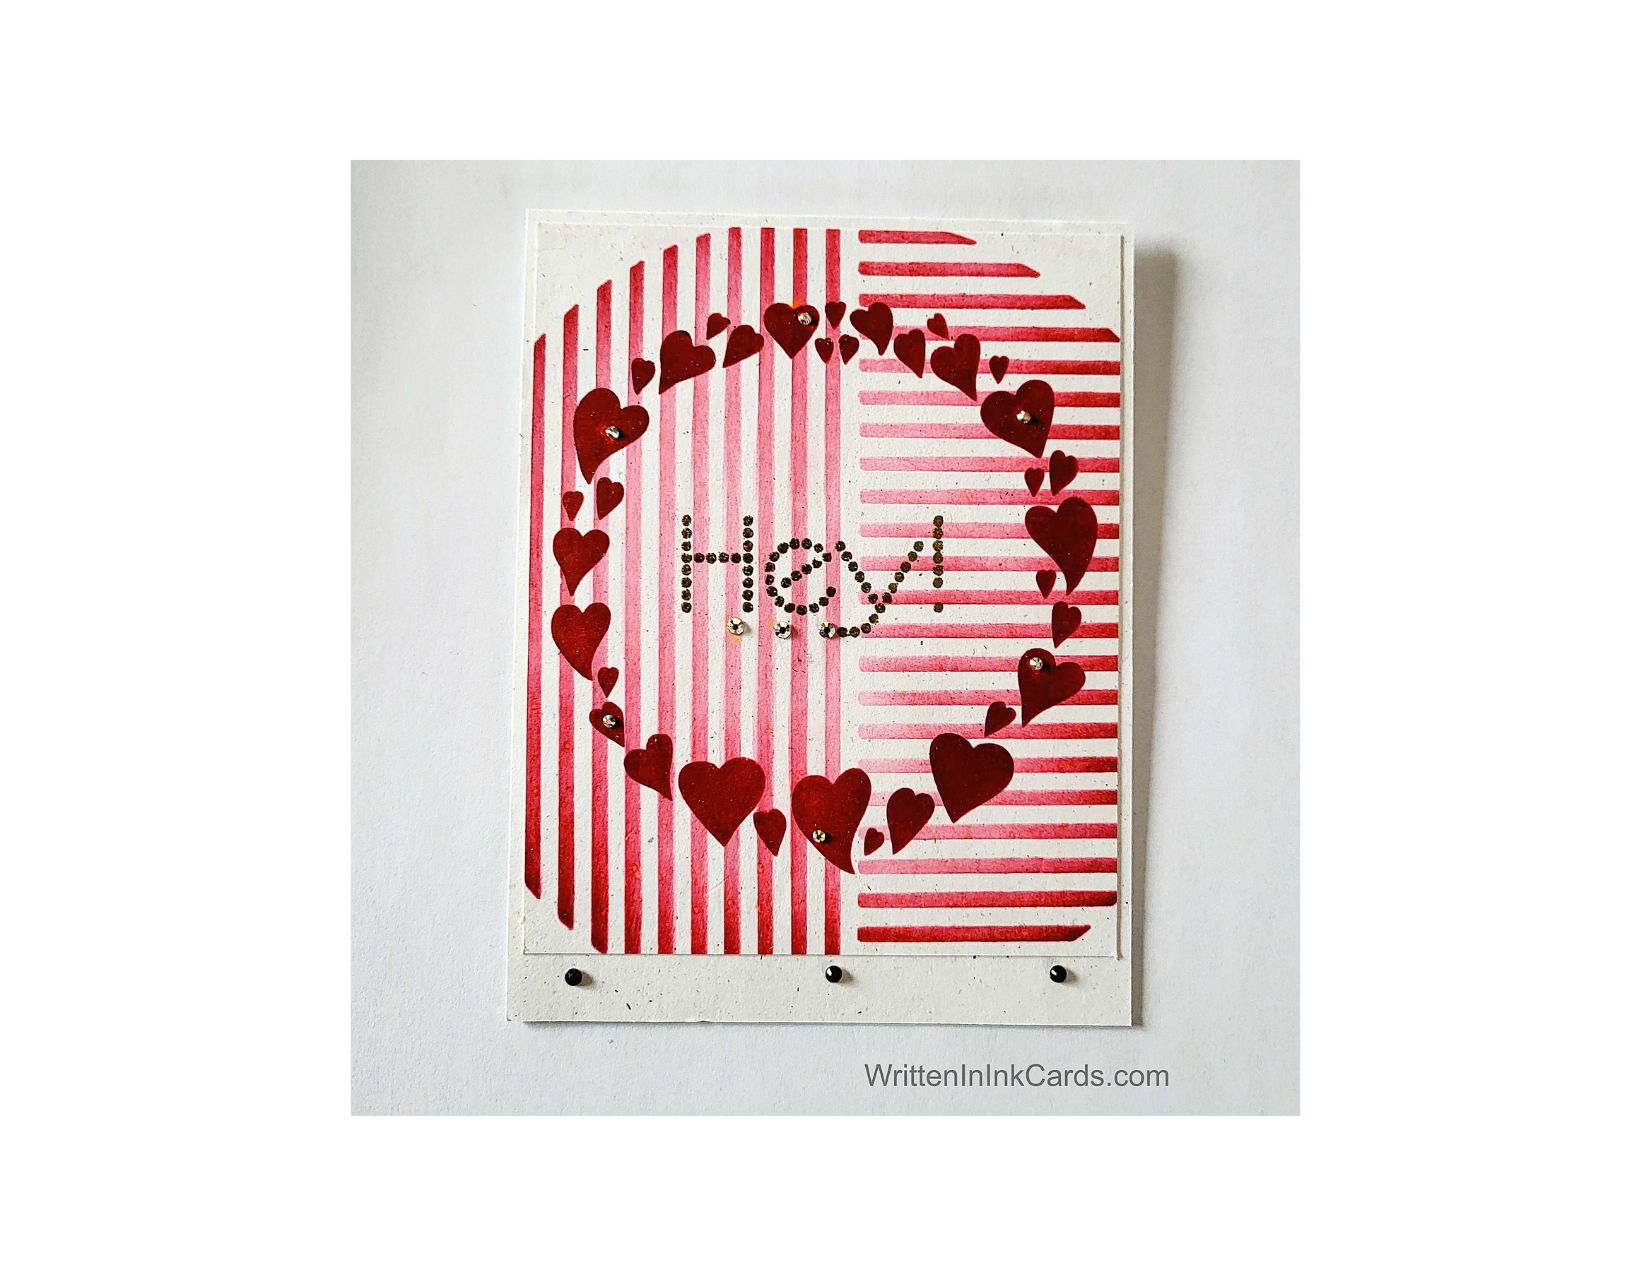
- I laid the cardstock on my Grip Mat and then positioned the Intersection stencil. Next, I applied red ink over the exposed areas, using more pressure towards the outside of the design and allowing the ink to fade slightly towards the center. I removed this stencil and set it aside.
- After positioning the heart stencil, I applied red ink again, going over the exposed areas repeatedly until I had intense colour.
- I allowed the ink to dry completely and then put the third stencil in place, centering the word carefully inside the hearts.
- I pressed my Versamark embossing pad through the openings in the stencil, repeating this several times to ensure ink transfer.
- Removing the stencil, I sprinkled gold embossing powder over the ink and set it with my heat gun.
Assembly
- I glued the border layer to the card base.
- I added the card face to these, ensuring an equal distance on the top and both sides: this left a much larger space on the bottom.
- I added small gold pearls onto some of the larger hearts, deliberately placing them off-center on all but one heart.
- Finally, I added three small gold pearls under the word in the center, as well as 3 along the bottom border, evenly spaced.
Final Thoughts:
This card began as another one of those backgrounds which I had created and then set aside. I decided to use it with the Heart Circle stencil and I like the very graphic look that was created. The circular shape created by the lines echoes that created by the hearts, and yet the hearts and lines provide nice contrast.
Supplies: (and links where possible)
I have listed which products I have used, and where they may be purchased. It’s a huge marketplace and in most instances, there are multiple sources and many alternatives to choose from.
Stencils:
Intersection: A Colorful Life Designs
Happy Thoughts Wreath: A Colorful Life Designs
Waffle Flower Grip Mat, 8.5 x 6.5, Scrapbook.com
Versamark Embossing Ink: Simon Says Stamp:
Ink: Stampin’ Up!
Blending Brushes: Stampin’ Up!
Versafine Onyx, Simon Says Stamp
Adhesive: Tombow Aqua, Michaels
Card Base & Card Face: Accent 100 lb., Amazon
Do you have comments or thoughts to share on this design? Drop me a line in the Comments Section below – I’d love to hear from you!
You can also use the Comments Section to be added to the list, and notified when I release new work.