Category: Fun

  • How to Rescue Your Card Designs from Mistakes

    How to Rescue Your Card Designs from Mistakes

    If you’re new, or experienced, or anything like me (!) you have run into situations where you need to rescue your card from a blunder.

    Let’s get Started:

    Card Base: 5.5 x 8.5, scored and folded at 4.25

    Border Layer: 5.5 x 4.25

    Card Face:  5.5 x 4

    Card Face:

    I stamped the images in black Momento ink and coloured them with alcohol markers.

      Then I put this aside for a period of time,  trying to decide how to finish the piece. When I picked it back up again I realized it had been sitting too close to something messy –  there was a fine blue spatter in the upper right.  (Probably from cleaning a stencil, and simple carelessness with my work!). How to salvage the time and materials…. ???

    I added both large and small drops of paint above the brush.  I used a fine liner to outline the drops and a blue alcohol marker to fill them in.  I also added small dots of blue marker here and there to bridge between the fine spatter and the larger drops.   It worked –  I had successfully camouflaged my error!

    I carried this one step further by creating puddles of paint under the brush. (There were puddles around the paint pot,  but not under this paintbrush).

    I used a white gel pen to add accents here and there in the scene.

    I put the card face into my stamp positioner and added the sentiment.

    I cut the card face into three panels,  1 ⅓” each.

    Assembly

    I glued the border layer to the card base.

    I glued the three pieces of the card face onto this, spacing evenly.

    Final Thoughts:

    I love Anita Jeram’s work,  and was so happy with the images as placed and coloured. (I don’t pretend to be an expert with any form of colouring, so when I get something that I’m satisfied with, I’m happy!).   

    Then I was dismayed to notice the spatter,  and finally, happy again when the problem was resolved.

    Happy – dismayed – happy.  Sounds like a movie theme!  

    I’m so happy that I decided to rescue this card.😆

    Supplies: (and links where possible)

       I have listed which products I have used, and where they may be purchased. It’s a huge marketplace; in most instances, there are multiple sources and many alternatives.

    Stamps: Paint the Town, Colorado Craft Co., 

    Versafine Onyx, Simon Says Stamp

    Memento Ink: Stampin’ Up!

    Alcohol Markers:

         Stampin’ Blends: Stampin’ Up!

         Copics:  Wallacks

    Fineliners: Amazon

    White Gel Pen: Arteza,  Amazon

    Adhesive: Tombow Aqua, Michaels

    Card Base & Card Face: Accent 100 lb., Amazon

  • Say I love you with a whimsical handmade Easter card

    Say I love you with a whimsical handmade Easter card

    Would you like to experiment with a design like this? You’ll find a supply list below, including a link to the stencils I used from A Colorful Life Designs.  Follow the link and use discount code ChrisFan10 to save 10% on your entire order! (Master Creator Bundles are excluded as they already have a 20% discount built in.)

    Easter means bunnies, chocolate, and celebrating traditions created over the years. Sending a card is a wonderful way to send a hug to someone you can’t be with.

    Let’s get Started:

    Card Base: 5.5 x 8.5, scored and folded at 4.25

    Border Layer:  5 x 4

    Card Face:  5 x 4 

    Card Face:

    • After laying the card face on my Grip Mat, I positioned the Easter egg stencil.
    • I applied blue ink to the bottom and pink ink to the top, going back and forth between the two colours until I got a smooth blend where they met.
    • After removing that stencil, I positioned the bunny stencil so that the bunny on the right was in the correct position.
    • I masked off all necessary areas around the bunny and applied gray ink across the exposed surface.
    • I repositioned the stencil to place the bunny on the left in the right spot, and again added gray ink after masking off all necessary areas.
    • I used a punch on all four corners of the card face to create the peek-through design.

    Other:

    • Using a scrap piece of cardstock, I stamped the Happy Easter sentiment with Versamark embossing ink.
    • I sprinkled this with silver embossing powder and set it with my heat gun.
    • I ran this through my Big Shot and cut it down with a small banner die.
    • I applied gray ink to the corners of the border layer.   (This ensured a match to the bunnies on the card face,  and was more economical than using a piece of cardstock.)

    Assembly

    • I put dimensional foam on the back of the border layer, and then glued the card face on top of this, allowing the gray ink to show through the punched-out design.
    • I centered this on the card base.
    • I glued the banner on top of the Easter egg, in between the bunnies’ hands.
    • I added tiny rhinestones to the center of the flowers on the Easter egg.

    Final Thoughts:

    I love these two stencils together:  I’ve been eyeing  the Bunny Dance stencil for a while now, and I’m so happy that I got it.

    Supplies: (and links where possible)

       I have listed which products I have used, and where they may be purchased. It’s a huge marketplace and in most instances, there are multiple sources and many alternatives to choose from.

    Stencils:

        Cute Easter Egg:  A Colorful Life Designs

        Bunny Dance, A Colorful Life Designs

    Waffle Flower Grip Mat: Scrapbook.com

    Versamark Embossing Ink: Simon Says Stamp

    Silver Embossing Powder: Hero Arts, Simon Says Stamp

    Ink: Stampin’ Up!

    Blending Brushes: Stampin’ Up! 

    Adhesive: Tombow Aqua: Michaels

    Card Base & Card Face: Accent 100 lb., Amazon

    Do you have comments or thoughts to share on this design?  Drop me a line in the Comments Section below –  I’d love to hear from you!

    You can also use the Comments Section  to be added to the Notification list, and be contacted when I release new work.

  • Master Card Making with Simple Innovative Stenciling Techniques

    Master Card Making with Simple Innovative Stenciling Techniques

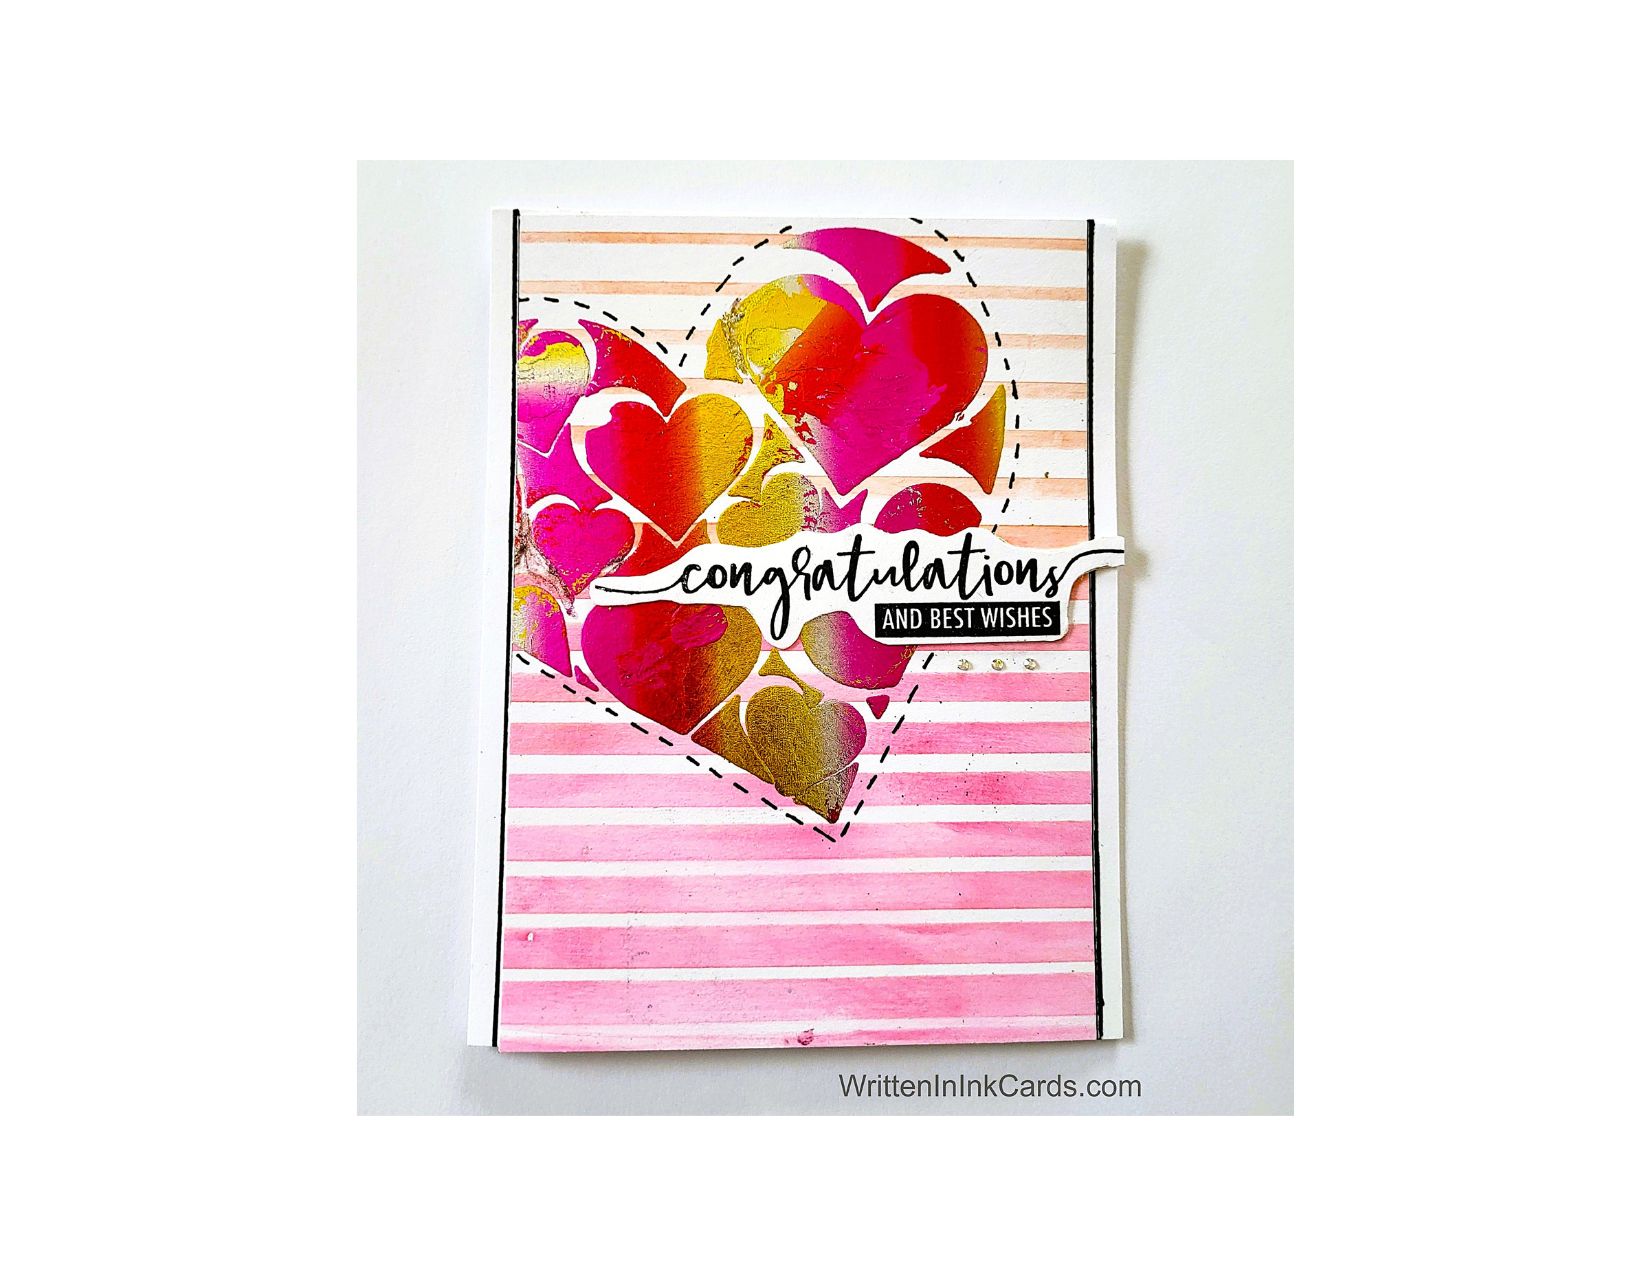
    Would you like to experiment with a design like this? Below, you’ll find a supply list, including a link to the stencils I used from A Colorful Life Designs. Follow the link and use the discount code ChrisFan10 to save 10% on your entire order! (Master Creator Bundles are excluded as they already have a 20% discount built in.)

    Mixing media and techniques can create stunning results – read more below for a how-to.

    Let’s get Started:

    Card Base: 4.25 x 11, scored and folded at 5.5

    Card Face:  4 x 5.25

    Card Face:

    • I placed my card face on the Grip Mat.
    • I sprayed the back of the Graduated Lines stencil with Pixie spray and waited for about 30 seconds before positioning it on the card face.   (The longer, unattached lines of this stencil may shift if not secured.)
    • I applied intense pink ink across the bottom of the stencil and then shifted to a softer orange colour before setting this stencil aside.
    • I took the Heart of Hearts stencil and scrap copy paper. I traced around the outer edges of the heart where I could. Once I removed the stencil, I joined the gaps to create a complete heart. I then carefully cut it out with an Xacto knife, leaving the borders intact.
    • I removed the card face from the Grip Mat and placed it on scrap paper. I positioned the stencil on the card face, securing it with mint tape.  
    • I laid the scrap paper over the stencil,  lining up the cut out opening carefully:  the remainder of the scrap paper became a mask.
    • I applied Duo Gel to all open areas on the stencil.
    • After carefully removing the stencil and putting it in water,  I set the card face aside to dry.
    • Once dry I laid a piece of transfer foil (previously cut to size)  over the now-sticky gel,  and ran the card face through the Big Shot.
    • When I removed the foil,  the Duo Gel held onto the foil, causing the stencilled pattern to remain.
    • I added dashes around the outside of the heart,  about ⅛” away from the foiling.

    Other:

    • I stamped the sentiment with  Versafine Onyx ink, immediately sprinkled on clear embossing powder and set it with my heat gun.

    Versafine Onyx is a pigment ink,  which stays wet long enough to allow heat embossing.

    • I fussy cut the around sentiment and put dimensional foam on the back.

    Assembly

    • I glued the card face to the card base, centering vertically.
    • I added the sentiment to the card face.
    • I added small dashes under the sentiment, echoing those around the heart.
    • I used a black marker and a ruler to create the look of a fine black border beside the card face.

    Final Thoughts:

    I really like the combination of the two stencils –  they work so well together.  I had initially tried to heat emboss the sentiment to create a flat card,  but it was too muted on top of the foil.  I solved it by heat embossing the sentiment on white and fussy cutting around it,  then lining it up directly over the dud sentiment.

    Supplies: (and links where possible)

       I have listed which products I have used, and where they may be purchased. It’s a huge marketplace; in most instances, there are multiple sources and many alternatives.

    Stencils:

    Graduated Lines,  A Colorful Life Designs

    Heart of Hearts,  A Colorful Life Designs

    Waffle Flower Grip Mat, 8.5 x 6.5, Scrapbook.com

    Versamark Embossing Ink: Simon Says Stamp

    Stamps: Loads of Wishes, Avery Elle, Amazon

    Fine Liners:  Amazon

    Ink: Stampin’ Up!

    Blending Brushes: Stampin’ Up! 

    Versafine Onyx, Simon Says Stamp

    Clear Embossing Powder: Wow, Simon Says Stamp

    Duo Gel: Therm O Web, Simon Says Stamp

    Transfer Foil: Summer Rainbow, Therm O Web, Amazon

    Adhesive: Tombow Aqua, Michaels

    Card Base & Card Face: Accent 100 lb., Amazon
    Do you have comments or thoughts to share on this design?  Drop me a line in the Contact section in the header –  I’d love to hear from you!

       Before you go –  use the Notifications box     (below)  to be notified when I release new work.