Tag: stencils

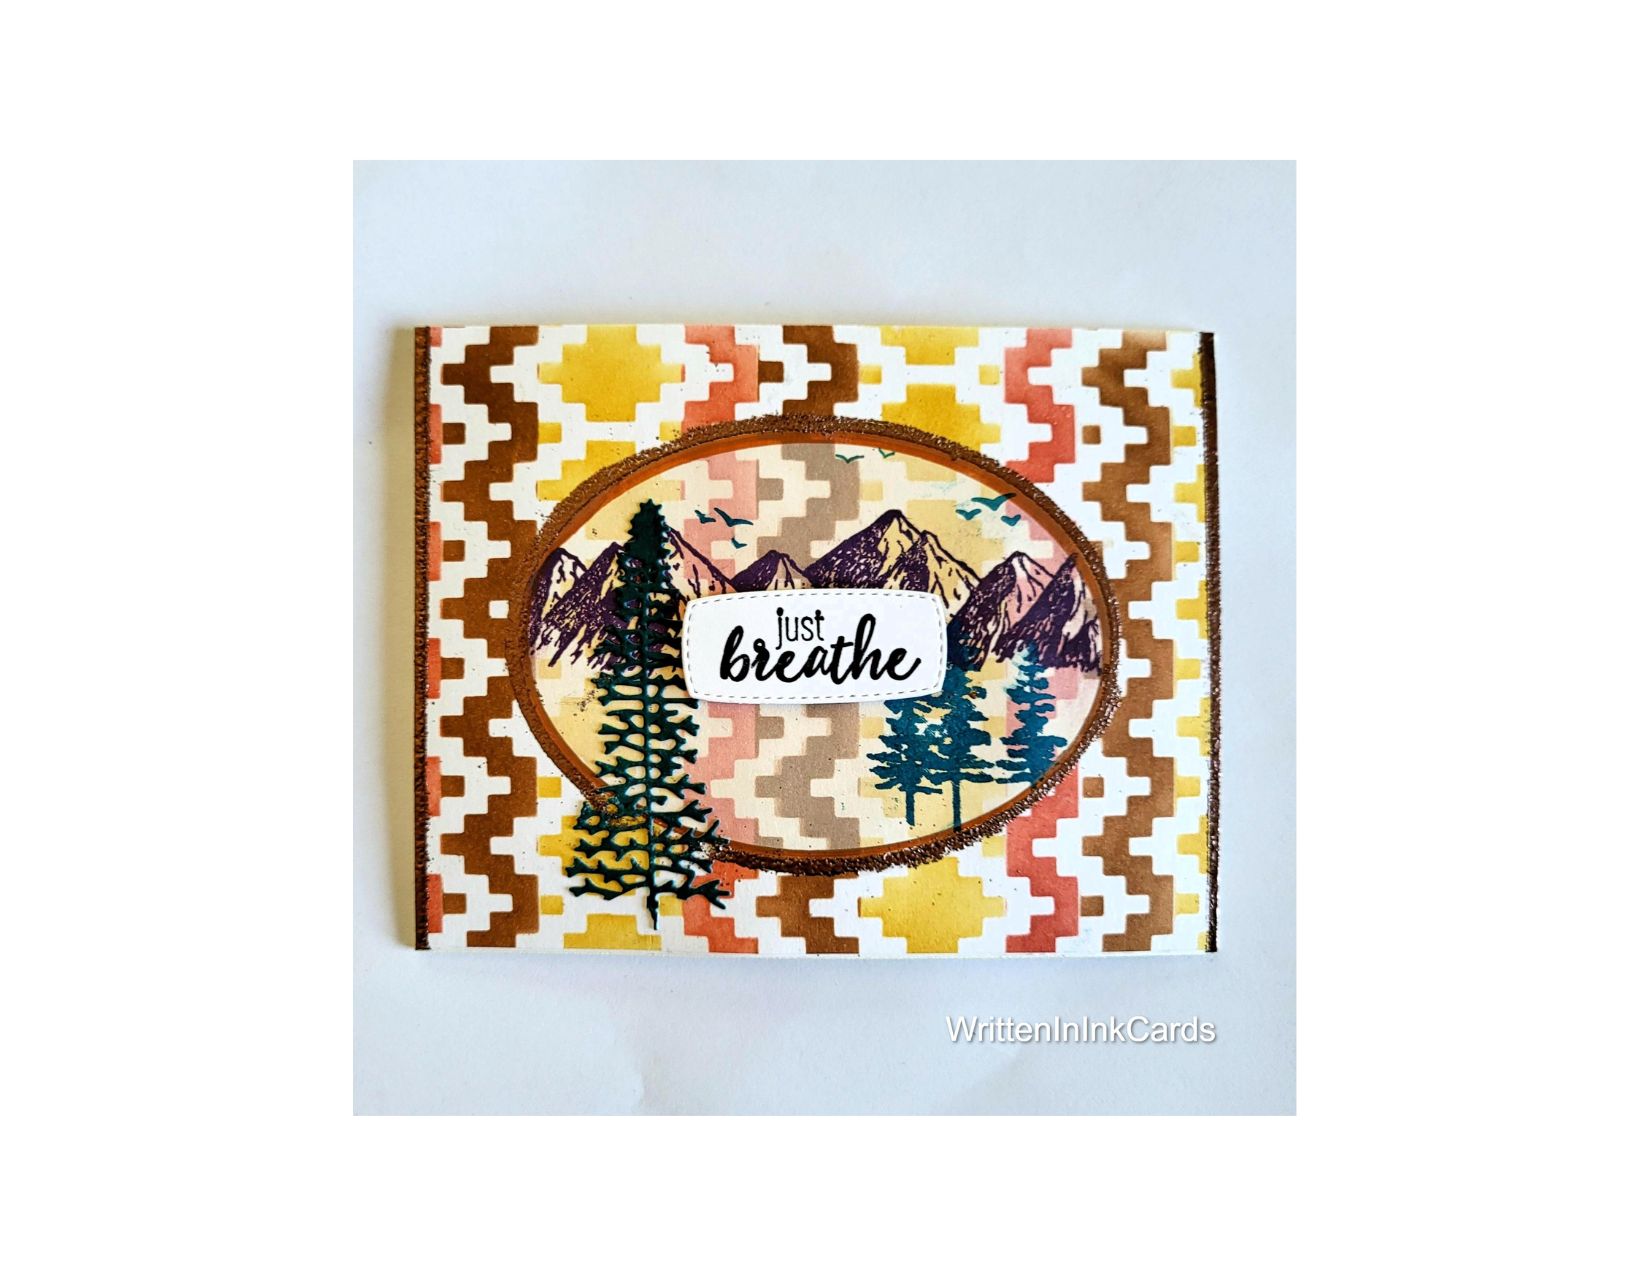
  • Unique Card Design: Get out there and Just Breathe

    Unique Card Design: Get out there and Just Breathe

    Would you like to experiment with a design like this? You’ll find a supply list below, including a link to the stencils I used from A Colorful Life Designs.  Follow the link and use discount code ChrisFan10 to save 10% on your entire order! (Master Creator Bundles are excluded as they already have a 20% discount built in.)

    Let’s get Started:

    Card Base: 5.5 x 8.5, scored and folded at 4.25

    Card Face: 5.5 x 4.25

    Card Face:

    • I laid the card face onto my grip mat and positioned the Aztec Pattern stencil.
    • Masking between rows,  I used yellow, rust and brown inks in a repeating pattern.
    • After removing the first stencil,  I centered the second largest oval stencil on the card face and applied white pigment ink liberally.   I repeated this step 4 or 5 times, allowing time for the ink to dry between layers .  This muted the Aztec pattern in the center of the card face.
    • I put the card face info my stamp positioner and once again put the oval stencil in place and stamped the mountains, birds and trees. (Having the stencil in place allowed me to only stamp onto the muted section of ink as the rest was covered.)
    • Returning the card face to my work surface, I put the corresponding oval mask into the opening, and then removed the stencil..  I traced around the oval with a brown marker.
    • I used an embossing pen to create an oval just outside of the brown one,  sprinkled it with copper embossing powder and set it with my heat gun.
    • Using a ruler and the same embossing pen,  I drew a line on both sides of the card face, sprinkled on copper embossing powder and set it with my heat gun.

    Other:

    • I die cut a tree from green cardstock.
    • I looked through my sentiment binder, and found the perfect sentiment for this card.

    Assembly

    • I glued the card face to the card base.
    • I added the die cut tree, allowing it to extend outside of the oval.
    • I put foam tape on the back of the sentiment, and put it in place.

    Final Thoughts:

    This card was far more time consuming than I anticipated,  due to the number of layers of white ink required, and the necessary dry time between layers.  In fact at one point I put it aside for months before finally picking it up again.   Luckily,  I’m happy with the result!

    Supplies: (and links where possible)

       I have listed which products I have used, and where they may be purchased. It’s a huge marketplace and in most instances, there are multiple sources and many alternatives to choose from.

    Stencils:

    Marvellous Masks, Ovals,  A Colorful Life Designs

    Aztec Pattern, A Colorful Life Designs

    Waffle Flower Grip Mat, 8.5 x 6.5, Scrapbook.com

    Versamark Embossing Ink: Simon Says Stamp

    Embossing Pen: Ranger, Amazon

    Copper Embossing Powder,  Wow,  R&R Scrapbooking

    Stamps: Mountain Air, Stampin’ Up! (retired)

    Dies: Mountain Air, Stampin’ Up! (retired)

    Ink: Stampin’ Up!

    Blending Brushes: Stampin’ Up! 

    Adhesive: Tombow Aqua, Michaels

    Card Base & Card Face: Accent 100 lb., Amazon

    Do you have comments or thoughts to share on this design?  Drop me a line in the Comments Section below –  I’d love to hear from you!

    You can also use the Comments Section  to be notified when I release new work

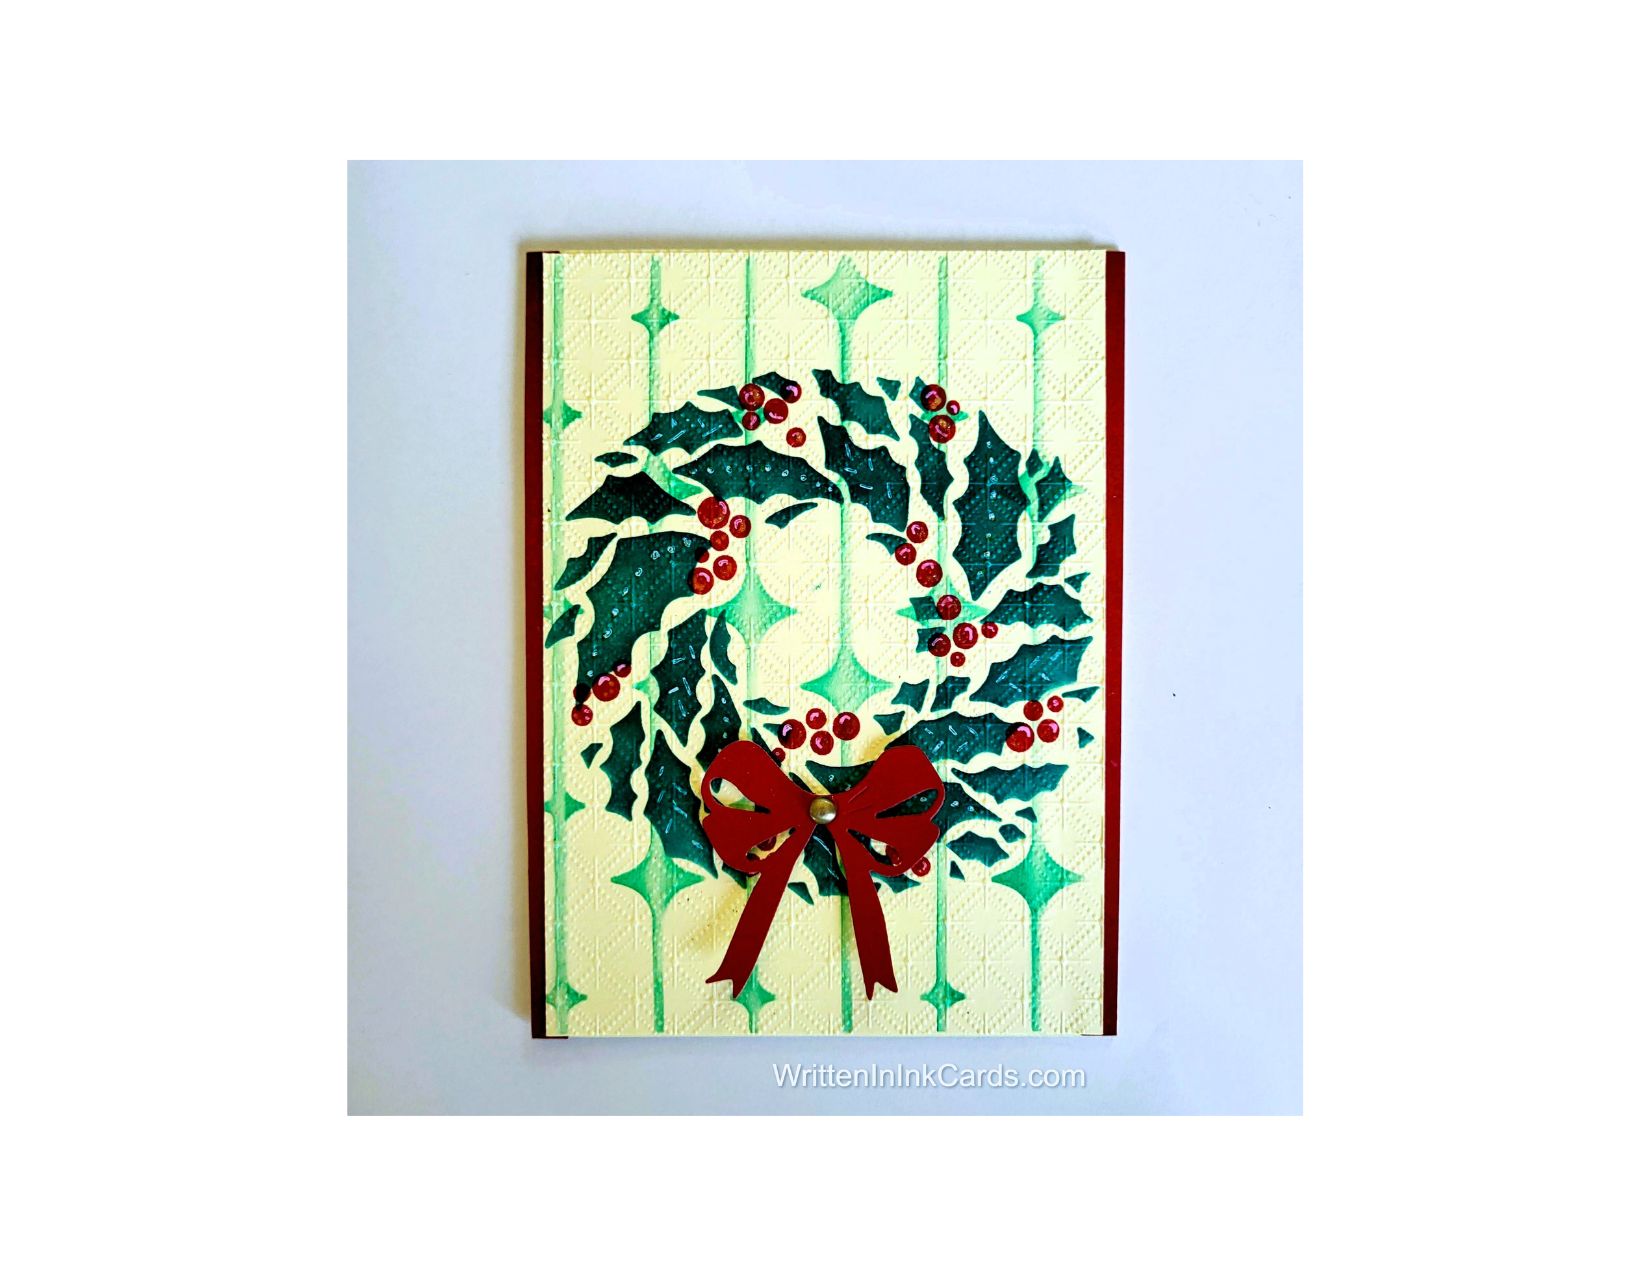
  • A retro Christmas card is easy to create with these supplies

    A retro Christmas card is easy to create with these supplies

    Would you like to experiment with a design like this? You’ll find a supply list below, including a link to the stencils I used from A Colorful Life Designs.  Follow the link and use discount code ChrisFan10 to save 10% on your entire order! (Master Creator Bundles are excluded as they already have a 20% discount built in.)

    Let’s get Started:

    Card Base: 5.5 x 8.5, scored and folded at 4.25

    Border Layer: 5.5 x 4.25

    Card Face: 5.5 x 4

    Card Face:

    • I laid the card face on the Grip Mat and positioned the Atomic Strands stencil.  I used light green ink across the entire surface.
    • After removing this stencil,  I positioned the wreath on the card face: I applied dark green ink across all exposed areas
    • I repositioned the stencil to place the berries where they belonged on the wreath and applied red ink across all exposed areas.
    • Using a white gel pen, I added accents to both the leaves and the berries.
    • I put the card face into an embossing folder and ran it through the Big Shot, creating depth and visual interest.

    Other:

    • I used a scrap piece of red cardstock to create the bow, securing a die to the paper and running it through the Big Shot.

    Assembly

    • I glued the red border layer to the card base,  and centered the card face on top of these.
    • I glued the bow in place, and then added a small metallic gem to the center as a finishing touch.

    Final Thoughts:

    I love the retro feel of the Mid Century Atomic Strands stencil,  and I think it creates a wonderful vintage feel for this card.

    Supplies: (and links where possible)

       I have listed which products I have used, and where they may be purchased. It’s a huge marketplace and in most instances, there are multiple sources and many alternatives to choose from.

    Stencils:

         Mid Century Atomic Strands, A Colorful Life Designs

         Layered Holly Berry Wreath, A Colorful Life Designs

    Waffle Flower Grip Mat, 8.5 x 6.5, Scrapbook.com

    Dies:  Bow Toppers, Scrapbook.com

    Ink: Stampin’ Up!

    White Gel Pens, Arteza,  Amazon

    Blending Brushes: Stampin’ Up! 

    Adhesive: Tombow Aqua, Michaels

    Cream Card Base & Card Face: Recollections 100 lb.,Michaels

    Do you have comments or thoughts to share on this design?  Drop me a line in the Comments Section below –  I’d love to hear from you!

    You can also use the Comments Section  to be notified when I release new work

    Mid Century Atomic Strands from A Colorful Life Designs

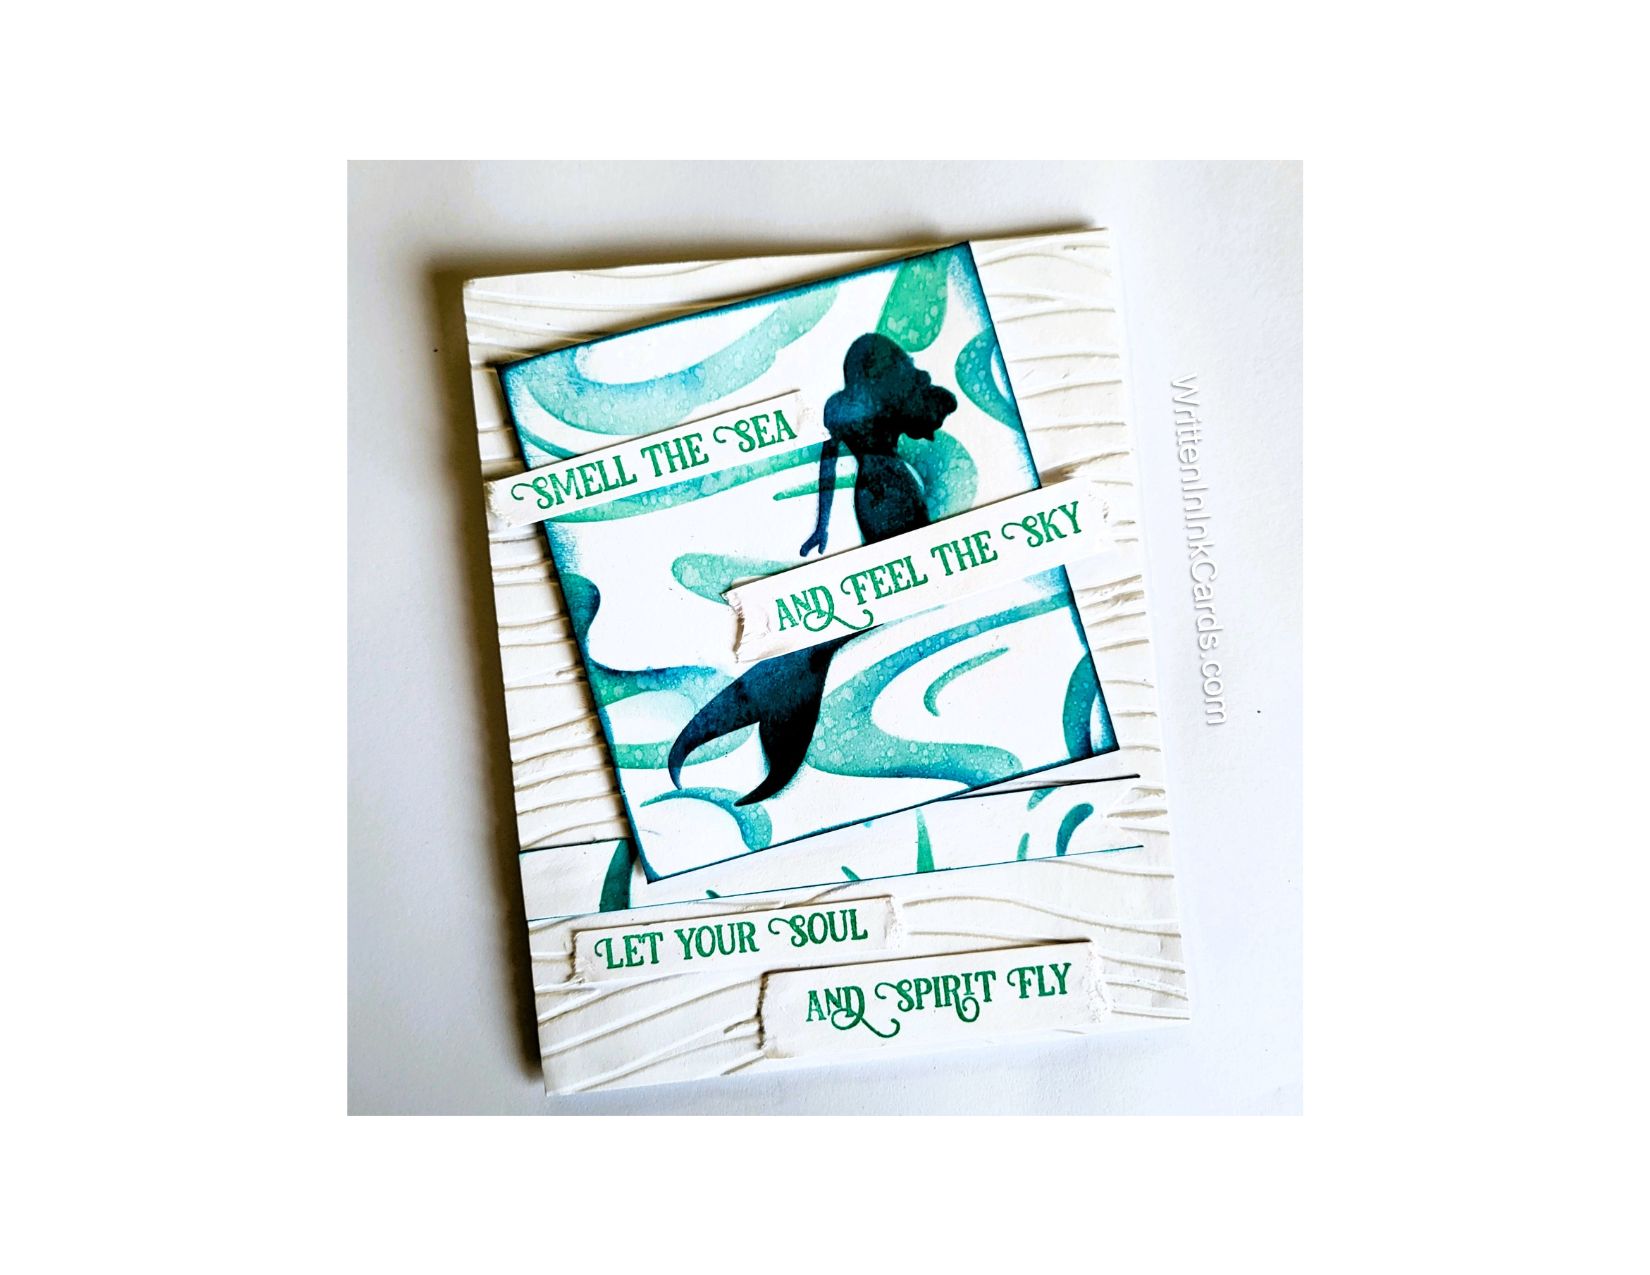
  • Let the Sea set you FREE

    Let the Sea set you FREE

    Would you like to experiment with a design like this? You’ll find a supply list below, including a link to the stencils I used from A Colorful Life Designs.  Follow the link and use discount code ChrisFan10 to save 10% on your entire order! (Master Creator Bundles are excluded as they already have a 20% discount built in.)

    Let’s get Started:

    Card Base: 5.5 x 8.5, scored and folded at 4.25

    Border Layer: 5.5 x 4.25

    Card Face: 5.5 x 4.25

    Card Face:

    • I put the card face onto the grip mat and positioned the Eddies stencil. I applied a mixture of light and dark teal inks across the exposed areas, varying pressure and colours randomly.
    • Leaving the stencil in place,  I spattered water across the exposed areas on the card face, blotting after several seconds to limit the effect.
    • I removed the first stencil and replaced it with the mermaid stencil. I applied dark teal ink with a heavy hand across the exposed surface.
    • I cut the card face down to 3.5 x 2.75,  and then ran the edges over the dark teal ink pad.  I allowed the ink to creep into the card face just slightly.

    Other:

    • I stamped the sentiment with the medium teal ink.
    •   This is a single stamp , with four lines: I cut the lines apart and tore both the right and left-hand edges on each piece.
    • I put dimensional foam on the back of each of the sentiment strips.
    • I salvaged a piece of the cut-off card front and trimmed it down to a  4 x .75” strip.  I cut the right hand end into a banner and then ran all the edges over the dark teal ink pad.
    • I placed the border layer into an embossing folder and ran it through the Big Shot.

    Assembly

    • I glued the embossed border to the card base.
    • I glued the narrow strip to this, aligned to the left hand side about ¾ of the way down the paper.
    • I added dimensional foam to the back of the card face, and then secured it on an angle, as shown.
    • I positioned the four sentiment strips as shown in the picture.

    Final Thoughts:

    I love the play of colours on this card, as well as the texture created by the spatter.

    Supplies: (and links where possible)

       I have listed which products I have used, and where they may be purchased. It’s a huge marketplace and in most instances, there are multiple sources and many alternatives to choose from.

    Stencils:

         Eddies: A Colorful Life Designs

         Set You Free,   A Colorful Life Designs

    Waffle Flower Grip Mat, 8.5 x 6.5, Scrapbook.com

    Stamps:  Sentiment:  Technique Junkies (no longer in business)

    Ink: Stampin’ Up!

    Blending Brushes: Stampin’ Up! 

    Adhesive: Tombow Aqua, Michaels

    Card Base & Card Face: Accent 100 lb., Amazon

    Do you have comments or thoughts to share on this design?  Drop me a line in the Comments Section below –  I’d love to hear from you!

    You can also use the Comments Section  to be notified when I release new work.

    Eddies, by A Colorful Life Designs

  • DIY Card Design: Techniques for Beautiful Stenciled Art

    DIY Card Design: Techniques for Beautiful Stenciled Art

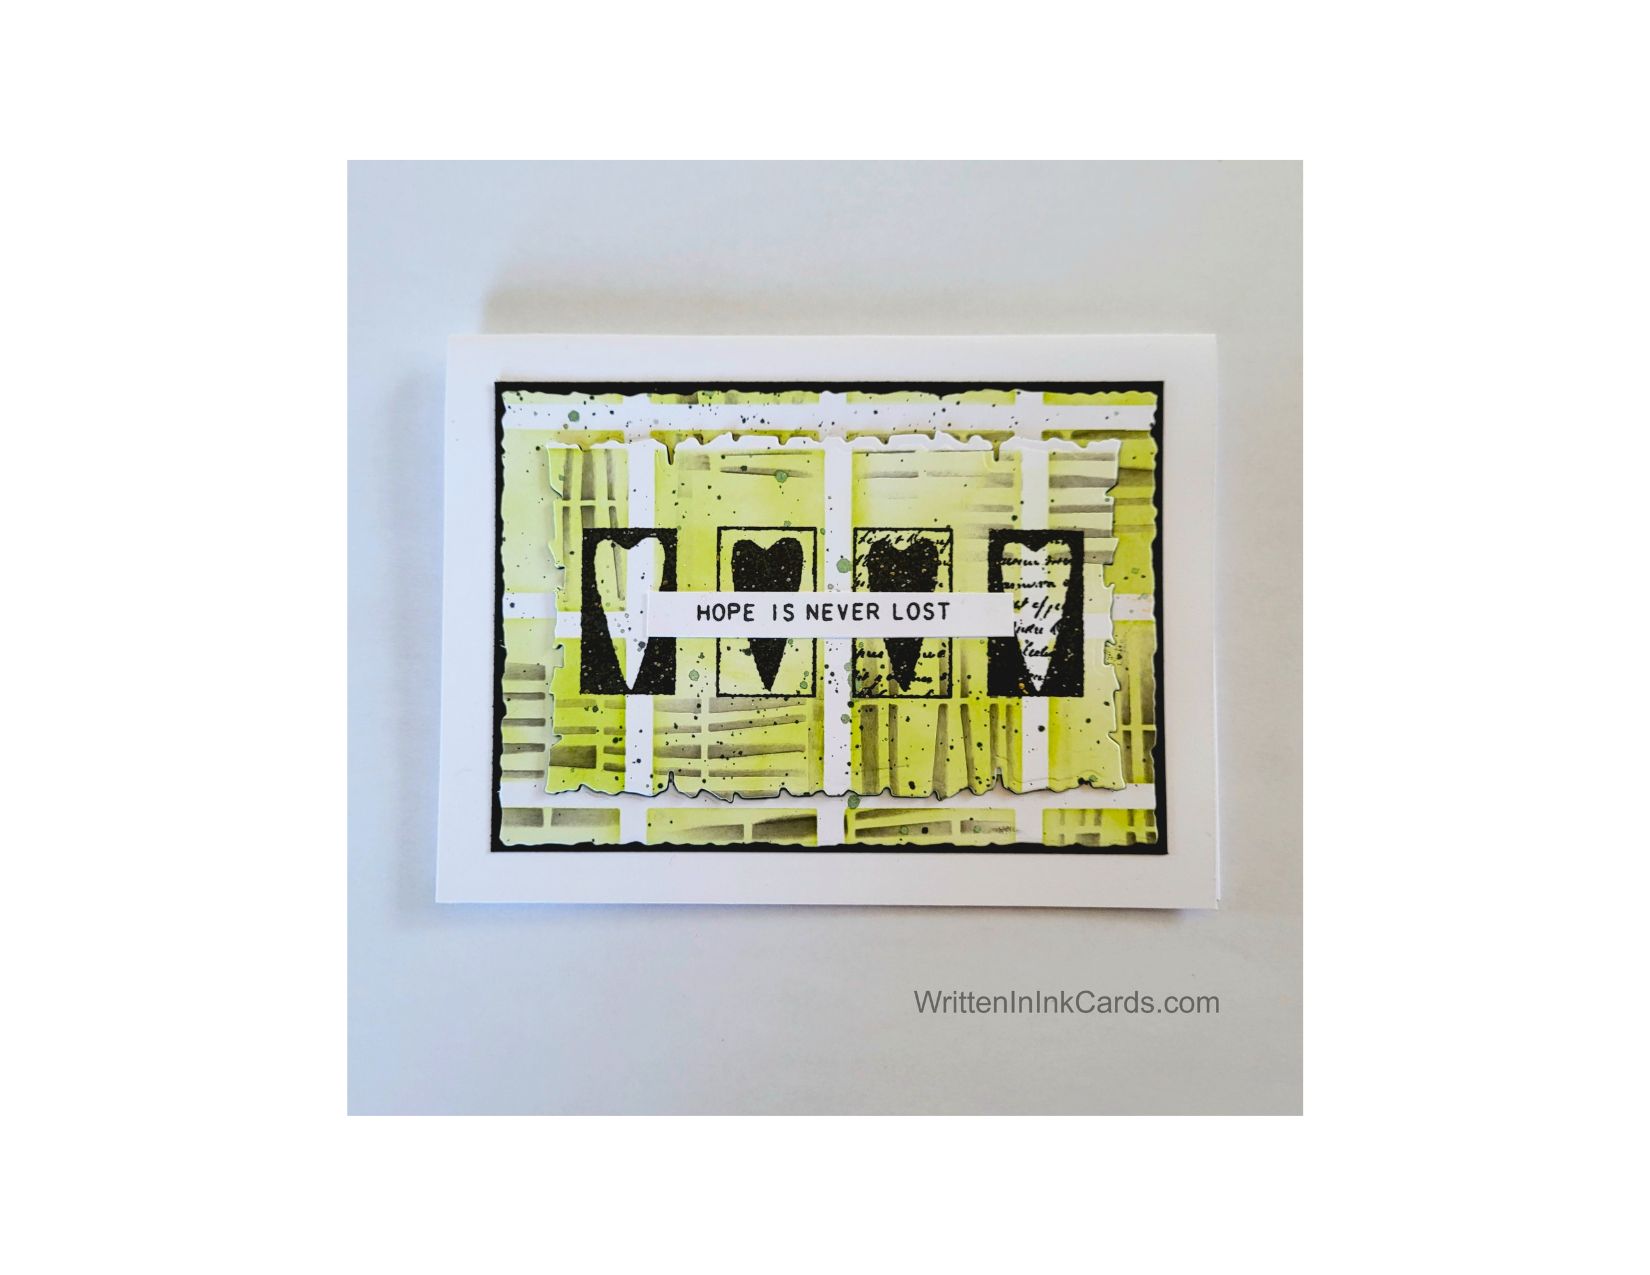
    Would you like to experiment with a design like this? You’ll find a supply list below, including a link to the stencils I used from A Colorful Life Designs.  Follow the link and use discount code ChrisFan10 to save 10% on your entire order! (Master Creator Bundles are excluded as they already have a 20% discount built in.)

    Let’s get Started:

    Card Base: 5.5 x 8.5, scored and folded at 4.25

    Border Layer: 5 x 3.75

    Card Face:  4 ⅞ x 3 ⅝ (after die cut)

    Card Face:

    • I began by laying the card face down on the Grip Mat and positioning the grid stencil.  I applied  lime green ink over the exposed areas, deliberately creating variations in depth of tone
    • I laid the Broken Lines stencil directly over the first stencil and secured it before adding dark grey ink randomly through the stencil.
    • After removing both stencils and setting them aside,  I placed the card face in my stamp positioner and added those awesome hearts.  I stamped twice to be certain that the image was dark enough.
    • I added both gold and black spatter, using metallic watercolour paint.
    • I used a deckled edge rectangle die to trim the card face down to its final size.
    • Then I decided that I wanted one more detail for visual interest,  so I used a smaller die from the same set to cut a deckled rectangle from the card face, centering the die around the hearts.

    Other:

    • I looked through my sentiment binder for the perfect finishing touch and decided on a motivational sentiment in the end.

    Assembly

    I added dimensional foam to the back of the inner piece of the card face.

    I centered the outer section of the card face on the black border and then glued these layers to the card base.

    I put the center of the card face back where it belonged, with the foam creating added dimension.

    Finally,  I glued the sentiment to the card face, directly over the hearts.

    Final Thoughts:

    This design would work for any occasion:  I’m always happy when I have a fun, multipurpose card.   

    I’m really happy with the way that these two stencils work together, as well as the final result.

    Supplies: (and links where possible)

       I have listed which products I have used, and where they may be purchased. It’s a huge marketplace and in most instances, there are multiple sources and many alternatives to choose from.

    Stencils:

        Broken Lines,  A Colorful Life Designs

        16 Square Shadow,  A Colorful Life Designs
    Waffle Flower Grip Mat, 8.5 x 6.5, Scrapbook.com

    Metallic Watercolour Ink:  Amazon

    Stamps:  

        Hearts,  Technique Junkies  (no longer in business)

        Polka Dot Blossoms Sayings,  Tim Holtz,  Amazon

    Dies:   Deckled Edged Rectangles, Stampin’ Up! (retired)

    Ink: Stampin’ Up!

    Blending Brushes: Stampin’ Up! 

    Versafine Onyx, Simon Says Stamp

    Adhesive: Tombow Aqua, Michaels

    Card Base & Card Face: Accent 100 lb., Amazon

    Do you have comments or thoughts to share on this design?  Drop me a line in the Comments Section below –  I’d love to hear from you!

    You can also use the Comments Section  to be added to the list, and notified when I release new work.

  • Create a handmade card that celebrates the Simple Moments

    Create a handmade card that celebrates the Simple Moments

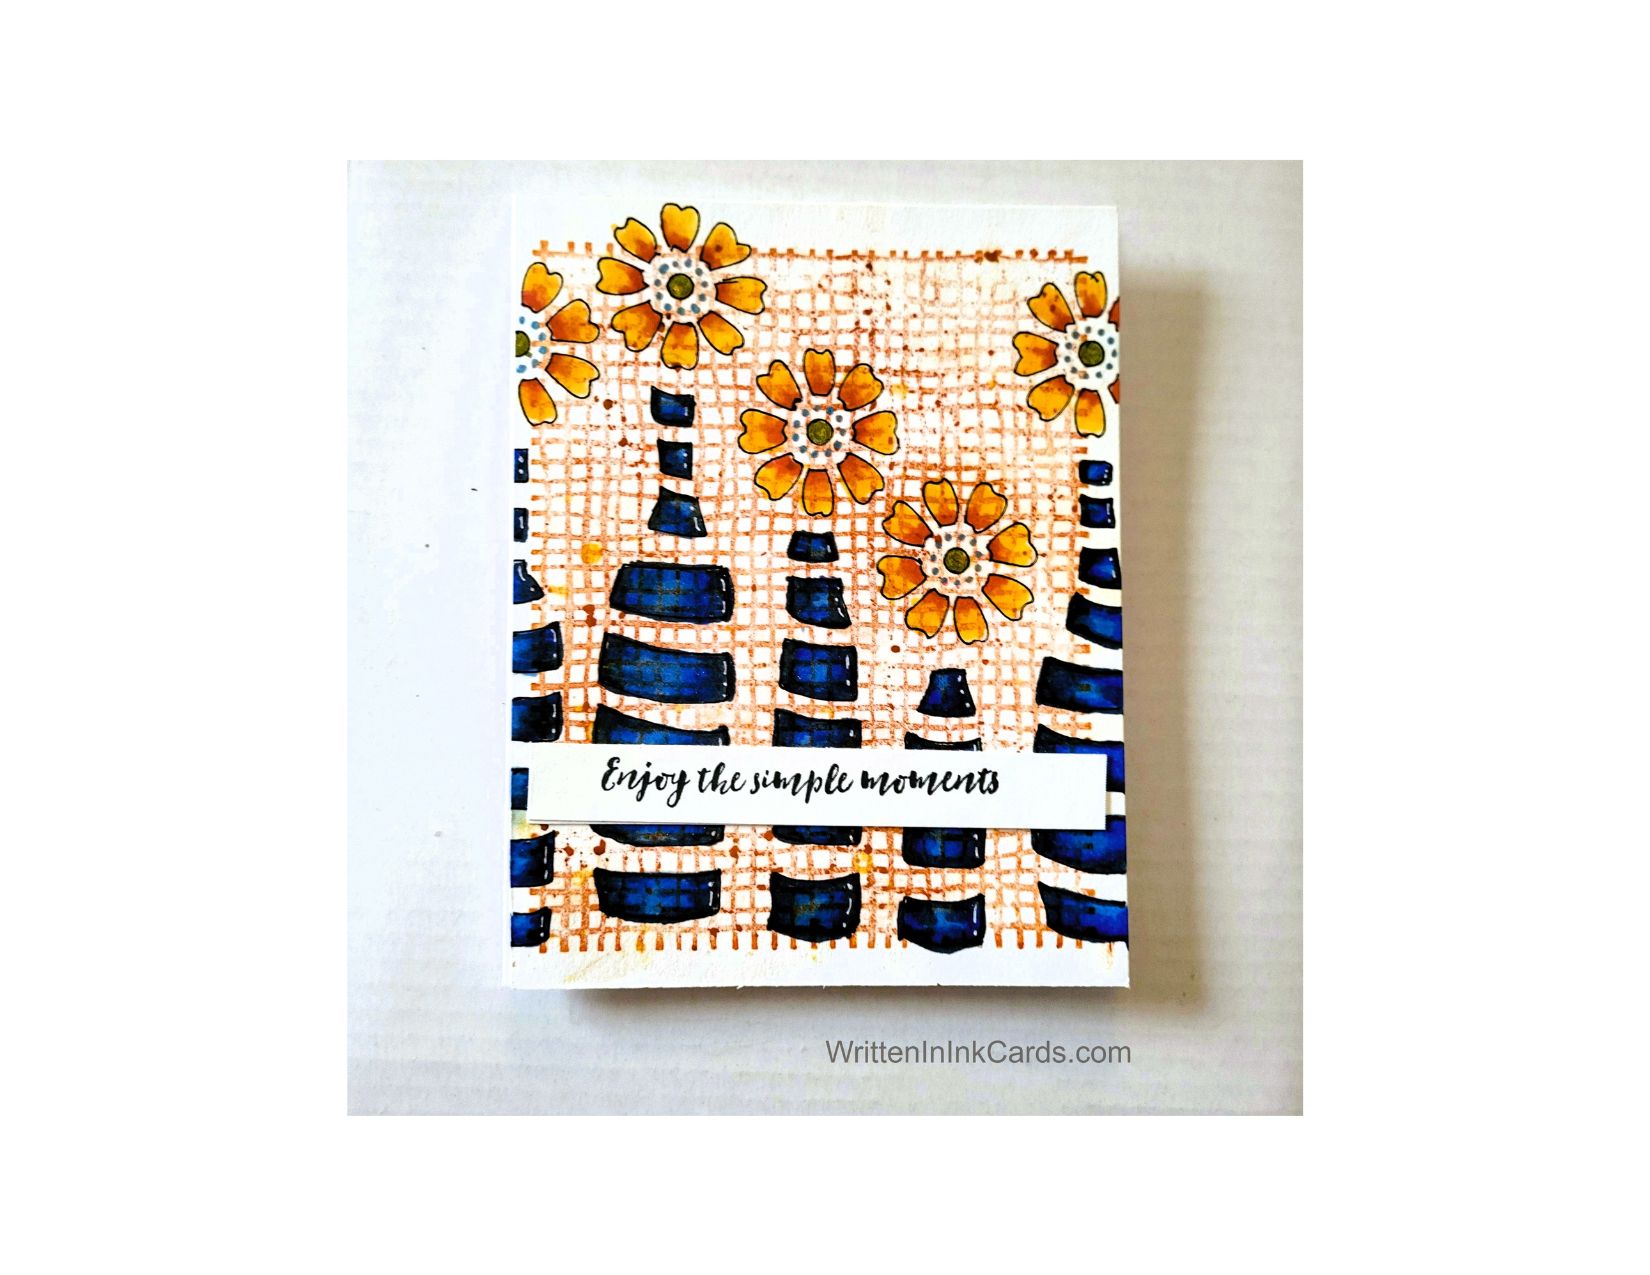
    Sometimes the simple pleasures really are the best; it could be a smile from a loved one, sunshine on a spring day, or flowers in a vase.

    Would you like to experiment with a design like this? You’ll find a supply list below, including a link to the stencil I used from A Colorful Life Designs.  Follow the link and use discount code ChrisFan10 to save 10% on your entire order! (Master Creator Bundles are excluded as they already have a 20% discount built in.)

    Let’s get Started:

    Card Base: 5.5 x 8.5, scored and folded at 4.25

    Card Face:  5.5 x 4.25

    Card Face:

    • I inked up the background stamp with orange ink, and laid it face up on my desk: then I placed the card face on top, doing my best to keep it straight.
    • I laid a piece of scrap copy paper over this and ran my fingers over the entire surface to ensure ink transfer.   (This is my preferred method when using a background stamp.
    • I put the card face on my Grip Mat and used a black fineliner to trace the pattern onto the card face.
    • I coloured the images with alcohol markers, adding white highlights with gel pen.
    • I used a blue gel pen to add the dotted circle around the center of each blossom  ( it doesn’t look blue in the image, but it is).
    • I used a clear metallic pen to add sparkle to the center of each blossom:  the centers had been coloured green with alcohol marker and the addition of the metallic ink activated that, creating a pretty greenish gold.

    Other:

    • I looked through my sentiment binder and selected one that was a good size for this bold image, and I felt this sentiment worked well too.
    • The sentiment had been created on very light cardstock:  I added a piece of heavier cardstock to the back to create stability.

    Assembly

    • I glued the card face directly to the card base.
    • I added the sentiment as shown.

    Final Thoughts:

    I love this stamp and stencil combination:  they work so very well together.

    I was initially concerned about the orange ink showing through the colouring but then decided that it would just add depth and  visual interest.  I don’t mind the result, what do you think?

    Supplies: (and links where possible)

       I have listed which products I have used, and where they may be purchased. It’s a huge marketplace and in most instances, there are multiple sources and many alternatives to choose from.

    Stencil: Bottled Posies,  A Colorful Life Designs

    Waffle Flower Grip Mat, 8.5 x 6.5, Scrapbook.com

    Versamark Embossing Ink: Simon Says Stamp

    Stamps:  Weave,  Technique Junkies  (no longer available)

    Fineliner:  Amazon

    Metallic Gel  Pen: Sakura Gelly Roll, Amazon

    White Gel Pen: Arteza,  Amazon

    Ink: Stampin’ Up!

    Blending Brushes: Stampin’ Up! 

    Memento Ink: Stampin’ Up!

    Alcohol Markers:

         Stampin’ Blends: Stampin’ Up!

         Copics:  Wallacks

    Adhesive: Tombow Aqua, Michaels

    Card Base & Card Face: Accent 100 lb., Amazon

    Do you have comments or thoughts to share on this design?  Drop me a line in the Comments Section below –  I’d love to hear from you!

    You can also use the Comments Section  to be added to the list, and notified when I release new work.

  • When handcrafted is heartfelt: Tips for Stunning Card Designs

    When handcrafted is heartfelt: Tips for Stunning Card Designs

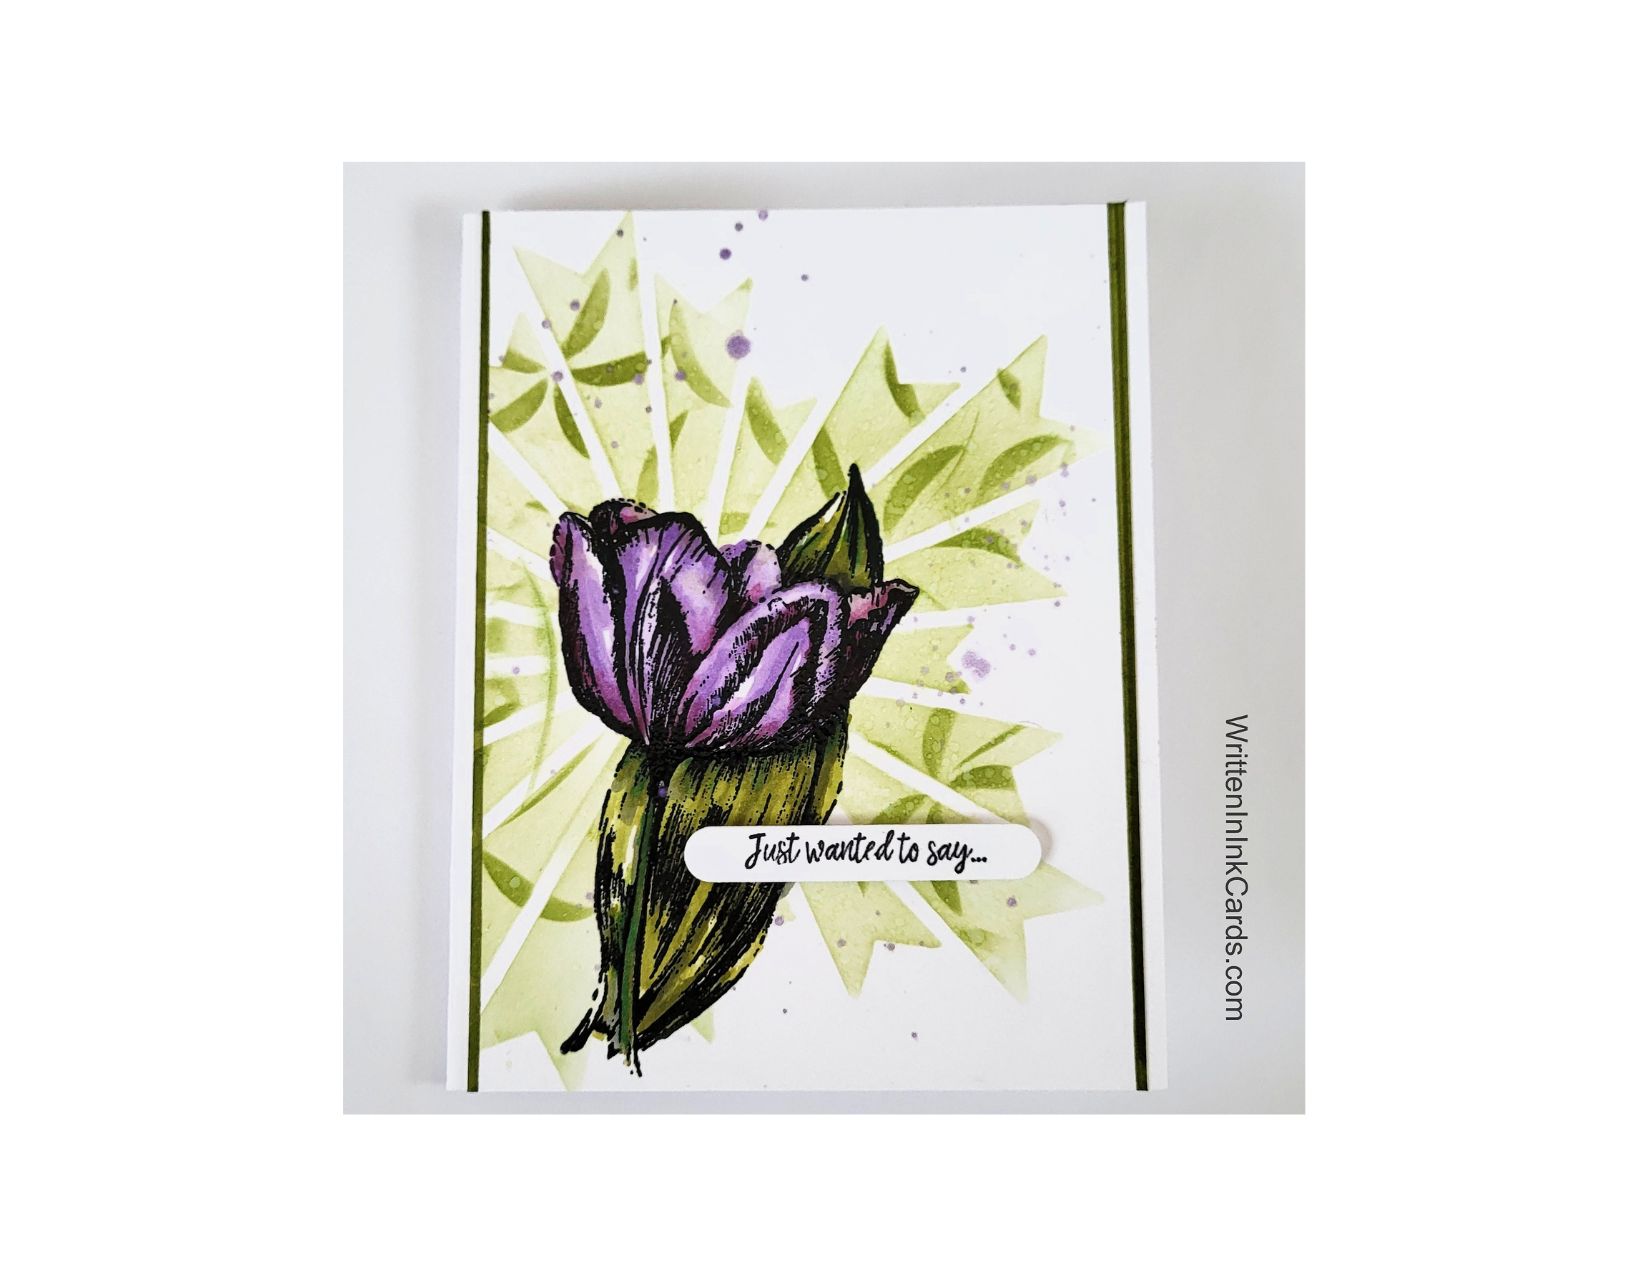
    Would you like to experiment with a design like this? You’ll find a supply list below, including a link to the stencils I used from A Colorful Life Designs.  Follow the link and use discount code ChrisFan10 to save 10% on your entire order! (Master Creator Bundles are excluded as they already have a 20% discount built in.)

    Let’s get Started:

    Card Base: 

    4.25 x 11, scored and folded at 5.5

    Card Face:   3 ⅞ x 5.5

    Card Face:

    • I laid my card face on the Grip Mat and positioned the Starry Rays stencil so that it was hanging off on the left hand side.  I used light green ink across the exposed surface.
    • Leaving that stencil in place,  I secured the Floating Flowers stencil,  applying a darker green ink over the exposed areas.
    • I removed both stencils and spattered water lightly over the ink,  blotting off quite quickly.  This added texture and depth to this part of the design.
    • I placed the card face in my Stamp Positioner and used Memento ink to stamp the image of the tulip.
    • I coloured this with alcohol markers.
    • I spattered purple metallic watercolour over the card face.

    Other:

    • I looked through my binder of sentiments and selected one that worked for the design.

    Assembly

    I added the card face to the card base, centering vertically.

    I used a dark green marker and a ruler to draw a line down each side of the card face, creating a faux border layer.

    I put dimensional foam on the back of the sentiment and put it in place as shown.

    Final Thoughts:

    I love this bold tulip,  and the stencils created a fabulous background for it.

    Supplies: (and links where possible)

       I have listed which products I have used, and where they may be purchased. It’s a huge marketplace and in most instances, there are multiple sources and many alternatives to choose from.

    Stencils:

        Starry Rays,  A Colorful Life Designs

        Floating Flowers, A Colorful Life Designs

    Waffle Flower Grip Mat, 8.5 x 6.5, Scrapbook.com

    Versamark Embossing Ink: Simon Says Stamp

    Stamps: Sketched Tulip, Technique Junkies  (no longer available)

    Ink: Stampin’ Up!

    Blending Brushes: Stampin’ Up! 

    Versafine Onyx, Simon Says Stamp

    Memento Ink: Stampin’ Up!

    Alcohol Markers:

         Stampin’ Blends: Stampin’ Up!

         Copics:  Wallacks

    Adhesive: Tombow Aqua, Michaels

    Card Base & Card Face: Accent 100 lb., Amazon

    Do you have comments or thoughts to share on this design?  Drop me a line in the Comments Section below –  I’d love to hear from you!

    You can also use the Comments Section  to be added to the list, and notified when I release new work.