Tag: embossingpaste

  • Create  Bold Captivating Design in a Card that will be Treasured

    Create Bold Captivating Design in a Card that will be Treasured

    Would you like to experiment with a design like this? You’ll find a supply list below, including a link to the stencil I used from A Colorful Life Designs.  Follow the link and use discount code ChrisFan10 to save 10% on your entire order! (Master Creator Bundles are excluded as they already have a 20% discount built in.)

    Let’s get Started:

    Card Base: 5.5 x 8.5, scored and folded at 4.25

    Card Face:  5 ⅛ x 3 7/8

    Card Face:

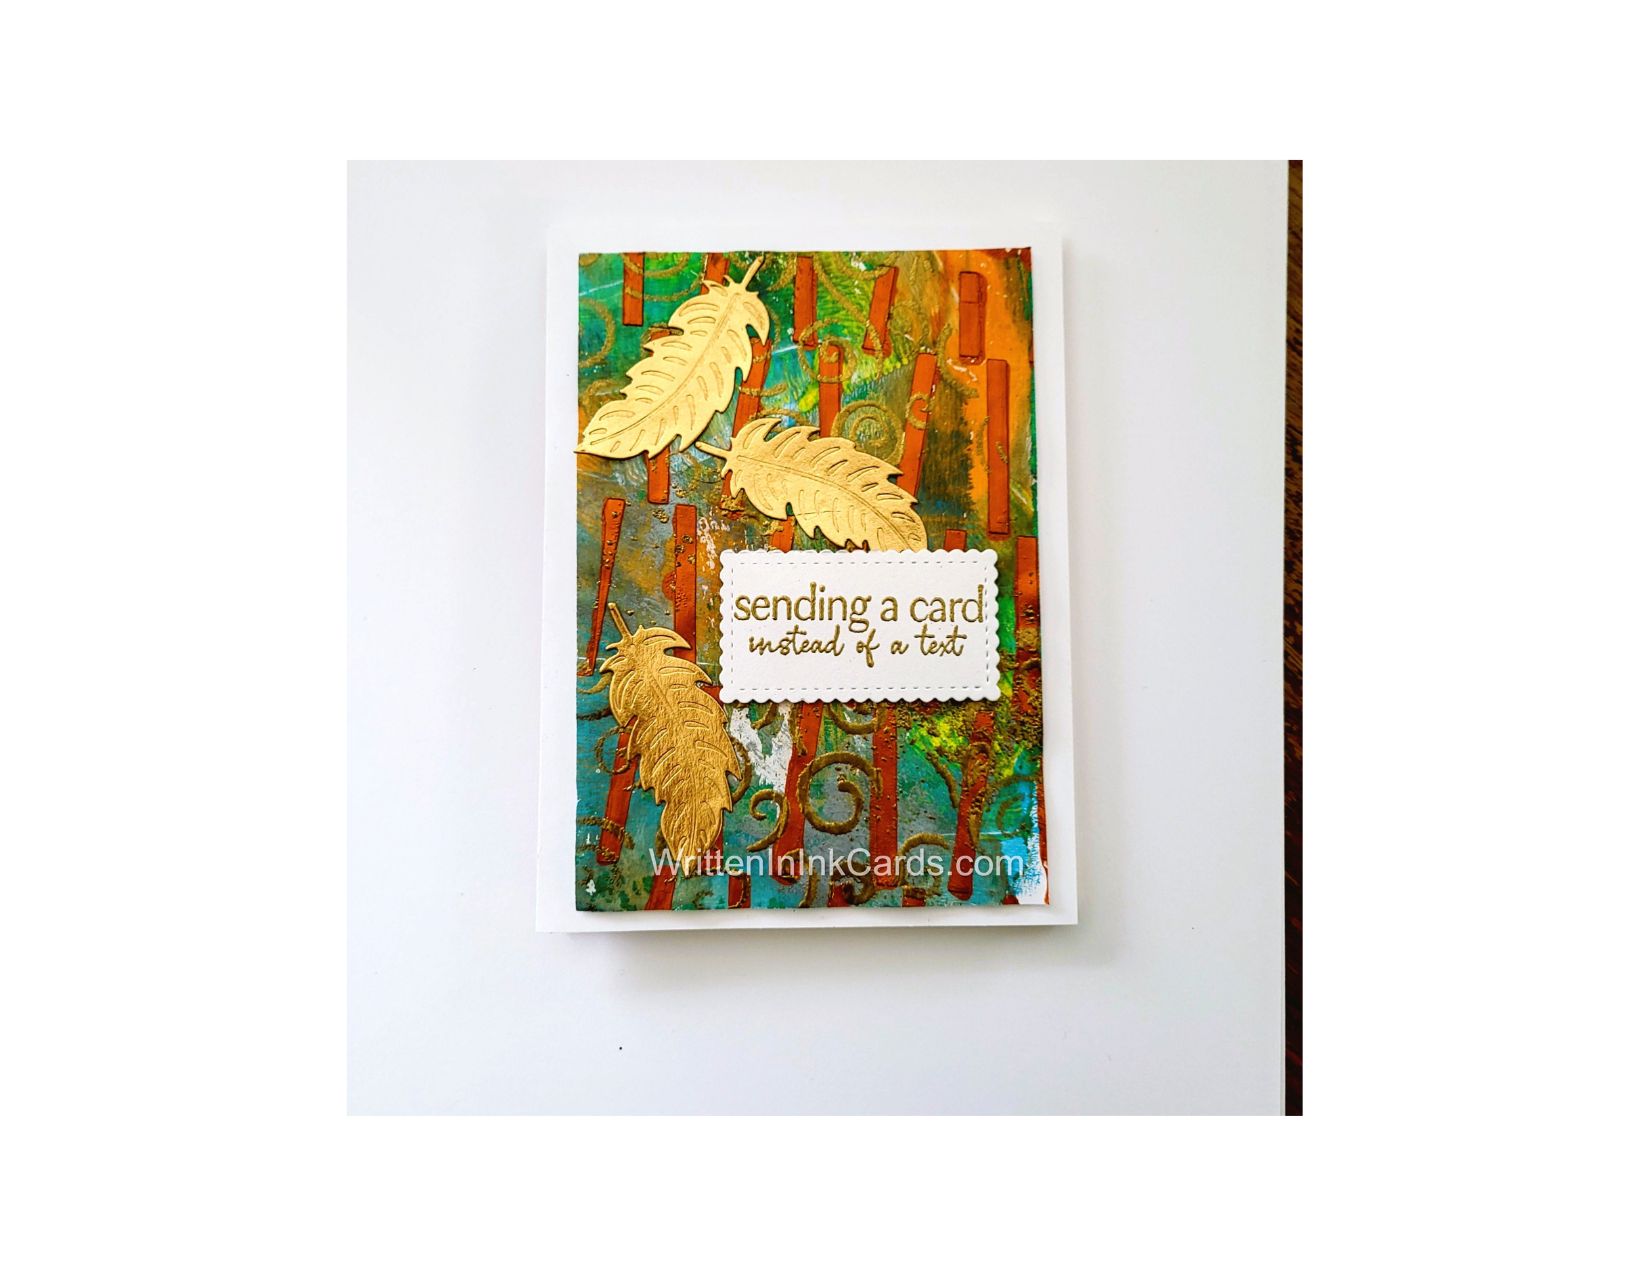
    This card face began as a bold gel print that I simply cut down to size.

    • I placed the card face on scrap paper and positioned the stencil.  I secured these with Mint Tape.
    • I applied Lunar Paste to the exposed areas, then carefully removed the stencil to avoid smudges.
    • I placed the stencil immediately into a basin of water (keeping the paste wet makes clean up much easier).
    • I put the card face aside to dry.
    • Once the paste had dried,  I positioned a second stencil over top and pressed my Versamark embossing ink firmly over all exposed areas.
    • After removing the stencil, I sprinkled this with gold embossing powder and set it with my heat gun.

    Other:

    • I die-cut three small leaves from gold cardstock.
    • Using Versamark embossing ink, I stamped the sentiment on a piece of scrap cardstock.
    • I sprinkled gold embossing powder over this and set it with my heat gun.
    • I used a die to cut this down to size.

    Assembly

    • I added dimensional foam to the back of the card face and centered it on the card base.
    • I glued the leaves and sentiment in place, as shown.

    Final Thoughts:

    I love the warm, rich tones this piece has, and the way the Rungs stencil appears to float between layers of colour and texture.  This was the result of the addition of the gold-embossed layer of stencilling:  I have had that curly Q stencil for so long that I no longer know who the maker is,  but you could achieve a similar look with Simple Spirals from A Colorful Life Designs.

    Supplies: (and links where possible)

       I have listed which products I have used, and where they may be purchased. It’s a huge marketplace and in most instances, there are multiple sources and many alternatives to choose from.

    Stencil: Rungs, A Colorful Life Designs

    Versamark Embossing Ink: Simon Says Stamp

    Gold Embossing Powder by  Wow,  R&R Scrapbooking

    Stamp/ Dies: Stampin’ Up! (retired)

    Embossing Paste:  Tropical Tango by Simon Hurley, Amazon

    Adhesive: Tombow Aqua, Michaels

    Card Base & Card Face: Accent 100 lb., Amazon  

    Do you have comments or thoughts to share on this design?  Drop me a line in the Comments Section below –  I’d love to hear from you!

    You can also use the Comments Section  to be notified when I release new work.

    Rungs by A Colorful Life Designs

  • Make an elegant card: combine embossing paste and vellum

    Make an elegant card: combine embossing paste and vellum

    Would you like to experiment with a design like this? You’ll find a supply list below, including a link to the stencil I used from A Colorful Life Designs.  Follow the link and use discount code ChrisFan10 to save 10% on your entire order! (Master Creator Bundles are excluded as they already have a 20% discount built in.)

    Let’s get Started:

    Card Base: 5.5 x 8.5, scored and folded at 4.25

    Border Layer: 5.5 x 4

    Card Face:  5.5 x 3.75

    Vellum:  7 x 2.5

    Card Face:

    • I laid the card face on scrap paper and positioned the stencil.  I secured both with Mint Tape.
    • I applied DIY embossing paste across all exposed areas.
    • I carefully removed the stencil and placed it in water immediately.

    When I work with embossing paste, I have a container of water beside me:  I usually do several card faces during a session with paste,  with each one going into the water as soon as it’s removed from the card face. When I’m done, the stencils are all cleaned at the same time.  This makes clean-up much faster and easier.

    • I put the card face aside to dry.

    Other:

    • I turned on my heat gun before starting work with the vellum.
    • I placed the vellum in my stamp positioner and added the butterflies with Versafine Onyx.
    • I sprinkled the ink with clear embossing powder and set it with my heat gun.

    Vellum will warp easily with heat,  so it’s important to have a very hot, preheated tool and to move it constantly until the powder has melted.

    • I stamped a scrap of cardstock with the sentiment,  and then cut it out with a die.
    • Assembly
    • I folded the vellum around the card face and secured it with scotch tape.
    • I glued the card face to the card base,  making sure that the vellum on the back of the card face was fully adhered.
    • I glued the sentiment in place as shown,  taking care to use no more glue than was needed, as vellum warps very easily with moisture.

    Final Thoughts:

    The gleam of the embossing paste is so pretty, but the panel was very busy as a whole:  the vellum is such a great tool in this instance,  as it dampens that down, while providing another layer of interest because it is translucent.

    Sadly, the stamps here are retired: but this design is easily replicated with others that you have on hand.

    Supplies: (and links where possible)

       I have listed which products I have used and where they may be purchased. It’s a huge marketplace, and in most instances, there are multiple sources and many alternatives to choose from.

    Stencil: Chaos Squares, A Colorful Life Designs

    Clear Embossing Powder,  Wow,  Simon Says Stamp

    Stamp & Die:  Stampin’ Up!  (retired)

    Versafine Onyx, Simon Says Stamp

    Vellum: Stampin’ Up!    

    Adhesive: Tombow Aqua, Michaels

    Card Base & Card Face: Accent 100 lb., Amazon 

    Do you have comments or thoughts to share on this design?  Drop me a line in the Comments Section below –  I’d love to hear from you!

    You can also use the Comments Section  to be notified when I release new work.

    Chaos Squares by A Colorful Life Designs

  • How to Make a Gorgeous Card with Dotted Wreath Stencil

    How to Make a Gorgeous Card with Dotted Wreath Stencil

    Would you like to experiment with a design like this? You’ll find a supply list below, including a link to the stencil I used from A Colorful Life Designs.  Follow the link and use discount code ChrisFan10 to save 10% on your entire order! (Master Creator Bundles are excluded as they already have a 20% discount built in.)

    Let’s get Started:

    Card Base: 5.5 x 8.5, scored and folded at 4.25

    Border Layer: 5.5 x 4.25

    Cranberry Card Face: 5.25 x 5.25

    Card Face:

    • I laid my card face on a piece of scrap paper and positioned the stencil.  I applied green embossing paste through the stencil, then removed the stencil very carefully so I didn’t smudge the paste.
    • The stencil went into water immediately,  and the card face was put aside to dry.
    • Once dry the card face was cut in half, and became 5.25 x 2.75.
    • I also cut ⅛” off the top and bottom of this piece.

    Other:

    • I glued the card face (or rather, half of it!)  to the kraft border layer on the left, ensuring equal spacing on the top, bottom and left-hand sides.
    • I placed this newly created combination into my stamp positioner and stamped the reindeer image with Versamark embossing ink.  I stamped several times to get a good impression.
    • I removed this from the stamp positioner, added copper embossing powder, and set it with my heat gun.
    • I drew a narrow line snugly against the right-hand edge of the cranberry cardstock,  added copper embossing powder and set it with my heat gun.  

    This was necessary because of the raised cranberry layer:  no ink transferred immediately beside it,  so I used the embossing pen to draw a line and fill in the narrow gap.

    • I stamped the sentiment on a scrap of cardstock in cranberry ink and cut it with a die.
    • I die cut a tiny bow out of the same cardstock.

    Assembly:

    • I glued the sentiment to the card face, allowing part of it to hang off the left-hand edge.  I cut this off flush.
    • I glued the card face to the card base.
    • I added the tiny bow to the reindeer as shown.

    Final Thoughts:

    I wasn’t at all sure about this design when I tried it,  but I quite like it in the end.

    This is such a great stencil to play with –  and I still  have half of it to work into a card.

    Supplies: (and links where possible)

       I have listed which products I have used, and where they may be purchased. It’s a huge marketplace and in most instances, there are multiple sources and many alternatives to choose from.

    Stencil: Dotted Wreath : A Colorful Life Designs

    Waffle Flower Grip Mat, 8.5 x 6.5, Scrapbook.com

    Versamark Embossing Ink:  Ecstasy Crafts

    Embossing Pen: Versamark, Ecstasy Crafts

    Copper Embossing Powder: Wow,  R&R Scrapbooking

    Embossing Paste: Later Gater, Simon Hurley,  R&R Scrapbooking

    Stamps:  Cheerful Prancing, Unity Stamps  (retired,  but there are still similar stamps     available!)

    Dies: 

         Sentiment: Stampin’ Up! (retired)

         Bow Topper:  Scrapbook.com

    Ink: Stampin’ Up!

    Adhesive: Tombow Aqua, Michaels

    Card Base & Card Face: Accent 100 lb., Amazon

    Do you have comments or thoughts to share on this design?  Drop me a line in the Comments Section below –  I’d love to hear from you!

    You can also use the Comments Section  to be notified when I release new work.

    Dotted Wreath by A Colorful Life Designs