Tag: diycard

  • Autumn Card Design Tips with A Colorful Life Stencils

    Autumn Card Design Tips with A Colorful Life Stencils

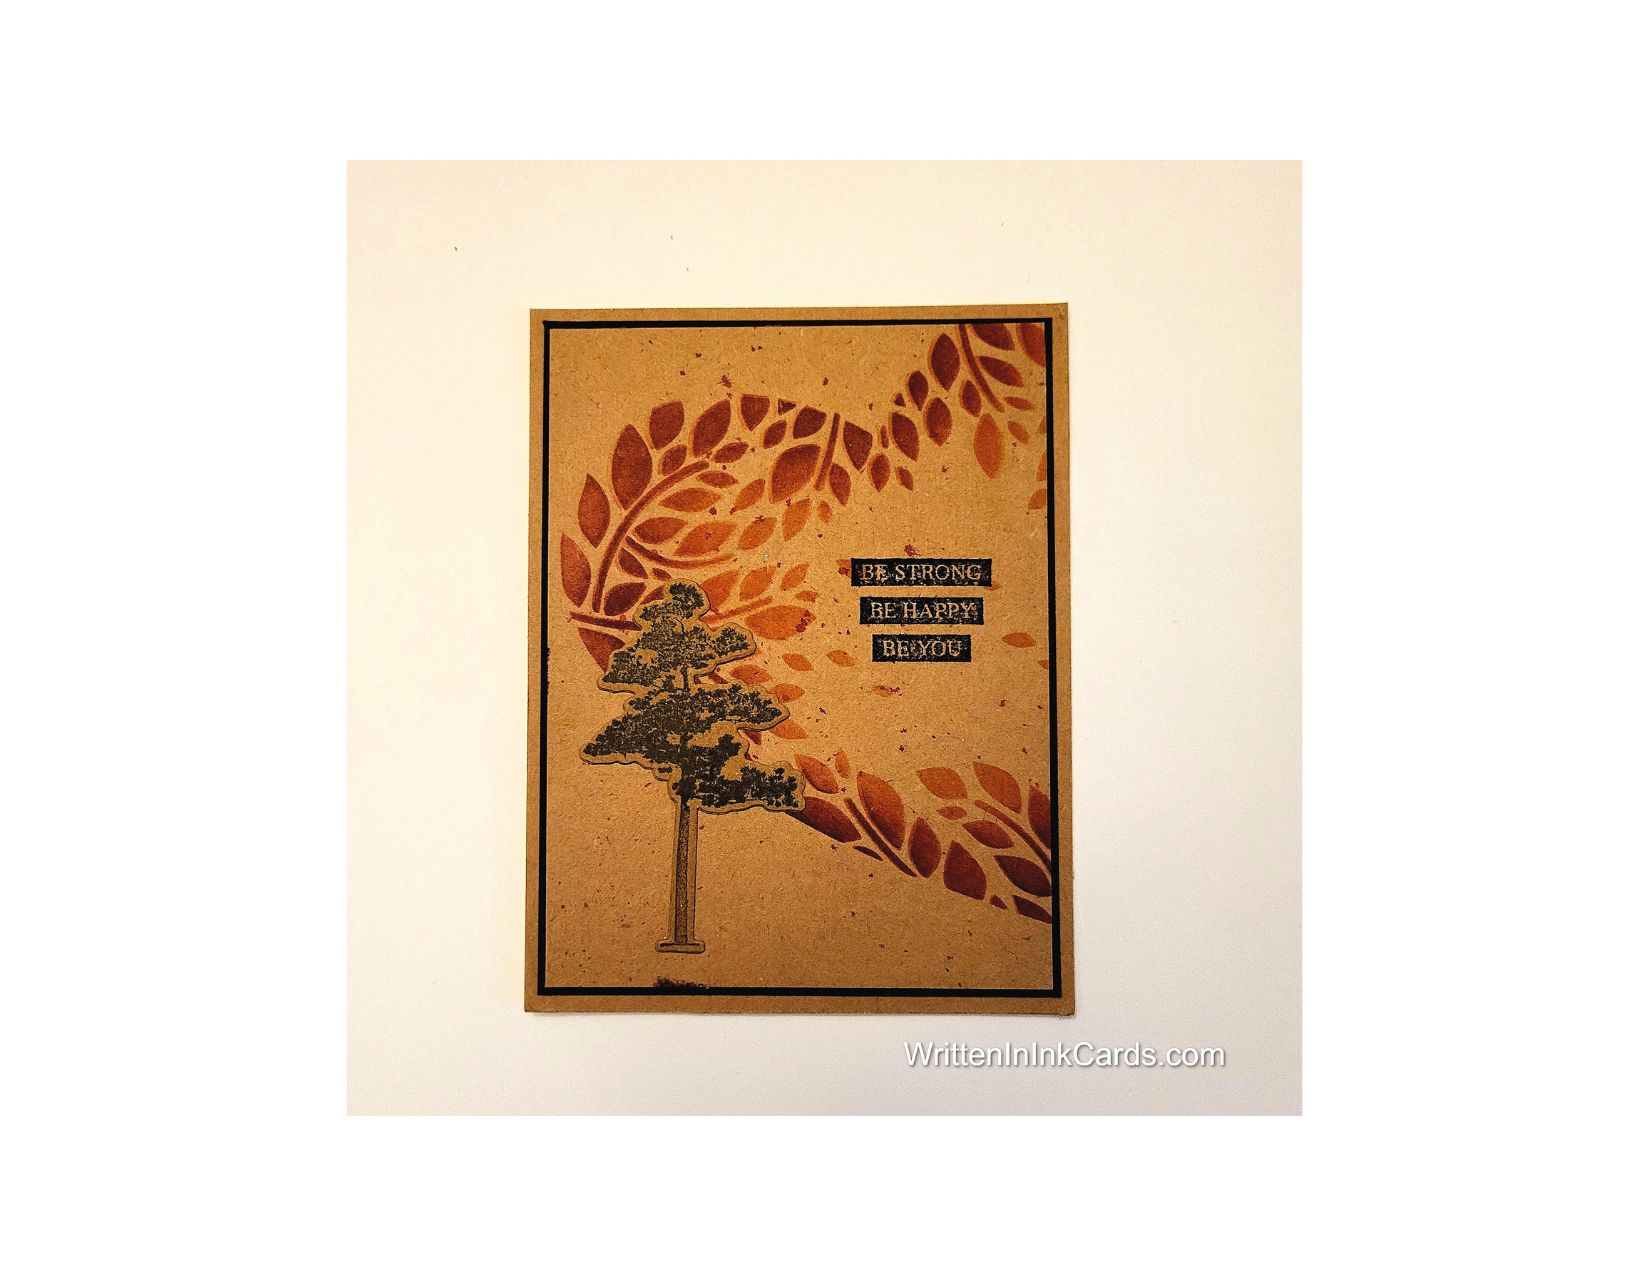
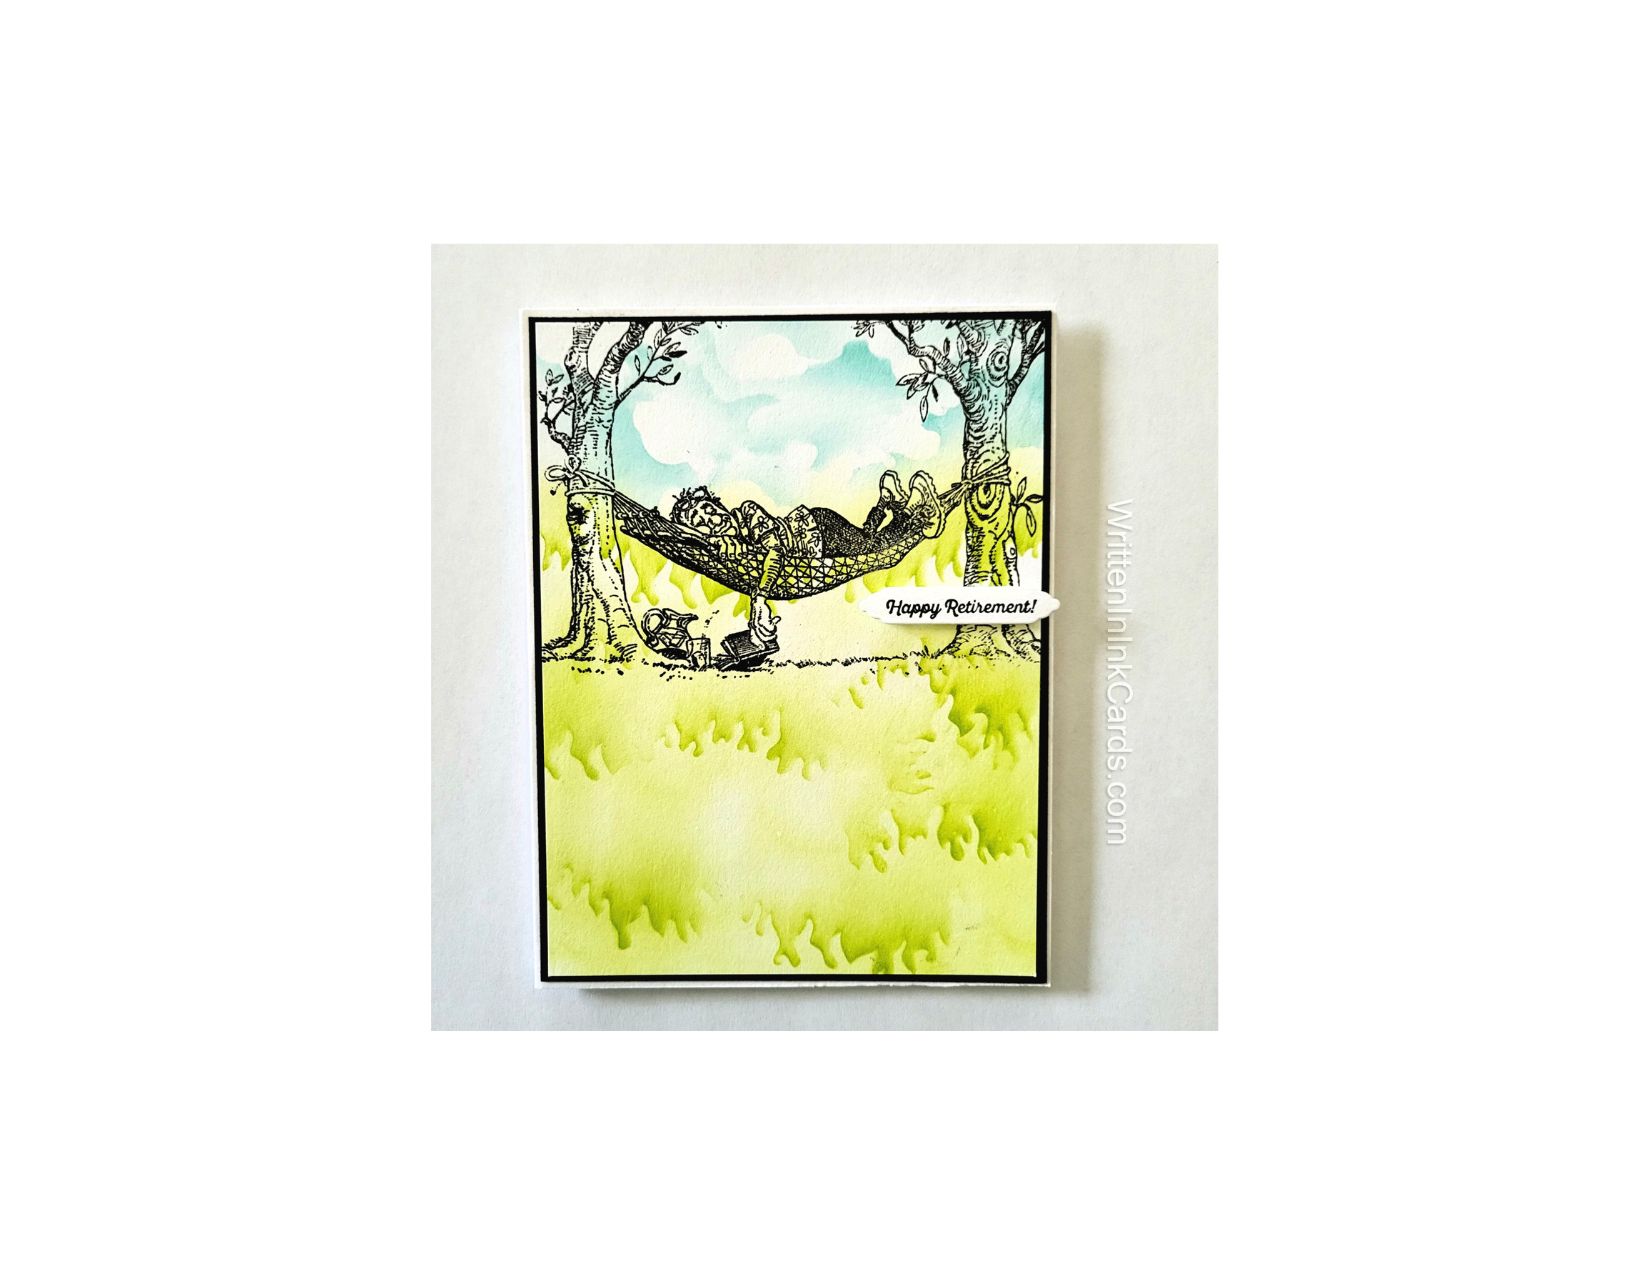
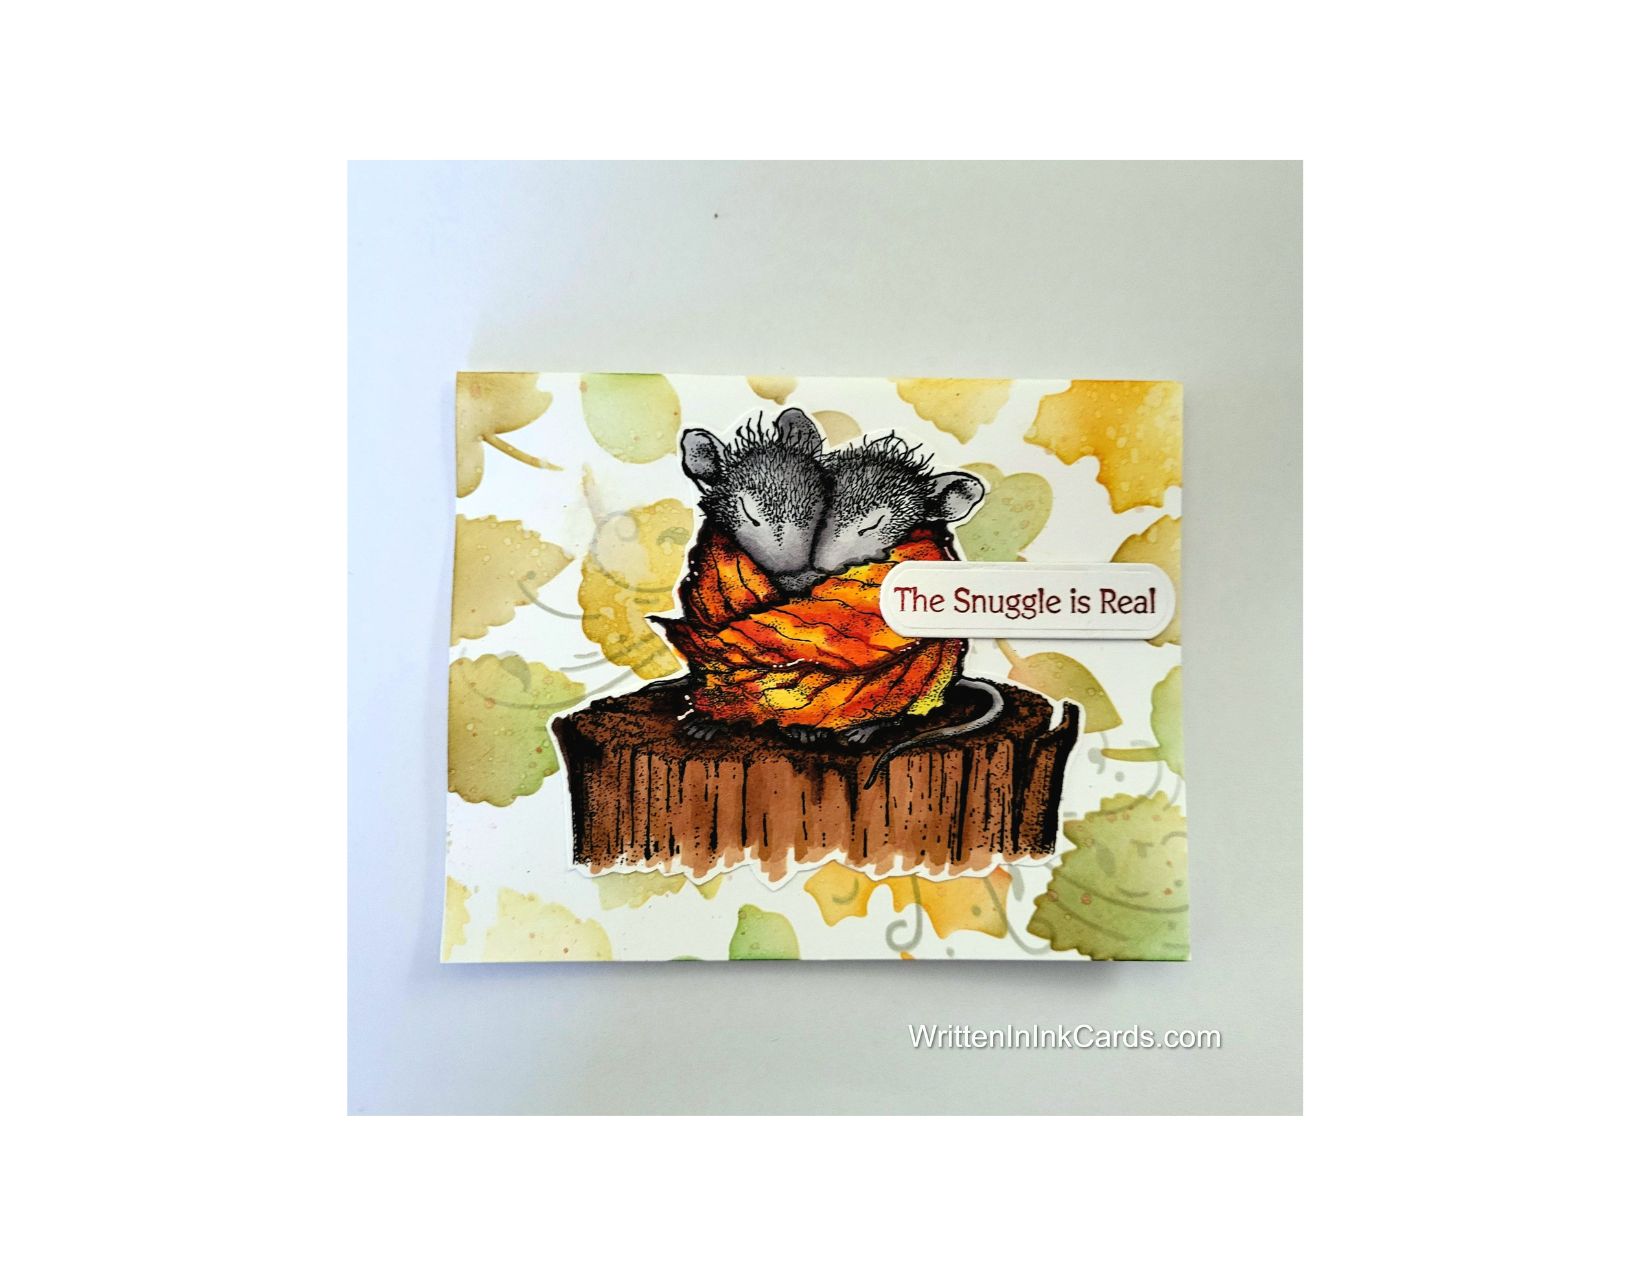
    Snuggling up and getting cozy when autumn bring chilly winds … bliss!

    Would you like to experiment with a design like this? You’ll find a supply list below, including a link to the stencils I used from A Colorful Life Designs.  Follow the link and use discount code ChrisFan10 to save 10% on your entire order! (Master Creator Bundles are excluded as they already have a 20% discount built in.)

    Let’s get Started:

    Card Base: 5.5 x 8.5, scored and folded at 4.25

    Card Face:  5.5 x 4.25

    Card Face:

    • I laid this piece on the Grip Mat and then positioned the stencil. 
    •  Using a soft hand, I applied a mixture of brown, yellow and green inks across the open areas.  
    •    Tip: Adding just a touch of extra colour to the edges created the look of a shadow and provided additional dimension.
    • I decided to add the Windy Day stencil to represent the chilly winds of autumn: I positioned this stencil so that it would extend from the left-hand side of the focal image, and applied light blue ink to create the pattern.
    • I selected a different portion of the stencil and added the pattern after positioning it to be added to the bottom right-hand corner of the card.
    • I added spatter to the card face using both plain water and metallic copper watercolour paint.

    Other:

    • I stamped the image using Memento ink, and coloured it with alcohol markers.
    • Once the colouring was complete, I fussy cut the image with my snips.
    • I stamped the sentiment using brown ink, and cut it out with a small oblong die.

    Assembly

    • I glued the card face to the card base.
    • I glued the focal image into the center of the card face.
    • I added the sentiment as shown.

    Final Thoughts:

    I love House Mouse stamps –  they are so deliciously whimsical.   I loved spending time colouring this one and then using it on a card. I decided to colour the leaf in the bright colours of autumn, despite the fact that this  kind of leaf would not actually have those colours in real life.  Artistic licence!

    Supplies: (and links where possible)

       I have listed which products I have used, and where they may be purchased. It’s a huge marketplace and in most instances, there are multiple sources and many alternatives to choose from.

    Stencils:

        Windy Day,  A Colorful Life Designs

        Fall Leaves, A Colorful Life Designs

    Waffle Flower Grip Mat, 8.5 x 6.5, Scrapbook.com

    Stamps:   Snuggle Up- House Mouse, Spellbinders, Frantic Stamper

    Dies: Ornate Labels, Sizzix, Amazon

    Metallic Watercolour:  Amazon

    Ink: Stampin’ Up!

    Blending Brushes: Stampin’ Up! 

    Memento Ink: Stampin’ Up!

    Alcohol Markers:

         Stampin’ Blends: Stampin’ Up!

         Copics:  Wallacks

    Adhesive: Tombow Aqua, Michaels

    Card Base & Card Face: Accent 100 lb., Amazon

    Do you have comments or thoughts to share on this design?  Drop me a line in the Comments Section below –  I’d love to hear from you!

    You can also use the Comments Section  to be notified when I release new work

    Fall Leaves by A Colorful Life Designs

    Windy Day by A Colorful Life Designs

  • Easy Steps to Craft a Santa Card

    Easy Steps to Craft a Santa Card

    Even the Big Guy needs a break and some fresh air every now and then!

    Would you like to experiment with a design like this? You’ll find a supply list below, including a link to the stencil I used from A Colorful Life Designs.  Follow the link and use discount code ChrisFan10 to save 10% on your entire order! (Master Creator Bundles are excluded as they already have a 20% discount built in.)

    Let’s get Started:

    Card Base: 5.5 x 8.5, scored and folded at 4.25

    Stamped Layer: 5.25 x 4

    Card Face:  5.25 x 4 

    Card Face:

    • I brushed blue ink onto the top two-thirds of the the card face, allowing variations in depth to create the look of clouds.
    • I placed the card face onto the grip mat,  and positioned the stencil about ¾ of the way down the card face.  I used green ink to create the tree line.
    • I shifted the stencil up and over (to allow the trees to fall in between those in the first row) and created a second row, overlapping where necessary.
    • I put the card face into the stamp positioner and added the sentiment in the upper left, using Versafine Onyx.

    Other:

    • I stamped  Santa on the second piece of cardstock, placing him towards the bottom right.
    • I coloured this with alcohol markers, adding a shadow under him and the ski track behind him in the snow as well.
    • I drew a curved hillside behind Santa,  and then cut along that line and also carefully cut around the upper half of Santa.

    Assembly

    • I glued the card face to the card base,  and the layer with the cut out Santa on top of these.

    Final Thoughts:

    This is such a cute combination –  the style of the tree stencil works with Santa so very well.  I really like this one.

    Supplies: (and links where possible)

       I have listed which products I have used, and where they may be purchased. It’s a huge marketplace and in most instances, there are multiple sources and many alternatives to choose from.

    Stencil: Christmas Tree Edger #1,  A Colorful Life Designs

    Waffle Flower Grip Mat, 8.5 x 6.5, Scrapbook.com

    Stamps: Jolly Santas, Colorado Craft Co., (retired)

    Ink: Stampin’ Up!

    Blending Brushes: Stampin’ Up! 

    Versafine Onyx, Simon Says Stamp

    Memento Ink: Stampin’ Up!

    Alcohol Markers:

         Stampin’ Blends: Stampin’ Up!

         Copics:  Wallacks

    Adhesive: Tombow Aqua, Michaels

    Card Base & Card Face: Accent 100 lb., Amazon

    Do you have comments or thoughts to share on this design?  Drop me a line in the Comments Section below –  I’d love to hear from you!

    You can also use the Comments Section  to be notified when I release new work

  • Touch his heart with a card he is sure to treasure

    Touch his heart with a card he is sure to treasure

    Would you like to experiment with a design like this? You’ll find a supply list below, including a link to the stencil I used from A Colorful Life Designs.  Follow the link and use discount code ChrisFan10 to save 10% on your entire order! (Master Creator Bundles are excluded as they already have a 20% discount built in.)

    Let’s get Started:

    Card Base: 5.5 x 8.5, scored and folded at 4.25

    Kraft Border:  5.5 x 4.25

    Black Border:  5.25 x 4

    Kraft Card Face:  5 ⅛ x 3 7/8

    Card Face:

    • I laid the card face onto my grip mat and positioned the stencil at an angle, extending off  the right-hand side.
    • I went over the exposed areas with red ink and then added another layer of ink to the outer edges, using a darker cranberry red.  
    • I placed the card face into my stamp positioner and added the sentiment with Versafine Onyx, stamping it two or three times to achieve a dark, clear image.

    Other:

    • I used a separate scrap of kraft cardstock for the tree. After placing it in the stamp positioner, I stamped the green leaves on the tree, carefully masking off the trunk.  I stamped twice to get the depth of colour I wanted,  masking both times to protect the trunk.
    • I repeated these steps to stamp the trunk, using brown ink,  stamping twice for the desired saturation and protecting the leaves both times by masking.
    • I used the matching die to cut this out.

    Assembly

    • I glued the kraft border to the card base.
    • I added the black border and the card face on top of these, centering both times.
    • I glued the tree in place.

    Final Thoughts:

    I really like this combination:  kraft cardstock produces such a different “feel”,  and the elements in this card work well with that.

    This masculine card would work for birthdays, a graduation, a new job – almost any occasion.

    Supplies: (and links where possible)

       I have listed which products I have used, and where they may be purchased. It’s a huge marketplace and in most instances, there are multiple sources and many alternatives to choose from.

    Stencil:  Leafy Heart Frame, A Colorful Life Designs

    Waffle Flower Grip Mat, 8.5 x 6.5, Scrapbook.com

    Stamps & Die:  Rooted in Nature, Stampin’ Up!  (retired)

    Ink: Stampin’ Up!

    Blending Brushes: Stampin’ Up! 

    Versafine Onyx, Simon Says Stamp

    Adhesive: Tombow Aqua, Michaels

    Card Base & Card Face: Accent 100 lb., Amazon

    Do you have comments or thoughts to share on this design?  Drop me a line in the Comments Section below –  I’d love to hear from you!

    You can also use the Comments Section  to be notified when I release new work

    Leafy Heart Frame by A Colorful Life Designs

  • A simple & elegant – and sincere! – thank you card

    A simple & elegant – and sincere! – thank you card

    Would you like to experiment with a design like this? You’ll find a supply list below, including a link to the stencil I used from A Colorful Life Designs.  Follow the link and use discount code ChrisFan10 to save 10% on your entire order! (Master Creator Bundles are excluded as they already have a 20% discount built in.)

    Let’s get Started:

    Card Base: 5.5 x 8.5, scored and folded at 4.25

    Card Face:  5.5 x 4.25

    Card Face:

    • I placed the card face on the Grip Mat and positioned the stencil.
    • I applied metallic silver ink across all exposed areas.
    •      Although I routinely use blending brushes for dye inks,  I use blending foams for pigment/metallic inks.   This is mostly because I have a supply of foams (from my pre-brush era) and I want to have a dedicated foam to each colour of metallic/pigment ink.)
    • After removing the stencil I placed the card face into the stamp positioner and added the sentiment with Versafine Onyx.
    • I used the edge of the ink pad to apply a narrow border of silver ink to all edges of the card face.

    Assembly

    • I glued the card face to the card base.

    Final Thoughts:

    I needed a simple but elegant thank you card –  this duet more than met the challenge!

    Supplies: (and links where possible)

       I have listed which products I have used, and where they may be purchased. It’s a huge marketplace and in most instances, there are multiple sources and many alternatives to choose from.

    Stencil: Filigree Leaf Stencil, A Colorful Life Designs

    Stamps:  Simply Sentimental,  Trinity Stamps

    Waffle Flower Grip Mat, 8.5 x 6.5, Scrapbook.com

    Ink: Metallic Ink- Lisa Horton, Glitter & Ink

    Blending Tool:  Studio Light, Ecstasy Crafts

    Versafine Onyx, Simon Says Stamp

    Adhesive: Tombow Aqua, Michaels

    Card Base & Card Face: Accent 100 lb., Amazon

    Do you have comments or thoughts to share on this design?  Drop me a line in the Comments Section below –  I’d love to hear from you!

    You can also use the Comments Section  to be notified when I release new work

    Filigree Leaf by A Colorful Life Designs

  • Simple Moments Become Treasured Memories

    Simple Moments Become Treasured Memories

    Would you like to experiment with a design like this? You’ll find a supply list below, including a link to the stencil I used from A Colorful Life Designs.  Follow the link and use discount code ChrisFan10 to save 10% on your entire order! (Master Creator Bundles are excluded as they already have a 20% discount built in.)

    Let’s get Started:

    Card Base: 5.5 x 8.5, scored and folded at 4.25

    Card Face:  5 3/8 x 4 1/8

    Card Face:

    • I laid the card face onto the Grip Mat and applied green and blue ink with a soft hand. 
    • I placed the stencil over the card face and used a variety of dark and medium green inks over the exposed areas.
    • I moved the card face to the stamp positioner and added the image with Versafine Onyx.
    • I intensified the blue around the edges, which adds to the sense of looking into a scene.
    • I spattered the card face with white metallic watercolour .

    Other:

    • I stamped the sentiment on a piece of scrap cardstock and cut it out with a punch.
    • I cut two additional “blanks” with the punch.

    Assembly

    • I glued the three punched shapes together,  with the sentiment on top.
    • I glued the card face to the card base, and added the sentiment as shown.

    Final Thoughts:

    I love the soft colours with the gentle feel and sentiment used on this card.  

    Supplies: (and links where possible)

       I have listed which products I have used, and where they may be purchased. It’s a huge marketplace and in most instances, there are multiple sources and many alternatives to choose from.

    Stencil: Falling Leaves,  A Colorful Life Designs

    Stamp:  Stampin’ Up! (retired)

    Waffle Flower Grip Mat, 8.5 x 6.5, Scrapbook.com

    Metallic Watercolour: Amazon 

    Ink: Stampin’ Up!

    Blending Brushes: Stampin’ Up! 

    Versafine Onyx, Simon Says Stamp

    Adhesive: Tombow Aqua, Michaels

    Card Base & Card Face: Accent 100 lb., Amazon

    Do you have comments or thoughts to share on this design?  Drop me a line in the Comments Section below –  I’d love to hear from you!

    You can also use the Comments Section  to be notified when I release new work

    Falling Leaves by A Colorful Life Designs

    cc

  • Gotta tackle that To-Do list… but first COFFEE

    Gotta tackle that To-Do list… but first COFFEE

    “gotta have my coffee!” – the morning anthem of much of the world

    Would you like to experiment with a design like this? You’ll find a supply list below, including a link to the stencil I used from A Colorful Life Designs.  Follow the link and use discount code ChrisFan10 to save 10% on your entire order! (Master Creator Bundles are excluded as they already have a 20% discount built in.)

    Let’s get Started:

    Card Base: 5.5 x 8.5, scored and folded at 4.25

    Border Layer 5.5  x 4 1/8

    Card Face:  5.5 x 4 

    Card Face:

    • I laid the card face onto my Grip Mat and then positioned the stencil, offsetting the design to the left.
    • I used brown ink and a light hand to go over all exposed areas.
    • Working one row at a time, I masked half of each circle with a piece of paper, and once again went over exposed areas with brown ink and a light hand.  This made each circle two-toned, and provided additional visual interest.
    • I put the card face into my stamp positioner and added the focal sentiment with the coffee cups.  I used navy blue ink for this –  although it looks black in the picture, it’s navy, honest!
    • I placed the card face on my desktop and added coffee rings and spatter using the brown ink used earlier.
    •  I lightly spattered the card face with water, adding additional texture.

    Assembly

    • I glued the black border layer to the card base,  and then centered the card face on top of both.

    Final Thoughts:

    The stencil provides a great backdrop for this fun stamp:  just enough for visual interest without being a distraction.

    Supplies: (and links where possible)

       I have listed which products I have used, and where they may be purchased. It’s a huge marketplace and in most instances, there are multiple sources and many alternatives to choose from.

    Stencil: Quarter Moon,  A Colorful Life Designs

    Waffle Flower Grip Mat, 8.5 x 6.5, Scrapbook.com

    Versamark Embossing Ink: Simon Says Stamp

    Clear Embossing Powder,  Wow,  Simon Says Stamp

    Ink: Stampin’ Up!

    Blending Brushes: Stampin’ Up! 

    Adhesive: Tombow Aqua, Michaels

    Card Base & Card Face: Recollections 110 lb., Michaels

    Do you have comments or thoughts to share on this design?  Drop me a line in the Comments Section below –  I’d love to hear from you!

    You can also use the Comments Section  to be notified when I release new work

    Quarter Moons by A Colorful Life Designs

  • Send Big Love with a Handmade Card

    Send Big Love with a Handmade Card

    Would you like to experiment with a design like this? You’ll find a supply list below, including a link to the stencil I used from A Colorful Life Designs.  Follow the link and use discount code ChrisFan10 to save 10% on your entire order! (Master Creator Bundles are excluded as they already have a 20% discount built in.)

    Let’s get Started:

    Card Base: 5.5 x 8.5, scored and folded at 4.25

    Border Layer: 5.5 x 4.25

    Card Face: 5.5 x 4.25

    Card Face:

    • I put the card face into the stamp positioner and stamped the bunny a couple of times with black Memento ink, centering the image.
    • I coloured her in with alcohol markers  (Memento ink doesn’t react to alcohol, making it perfect for this purpose).
    • I put the card face onto the grip mat and positioned the stencil:  I used pink ink to create the pattern around the bunny –  using more ink/ more pressure around the edges and allowing the ink to fade as I neared the center.
    • I added a rectangular stitched die to the card face, centering carefully.  This die creates a pattern in the paper; \it is not a cutting die.
    • I returned the card face to the stamping platform and added the sentiment with Versafine Onyx.  This is actually one stamp: to create the separation, I had to mask off the appropriate section, and stamp the other.
    • I used a punch on all four corners to create the peek-a-boo pattern.

    Assembly

    • I glued the black border layer to the card base, and then added the card face on top of that.
    • I thought this card needed one final detail,  so I added a clear heart shaped gem to the card face to finish it off.

    Final Thoughts:

    • This bunny is absolutely adorable,  and that sentiment suits perfectly.
    • If I were to re-do this card,  I would position the “sending” a little further to the right –  but by the time I saw the problem on this card it was too late to fix!

    Supplies: (and links where possible)

       I have listed which products I have used, and where they may be purchased. It’s a huge marketplace and in most instances, there are multiple sources and many alternatives to choose from.

    Stencil: Droplet Grid,  A Colorful Life Designs

    Waffle Flower Grip Mat, 8.5 x 6.5, Scrapbook.com

    Stamps:

         Cuddly Girl, Nellie’s Choice, Ecstasy Crafts  (out of stock)

          Sentiment:  Technique Junkies  (out of business)

    Dies: Stitched with Whimsy, Stampin’ Up!  (retired)

    Ink: Stampin’ Up!

    Blending Brushes: Stampin’ Up! 

    Versafine Onyx, Simon Says Stamp

    Memento Ink: Stampin’ Up!

    Alcohol Markers:

         Stampin’ Blends: Stampin’ Up!

         Copics:  Wallacks

    Adhesive: Tombow Aqua, Michaels

    Card Base & Card Face: Accent 100 lb., Amazon

    Do you have comments or thoughts to share on this design?  Drop me a line in the Comments Section below –  I’d love to hear from you!

    You can also use the Comments Section  to be notified when I release new work

    Droplet Grid by A Colorful Life Designs

  • Create a cute,cheeky birthday hug –  and share a giggle!

    Create a cute,cheeky birthday hug – and share a giggle!

    you’re old

    Would you like to experiment with a design like this? You’ll find a supply list below, including a link to the stencil I used from A Colorful Life Designs.  Follow the link and use discount code ChrisFan10 to save 10% on your entire order! (Master Creator Bundles are excluded as they already have a 20% discount built in.)

    Let’s get Started:

    Card Base: 5.5 x 8.5, scored and folded at 4.25

    5.5 x 4.25

    Card Face:

    • I laid the card face down on the Grip Mat and then positioned the stencil with the lines running vertically.  
    • I  used a soft yellow ink and a light hand to create the pattern.
    • I removed the stencil and rotated it so that the lines were running horizontally,  and again applied soft yellow ink with a light hand.
    • Voila –  a fun plaid had been created!
    • After removing the stencil, I put the card face into my stamp positioner and stamped the girl using black Memento ink.   I coloured her using alcohol markers.
    • I placed the three lines of sentiment as shown in the picture:  they were placed very deliberately, even though they have a random appearance.
    • (The sentiments are all on one stamp,  and I had to mask carefully to scatter them on the card face.)
    • I spattered a bit of green ink across the card face.

    Assembly

    • I glued the card face to the card base.
    • I glued small gems here and there on the card face. 

    Final Thoughts:

    I love this cute wee girl –   she can take on so many moods,  depending on what kind of card you want to create.  The plaid created with the stencil is a great background for her.

    Supplies: (and links where possible)

       I have listed which products I have used, and where they may be purchased. It’s a huge marketplace and in most instances, there are multiple sources and many alternatives to choose from.

    Stencil:  Drizzled Lines, a Colorful Life Designs

    Waffle Flower Grip Mat, 8.5 x 6.5, Scrapbook.com

    Stamps: 

        Joyful Echoes, Unity Stamps

        Sentiment: Technique Junkies  (no longer in business)

    Ink: Stampin’ Up!

    Blending Brushes: Stampin’ Up! 

    Versafine Onyx, Simon Says Stamp

    Memento Ink: Stampin’ Up!

    Alcohol Markers:

         Stampin’ Blends: Stampin’ Up!

         Copics:  Wallacks

    Adhesive: Tombow Aqua, Michaels

    Card Base & Card Face: Accent 100 lb., Amazon

    Do you have comments or thoughts to share on this design?  Drop me a line in the Comments Section below –  I’d love to hear from you!

    You can also use the Comments Section  to be notified when I release new work

  • What is more longed-for than time to relax?

    What is more longed-for than time to relax?

    Would you like to experiment with a design like this? You’ll find a supply list below, including a link to the stencils I used from A Colorful Life Designs.  Follow the link and use discount code ChrisFan10 to save 10% on your entire order! (Master Creator Bundles are excluded as they already have a 20% discount built in.)

    Let’s get Started:

    Card Base: 5.5 x 8.5, scored and folded at 4.25

    Border Layer: 5.5 x 4.25

    Card Face:  5.3/8 x 4 1/8

    Card Face:

    • I laid the card face onto my grip mat and positioned the Flame Edger Stencil. Using the lower ⅔ of the space,  I moved the stencil around, applying green ink.  I changed areas on the stencil to produce different  patterns of “grass”,  and also changed the intensity of the ink here and there.
    • I changed to the Cloud Edger stencil and blue ink to create the sky on the upper ⅓ of the card face.
    • I placed the card face into the stamp positioner and stamped the image 3X with Versafine Onyx.

    This is an old rubber stamp,  so positioning it where I wanted it in the design involved stamping onto acetate which was  placed over the card face, stamping and moving the stamp slightly until it was where it needed to be.

    Other:

    • I looked through my sentiment binder and selected Happy Retirement as a great match for this image.
    • I added dimensional foam tape to the back of the sentiment.

    Assembly

    • I glued the black border layer to the card base.
    • I centered the card face on top of this.
    • I added the sentiment as shown.

    Final Thoughts:

    I love finding alternate ways to use my products,  and when I was looking at the Flame Edger stencil I could see potential for creating grass.  And then…..  a cute card was born!

    Supplies: (and links where possible)

       I have listed which products I have used, and where they may be purchased. It’s a huge marketplace and in most instances, there are multiple sources and many alternatives to choose from.

    Stencils:

    Flame Edger:  A Colorful Life Designs

    Grass Edger: A Colorful Life Designs

    Waffle Flower Grip Mat, 8.5 x 6.5, Scrapbook.com

    Versamark Embossing Ink: Simon Says Stamp

    Stamps:  old, and long retired

    Ink: Stampin’ Up!

    Blending Brushes: Stampin’ Up! 

    Versafine Onyx, Simon Says Stamp

    Adhesive: Tombow Aqua, Michaels

    Card Base & Card Face: Accent 100 lb., Amazon

    Do you have comments or thoughts to share on this design?  Drop me a line in the Comments Section below –  I’d love to hear from you!

    You can also use the Comments Section  to be notified when I release new work.

    Fire Edger by A Colorful Life Designs

  • Send a supportive, encouraging card to that special Someone

    Send a supportive, encouraging card to that special Someone

    Would you like to experiment with a design like this? You’ll find a supply list below, including a link to the stencil I used from A Colorful Life Designs.  Follow the link and use discount code ChrisFan10 to save 10% on your entire order! (Master Creator Bundles are excluded as they already have a 20% discount built in.)

    Let’s get Started:

    Card Base: 4.25 x 11, scored and folded at 5.5

    Black Border Layer: 4.25 x 5.5

    Kraft Card Face:  4 x 5.5

    Card Face:

    • I placed the card face into my stamp positioner and used red ink to stamp the image.  I stamped three times  to ensure a clear, fully saturated image.
    • I moved the card face to my grip mat, and positioned the stencil.  I applied brown ink with a soft hand over the exposed areas,  avoiding the image.
    • I went around the borders on the card face with a light hand, brushing on the red ink used for stamping.
    • I put the card face into an embossing folder and ran it through the Big Shot to create texture.

    Other:

    • I placed a scrap of kraft cardstock into my stamp positioner and created the sentiment with Versafine Onyx.
    • I used a stitched die to cut this out,  and then went over the edges of this with red ink, as I had with the card face.

    Assembly

    • I glued the black border layer to the card base,  and then centered the card face on top of these.
    • I put dimensional foam tape on the back of the sentiment and put it in place as shown.

    Final Thoughts:

    I love kraft and red together,  and I also love how much the stencilling and the embossing add to this design (both subtle,  but critical to the end result).

    I am really happy with the simplicity of this card –  I think it makes a statement with minimal fuss.

    Supplies: (and links where possible)

       I have listed which products I have used, and where they may be purchased. It’s a huge marketplace and in most instances, there are multiple sources and many alternatives to choose from.

    Stencil: Broken Lines,  A Colorful Life Designs

    Waffle Flower Grip Mat, 8.5 x 6.5, Scrapbook.com

    Stamps:  Technique Junkies (no longer in business)

    Dies: Stampin’ Up! (retired)

    Ink: Stampin’ Up!

    Blending Brushes: Stampin’ Up! 

    Versafine Onyx, Simon Says Stamp

    Adhesive: Tombow Aqua, Michaels

    Card Base: Accent 100 lb., Amazon

    Do you have comments or thoughts to share on this design?  Drop me a line in the Comments Section below –  I’d love to hear from you!

    You can also use the Comments Section  to be notified when I release new work