Tag: diy card

  • Make him a  fun and fabulous Father’s Day card.

    Make him a fun and fabulous Father’s Day card.

    Let’s get Started:

    Would you like to experiment with a design like this? You’ll find a supply list below, including a link to the stencil I used from A Colorful Life Designs.  Follow the link and use discount code ChrisFan10 to save 10% on your entire order! (Master Creator Bundles are excluded as they already have a 20% discount built in.)

    Card Base: 5.5 x 8.5, scored and folded at 4.25

    Cranberry Border Layer: 5.5 x 4.25

    Copper Border Layer: 3.25 x 4.25 

               Alternatively, to save material-  just cut two ⅛ x 4.25 strips from the copper cardstock and glue them directly along the top and bottom of the card face.

    Card Face:  3 x 4.25   

    Card Face:

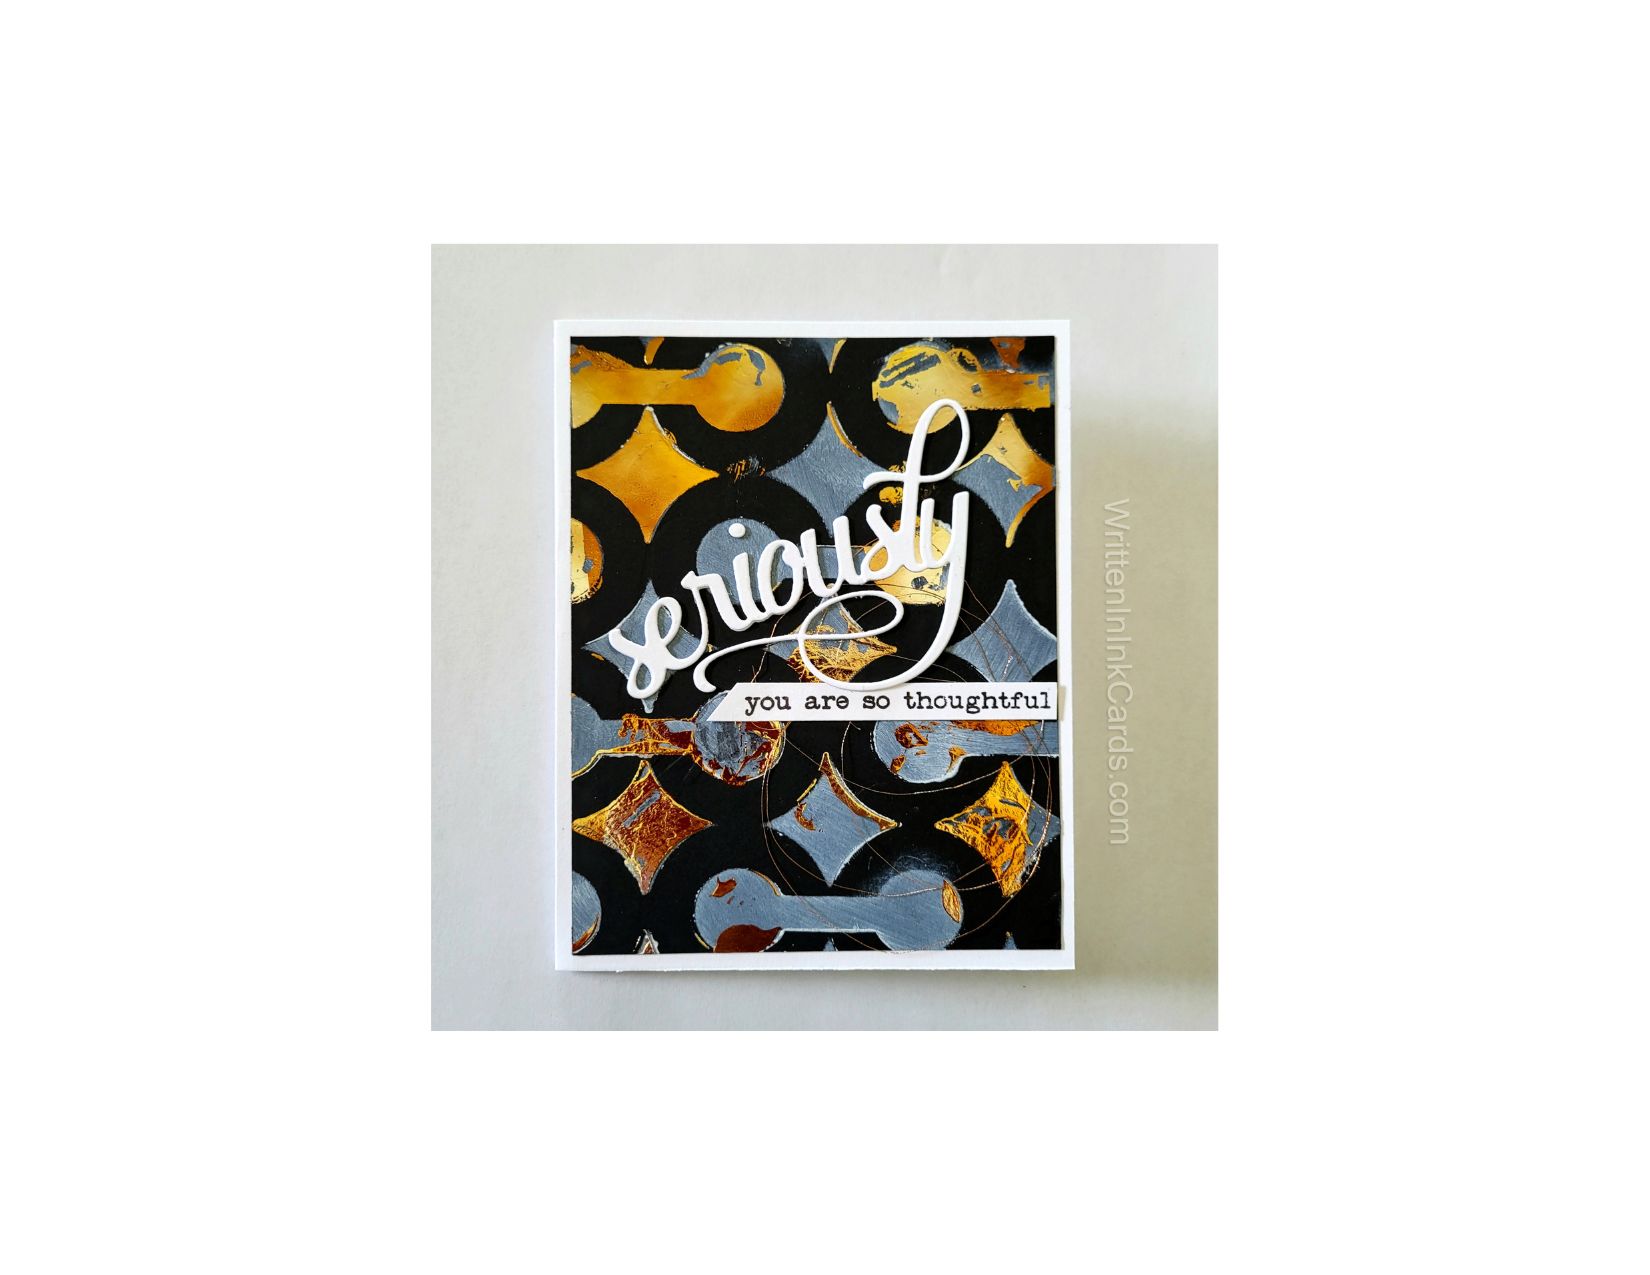
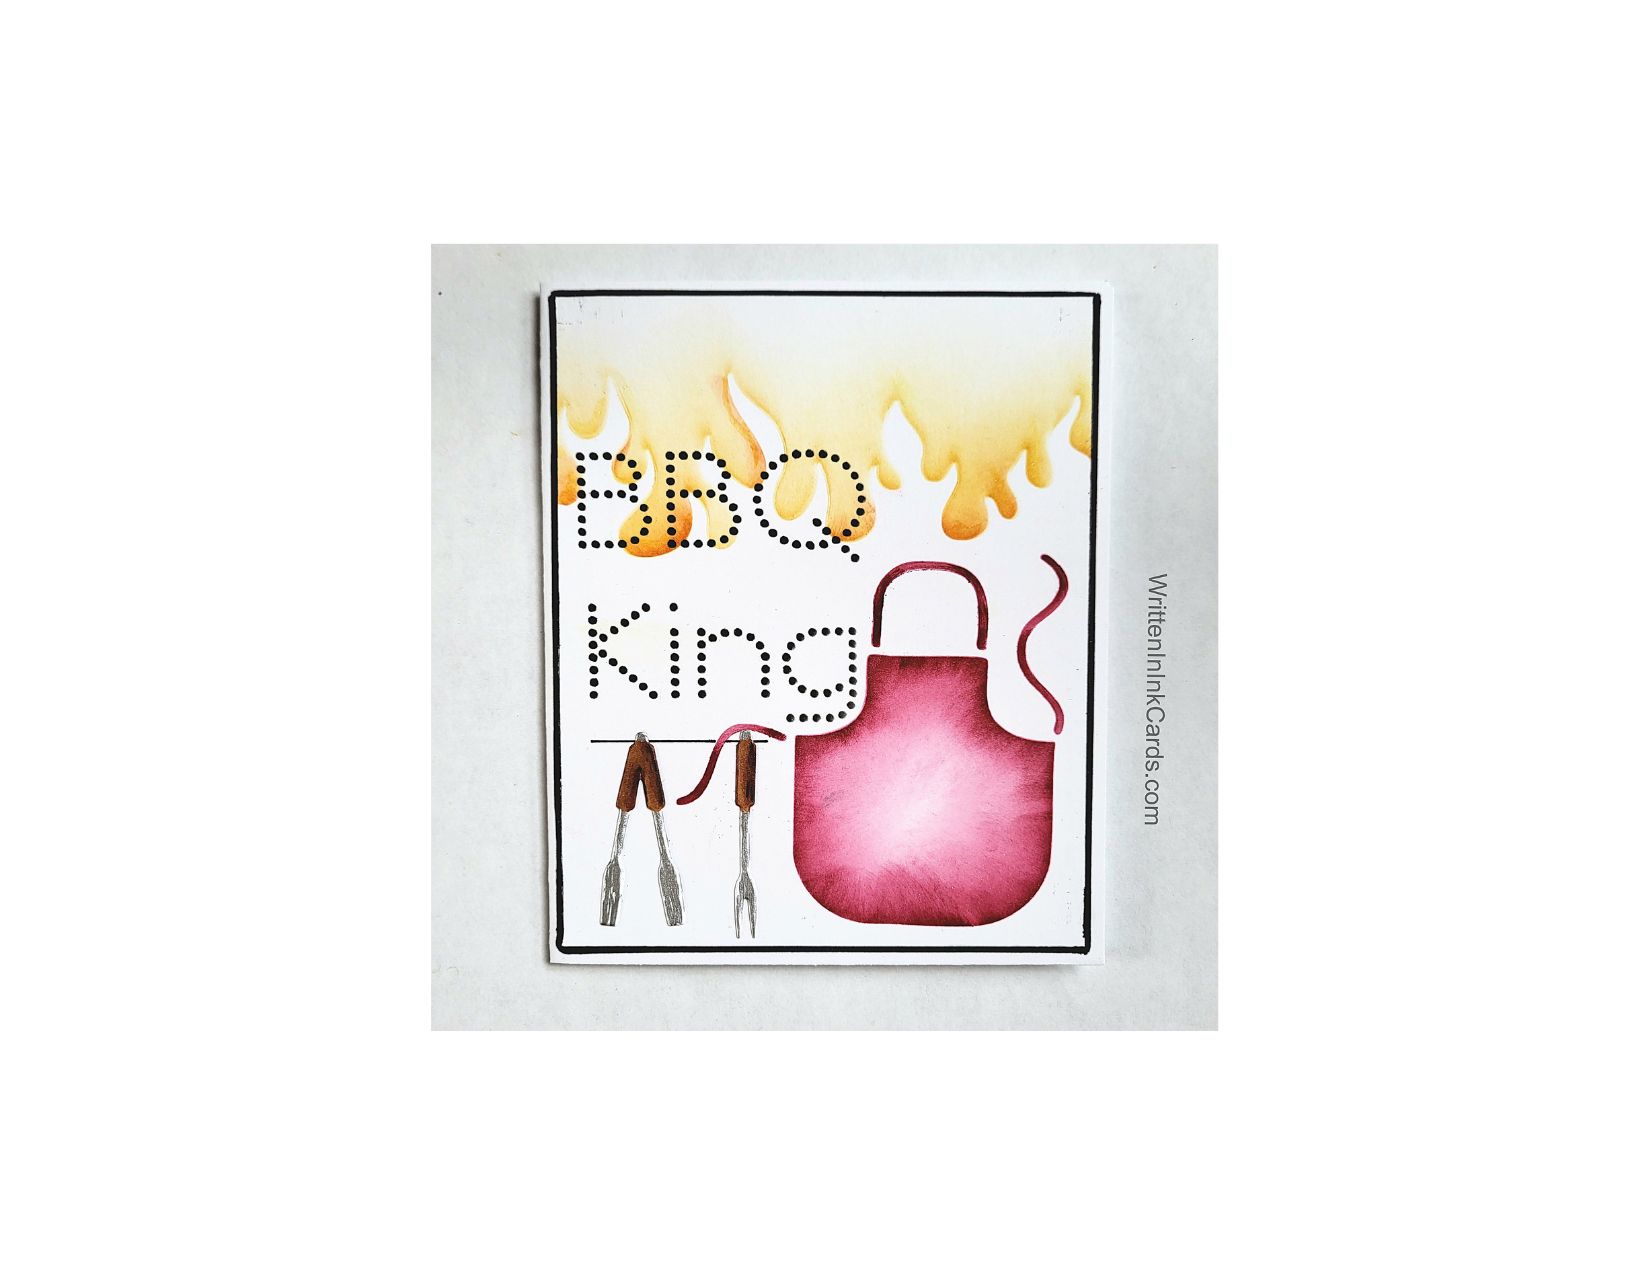
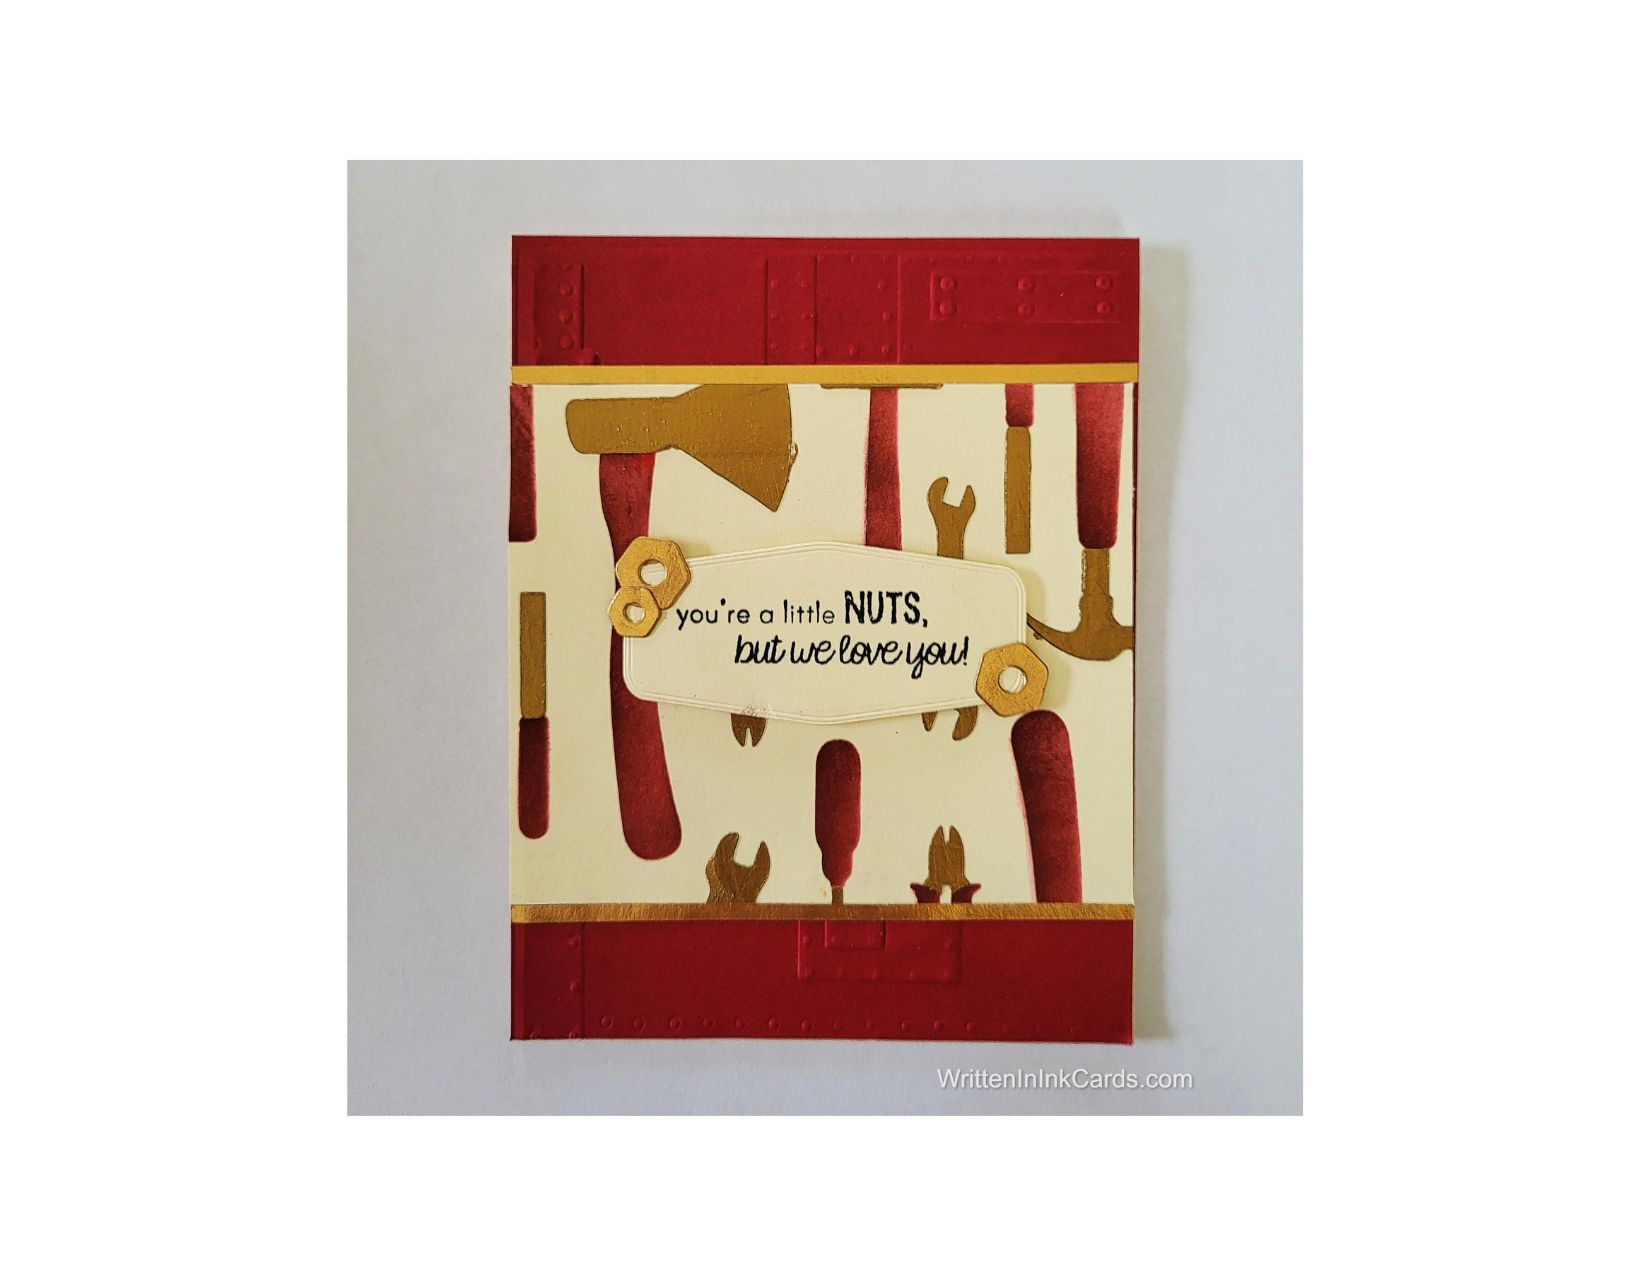
    • I placed the card face on my grip mat and then positioned the first part of the stencil (the handles).
    • Using cranberry ink and a moderate hand, I applied ink across the exposed areas.  I went back with a shading brush (smaller) and applied addition in specific areas to create depth in the handles.
    • I removed the first stencil and brought in the second layer (the “business end” of each tool).
    • I used copper metallic ink across all exposed areas.

       This is a very dense pigment ink,  and I wasn’t able to create further depth with additional layers.

    Other:

    • I stamped the sentiment with Versafine Onyx,  and cut it down to the finished size with a die.
    • I used an embossing folder on the cranberry border layer to create an industrial feel.
    • I used the same copper foil cardstock and dies to cut out the nuts used as an accent.

        If a piece of foiled cardstock was used for the copper border (rather than strips)  these nuts could be cut from the center of that piece – no one would know!   

    Assembly

    • I glued the cranberry border layer to the card base, and added the copper border layer and card face on top centering appropriately.
    • I put dimensional foam on the back of the sentiment and put it in place in the center of the card.
    • I added the small copper nuts as shown.

    Final Thoughts:

    Such a fun card:  I love the colours and textures.  And I love that sentiment, combined with the wee embellishments.

    Supplies: (and links where possible)

       I have listed which products I have used, and where they may be purchased. It’s a huge marketplace and in most instances, there are multiple sources and many alternatives to choose from.

    Stencil: Layered Tools, A Colorful Life Designs

    Waffle Flower Grip Mat, 8.5 x 6.5, Scrapbook.com

    Stamp and Die:  Taylored Expressions (retired)

    Ink: Stampin’ Up!

    Metallic Ink: Copper Pot:  Lisa Horton, Glitter & Ink

    Blending Brushes: Stampin’ Up! 

    Shading Brushes: Waffle Flower, Amazon

    Versafine Onyx, Simon Says Stamp

    Adhesive: Tombow Aqua, Michaels

    Copper Foil Cardstock:  Reflections,  Michaels

    Card Base & Card Face: Accent 100 lb., Amazon

    Do you have comments or thoughts to share on this design?  Drop me a line in the Comments Section below –  I’d love to hear from you!

    You can also use the Comments Section  to be notified when I release new work

    Layered Tools from A Colorful Life Designs

  • Make an Impression with an Exciting Mixed-Media Card

    Make an Impression with an Exciting Mixed-Media Card

    Would you like to experiment with a design like this? You’ll find a supply list below, including a link to the stencil I used from A Colorful Life Designs.  Follow the link and use discount code ChrisFan10 to save 10% on your entire order! (Master Creator Bundles are excluded as they already have a 20% discount built in.)

    Let’s get Started:

    Card Base: 5.5 x 8.5, scored and folded at 4.25

    Card Face: 5.25 x 4

    Card Face:

    • After laying the black cardstock onto the grip mat,  I positioned the stencil.
    • I used white pigment ink across the exposed surface, repeating a couple of times to build intensity. I had used pigment ink, so  I put this aside for several hours to allow the ink to dry fully.
    • I put the stencil back in place, lining the pattern up carefully; and then added Duo Gel randomly on the inked areas.
    • I placed the stencil water immediately,  and once again put the card face aside to dry.
    • Once the gel had dried (it goes on white,  but is transparent when dry), I added a piece of transfer foil and ran it through my Big Shot.  After pulling the foil away I was left with a wonderfully shiny, random, addition to to the pattern.

    Other:

    • I die cut the Seriously from white card stock twice, and glued them together.
    • I stamped the rest of the sentiment and used my trimmer to cut it down to the final size.

    Assembly

    • I glued the card face to the card base.
    • I glued the large die cut to the card face,  and then positioned the smaller rectangle underneath.

    Final Thoughts:

    I love the look of the stencilled pattern on black cardstock, and also the combination that created the sentiment for the card.

    Supplies: (and links where possible)

       I have listed which products I have used, and where they may be purchased. It’s a huge marketplace and in most instances, there are multiple sources and many alternatives to choose from.

    Stencil: Open Coils,  A Colorful Life Designs

    Waffle Flower Grip Mat, 8.5 x 6.5, Scrapbook.com

    Versamark Embossing Ink: Simon Says Stamp

    Dies:  Seriously,  Picket Fences (retired)

    Ink: Stampin’ Up!

    Blending Brushes: Stampin’ Up! 

    Versafine Onyx, Simon Says Stamp

    Deco Gel:  Therm O Web, Amazon

    Transfer Foil: Deco Foil, Therm O Web, Amazon

    Adhesive: Tombow Aqua, Michaels

    Card Base & Card Face: Accent 100 lb., Amazon

    Do you have comments or thoughts to share on this design?  Drop me a line in the Comments Section below –  I’d love to hear from you!

    You can also use the Comments Section  to be notified when I release new work

    Open Coils from A Colorful Life Designs

  • Stencilling + Paper Piecing on a DIY Card?  A fast & easy technique.

    Stencilling + Paper Piecing on a DIY Card? A fast & easy technique.

    Would you like to experiment with a design like this? You’ll find a supply list below, including a link to the stencil I used from A Colorful Life Designs.  Follow the link and use discount code ChrisFan10 to save 10% on your entire order! (Master Creator Bundles are excluded as they already have a 20% discount built in.)

    Let’s get Started:

    Card Base: 5.5 x 8.5, scored and folded at 4.25

    Black Border Layer:  5.5 x 4.25

    Card Face:  5.5 x 4.25, copy paper

    Patterned Paper

    Card Face:

    I decided to use this stencil with patterned paper instead of ink, creating a very different look.

    • I laid the stencil on the green plaid paper and traced the lines to create the suit jacket, and cut out the pieces
    • I traced the bow tie onto the orange patterned paper and cut out the pieces.

    This stencil is approximately 5.5 x 5.5,   and my card was going to be 5.5 x 4.25 –  I had to make the suit jacket smaller somehow.   Rather than cut the extra width off the sides,  I overlapped the two pieces on the copy paper.  This gave me a smaller V,  which worked well with that width.

    • I glued the two pieces of the suit in place, overlapping as necessary.
    • I glued the bow tie in place, allowing it to extend onto the green plaid.

    Other:

    • I stamped the sentiment with Versafine Onyx and cut it out with a die.

    Assembly

    • I glued the black border layer to the card base,  and then glued the copy paper layer on top of both.
    • I added foam tape to the back of the sentiment and put it in place.
    • I glued a tiny white button to the “shirt”.
    • I traced around the button and the pieces of the bow tie with a black fineliner,  providing more definition.

    Final Thoughts:

    I used papers to create a sort of quirky/geeky feel for this suit –  I love the result. Different papers will produce very different results.

    I don’t often do paper piecing, but it’s so much fun.

    Supplies: (and links where possible)

       I have listed which products I have used, and where they may be purchased. It’s a huge marketplace and in most instances, there are multiple sources and many alternatives to choose from.

    Stencil:  The Tux,  A Colorful Life Designs

    Versafine Onyx, Simon Says Stamp

    Adhesive: Tombow Aqua, Michaels

    Card Base & Card Face: Accent 100 lb., Amazon

    Do you have comments or thoughts to share on this design?  Drop me a line in the Comments Section below –  I’d love to hear from you!

    You can also use the Comments Section  to be added to the list, and notified when I release new work.

    The Tux by A Colorful Life Designs

  • DIY a Card that Celebrates the Dreamer in your Life.

    DIY a Card that Celebrates the Dreamer in your Life.

    Would you like to experiment with a design like this? You’ll find a supply list below, including a link to the stencil I used from A Colorful Life Designs.  Follow the link and use discount code ChrisFan10 to save 10% on your entire order! (Master Creator Bundles are excluded as they already have a 20% discount built in.)

    Let’s get Started:

    Card Base:  5.5 x 8.5, scored and folded at 4.25

    Kraft Card Face:  : 5.5 x 4.25

    Vellum:   2 x 4.5

    Card Face:

    • I laid the card face down onto my grip mat and positioned the stencil.  I used tan coloured ink and a soft hand over the exposed areas to create the pattern.
    • Removing the stencil and setting it aside,  I brushed the same ink around the edges of the card face.
    • I placed the card face in an embossing folder and ran it through my Big Shot.
    • I added several creases to the vellum to create additional texture and visual interest.

    Other:

    • I dusted the vellum liberally with anti-static powder.
    • I used Versamark embossing ink to stamp the image onto the vellum.
    • I sprinkled on copper embossing powder and then set it with my heat gun.

       **  when heat embossing vellum make sure that you have your heat gun really hot before starting and move the gun continually to avoid scorching the vellum.

    • I stamped the sentiment on a piece of Kraft cardstock using Versafine Onyx.  I sprinkled clear embossing powder over this and set it with my heat gun.
    • I used a stitched rectangle die to cut this to the finished size.

    Assembly

    • I wrapped the vellum around the card face towards the right as shown,  securing the ends with scotch tape.
    • I glued the card face to the card base.
    • I put foam tape on the back of the sentiment and placed it towards the bottom left of the card face.

    Final Thoughts:

    I quite like this combination of products –  they play together very nicely.

    After this picture was taken I added a “Happy Graduation”  sentiment above the one shown in the picture.  It makes a very nice masculine graduation card.

    Supplies: (and links where possible)

       I have listed which products I have used, and where they may be purchased. It’s a huge marketplace and in most instances, there are multiple sources and many alternatives to choose from.

    Stencil: Trim Octagon, A Colorful Life Designs

    Waffle Flower Grip Mat, 8.5 x 6.5, Scrapbook.com

    Versamark Embossing Ink: Simon Says Stamp

    Clear Embossing Powder: Wow,  R&R Scrapbooking

    Copper Embossing Powder: Wow , Glitter & Ink

    Stamps:  Observations, Tim Holtz, Stampers Anonymous

    Dies:  Stitched Rectangle, Stampin’ Up!  (retired)

    Ink: Stampin’ Up!

    Blending Brushes: Stampin’ Up! 

    Versafine Onyx, Simon Says Stamp

    Adhesive: Tombow Aqua, Michaels

    Card Base & Card Face: Accent 100 lb., Amazon

    Do you have comments or thoughts to share on this design?  Drop me a line in the Comments Section below –  I’d love to hear from you!

    You can also use the Comments Section  to be added to the list, and notified when I release new work.

    Trim Octagon by A Colorful Life Designs

  • The card no one wants to make

    The card no one wants to make

    Would you like to experiment with a design like this? You’ll find a supply list below, including a link to the stencil I used from A Colorful Life Designs.  Follow the link and use discount code ChrisFan10 to save 10% on your entire order! (Master Creator Bundles are excluded as they already have a 20% discount built in.)

    Let’s get Started:

    Card Base: 5.5 x 8.5, scored and folded at 4.25

    Border Layer: 5.5 x 4.25

    Card Face:  5.5 x 4.25 (before die-cutting)

    Card Face:

    • I laid the card face down onto my grip mat,  and then positioned the stencil I applied teal ink across the exposed area.
    • I moved the stencil down and repeated the process several times.  When I was approximately 60% of the way down the card face, i switched to green ink.

      This stencil actually has four sides with different representations of flames.  I chose one side, and stuck with it for this design.

    • After removing the stencil and setting it aside,  I put the card face into my stamp positioner. I stamped the floral image a couple of times with Versafine Onyx.
    • I used a deckled edge die to cut the card face down to it’s final size  (approximately 4 x 5.25)

    Other:

    • I wrapped silver metallic thread several times around the right hand side of the card face, securing the ends with scotch tape.
    • I used a small piece of the same thread to tie a knot around the threads,  pulling them together towards the top of the card face.  I put a tiny dot of glue on the knot,  and allowed this to dry before moving on.
    • This card could work for several different occasions:  I looked through my sentiment binder and selected the one shown in the image.

    Assembly

    • I glued the black border layer to the card base,  and then centered the card face on top of these.
    • I added a black irridescent gem over the knot in the metallic thread, using liquid glue to make sure it stayed put.
    • I added foam tape to the back of the sentiment and positioned it as shown in the picture.

    Final Thoughts:

    Sympathy cards are the ones that no one wants to have to make or send –  I’ve developed a habit of always having two or three on hand so I don’t have to make one when we receive some sade news.

    Supplies: (and links where possible)

       I have listed which products I have used, and where they may be purchased. It’s a huge marketplace and in most instances, there are multiple sources and many alternatives to choose from.

    Stencil:  Fire Edger,  A Colorful Life Designs

    Waffle Flower Grip Mat, 8.5 x 6.5, Scrapbook.com

    Versamark Embossing Ink: Simon Says Stamp

    Clear Embossing Powder: Wow,  R&R Scrapbooking

    Stamps: Bold Botanicals,  Tim Holtz, Amazon

    Dies:  Decked Edge,  Stampin’ Up!  (retired)

    Ink: Stampin’ Up!

    Blending Brushes: Stampin’ Up! 

    Versafine Onyx, Simon Says Stamp

    Adhesive: Tombow Aqua, Michaels

    Card Base & Card Face: Accent 100 lb., Amazon

    Do you have comments or thoughts to share on this design?  Drop me a line in the Comments Section below –  I’d love to hear from you!

    You can also use the Comments Section  to be added to the list, and notified when I release new work.

    The Fire Edger stencil from A Colorful Life Designs

  • Show your love,
 create  an elegant sympathy card

    Show your love, create an elegant sympathy card

    Would you like to experiment with a design like this? You’ll find a supply list below, including a link to the stencil I used from A Colorful Life Designs.  Follow the link and use discount code ChrisFan10 to save 10% on your entire order! (Master Creator Bundles are excluded as they already have a 20% discount built in.)

    Let’s get Started:

    Card Base: 5.5 x 8.5, scored and folded at 4.25

    Card Face:  5 x 3.75

    Three small scraps of white cardstock

    Silver Cardstock:   ⅛ x 5

    Card Face:

    • I began by spraying the back of this delicate stencil with Pixie Spray and waiting for (about) 30 seconds before using it.
    • Then I   laid the card face on my Grip Mat and positioned the stencil on the bottom of the card face –  approximately ⅔ of the stencil was on the paper.
    • I applied Versafine Onyx over the exposed areas, using firm pressure and building up ink until I had a bold, dramatic graphic.

    Other:

    • I put the first scrap of cardstock into my stamp positioner and stamped the flowers several times to get an intense black image.  I used the matching die to cut this out.
    • Using the second piece of scrap and the stamp positioner once again I stamped the sentiment a couple of times.  I fussy cut this, using my snips.
    • I die cut the white bow,  and coloured it with an embossing pen.  I sprinkled on silver embossing powder and set it with my heat gun.

    Assembly

    • I glued the card face to the card base.
    • I glued the die-cut bouquet in place and then added the silver bow as shown.
    • I added the sentiment to the card face.
    • I glued the narrow silver strip along the top of the card face.

    Final Thoughts:

    This was an interesting design to create –  the asymmetry in the design makes it interesting, as well as the still minimalistic feel.  I think it works well as a sympathy card.

    Initially the bow was going to remain white –  I changed my mind partway through the design (as I often do).

    I like to keep two or three sympathy cards on hand – experience has taught me that creating them upon need is very difficult.

    Supplies: (and links where possible)

       I have listed which products I have used, and where they may be purchased. It’s a huge marketplace and in most instances, there are multiple sources and many alternatives to choose from.

    Stencil: Swirl Band , A Colorful Life Designs

    Waffle Flower Grip Mat, 8.5 x 6.5, Scrapbook.com

    Versamark Embossing Pen:

    Silver Embossing Powder: Wow, 

    Stamp/Die: Floral Impressions, Hero Arts

    Blending Brushes: Stampin’ Up! 

    Versafine Onyx, Simon Says Stamp

    Adhesive: Tombow Aqua, Michaels

    Card Base & Card Face: Accent 100 lb., Amazon

    Do you have comments or thoughts to share on this design?  Drop me a line in the Comments Section below –  I’d love to hear from you!

    You can also use the Comments Section  to be added to the list, and notified when I release new work.

    Swirl Band by A Colorful Life Designs

  • A (quick & easy) gorgeous, inspirational handmade card.

    A (quick & easy) gorgeous, inspirational handmade card.

    Would you like to experiment with a design like this? You’ll find a supply list below, including a link to the stencil I used from A Colorful Life Designs.  Follow the link and use discount code ChrisFan10 to save 10% on your entire order! (Master Creator Bundles are excluded as they already have a 20% discount built in.)

    Let’s get Started:

    Card Base:   5.5 x 8.5, scored and folded at 4.25

    Border Layer: 5.5 x 4.25

    Card Face:  5.5 x 4   (subtle patterned paper)

    Card Face:

    • This stencil is delicate,  with long “strands” – so before I started, I sprayed the back with Pixie Spray.
    • Next I laid the card face on my Grip Mat, and then positioned the stencil. (I always allow approximately 30 seconds to allow the Pixie Spray to start working.)
    • I applied yellow ink across all exposed areas,  building up intensity in the top left and bottom right corners.
    • After removing the stencil I put the card face into my stamp positioner and added the dancer with dark yellow ink,  stamping a couple of times to create enough contrast with the background.
    • I removed that stamp and added the sentiment,  I stamped this three times with Versafine Onyx to achieve a crisp, intense result.

    When I want to add a sentiment directly to the card face, and need to be certain that it’s straight : I add a layer of acetate on top of the card face and stamp on that.   I make minor adjustments as necessary ,  cleaning the acetate and restamping until I’m satisfied.  Then I remove the acetate and stamp directly onto the card face.  This has saved a lot of work from hitting the trash!

    • I added spatter to the card face, using the reinker for the darker yellow.

    Assembly

    • I glued the black border layer to the card base, and then centered the card face on top of these.

    Final Thoughts:

    I love this elegant ballerina image,  and also the combination of the two stamps with this stencil. They all play together so very well!

    Although I used a subtle patterned paper for this,  the design would also work on regular cardstock.

    Supplies: (and links where possible)

       I have listed which products I have used, and where they may be purchased. It’s a huge marketplace and in most instances, there are multiple sources and many alternatives to choose from.

    Stencil: Glittering Hearts,  A Colorful Life Designs

    Waffle Flower Grip Mat, 8.5 x 6.5, Scrapbook.com

    Versamark Embossing Ink: Simon Says Stamp

    Clear Embossing Powder: Wow,  R&R Scrapbooking

    Stamps:  Dancer and Sentiment –  Technique Junkies (no longer in business)

    Ink: Stampin’ Up!

    Blending Brushes: Stampin’ Up! 

    Versafine Onyx, Simon Says Stamp

    Adhesive: Tombow Aqua, Michaels

    Card Base & Card Face: Accent 100 lb., Amazon

    Do you have comments or thoughts to share on this design?  Drop me a line in the Comments Section below –  I’d love to hear from you!

    You can also use the Comments Section  to be added to the list, and notified when I release new work.

    Glittering Hearts by A Colorful Life Designs

  • Celebrating the King of the Cookout with a DIY card

    Celebrating the King of the Cookout with a DIY card

    Would you like to experiment with a design like this? You’ll find a supply list below, including a link to the stencil I used from A Colorful Life Designs.  Follow the link and use discount code ChrisFan10 to save 10% on your entire order! (Master Creator Bundles are excluded as they already have a 20% discount built in.)

    Let’s get Started:

    Card Base: 5.5 x 8.5, scored and folded at  4.25

    Card Face:  5.25 x 4

    Card Face:

    After laying the card face on my Grip Mat, I positioned the stencil towards the top of the panel. I was using the section of the stencil which creates flames,  and I masked off any nearby openings.

    I brushed soft yellow ink over the exposed area,  and then (using a detail brush) I added touches of red to the base of the flames to provide visual interest.

    I rotated the stencil to allow the apron to appear in the bottom right of my card face.  After once again masking off nearby areas  I applied red ink.  I used a full sized brush for the main part of the apron,  and a detail brush for the strings.

    I repositioned the stencil again, this time to feature the dotty words.  After  (you guessed it!)  masking nearby areas  I applied black ink to create the fun font.

    Other:

    I die cut the BBQ tools from white cardstock.

    I used alcohol markers to colour the handles. 

    I used an embossing pen to colour the metallic parts of the tools, sprinkled some silver embossing powder over this and set it with my heat gun.

    Assembly

    I glued the card face to the card base.

    I used a ruler and a black marker to create a fine black border around the card face.  (There are two advantages to this:  it saves a piece of cardstock,  and I can draw a very fine line which is perfectly centered.)

    I used a ruler and a fineliner to draw a black line on the card face where shown,  and then glued the BBQ tools onto this.

    Final Thoughts:

    A fun “guy” card –  I haven’t decided if this will be for Father’s Day or a birthday.  My guy is truly a BBQ King,  he produces amazing results from the grill.

    Supplies: (and links where possible)

       I have listed which products I have used, and where they may be purchased. It’s a huge marketplace and in most instances, there are multiple sources and many alternatives to choose from.

    Stencil:  Kiss The Cook,  A Colorful Life Designs

    Waffle Flower Grip Mat, 8.5 x 6.5, Scrapbook.com

    Embossing Pen: Ranger, Amazon

    Silver  Embossing Powder: Wow, R&R Scrapbooking

    Dies:  Apron of Love,  Stampin’ Up!  (retired)

    Fineliner: Amazon

    Ink: Stampin’ Up!

    Blending Brushes: Stampin’ Up! 

    Detail Brushes:  Scrap n’ Stamp

    Versafine Onyx, Simon Says Stamp

    Adhesive: Tombow Aqua, Michaels

    Card Base & Card Face: Accent 100 lb., Amazon

    Do you have comments or thoughts to share on this design?  Drop me a line in the Comments Section below –  I’d love to hear from you!

    You can also use the Comments Section  to be added to the list, and notified when I release new work.

  • Easy Stencil Ideas for Beautiful DIY Mother’s Day Cards

    Easy Stencil Ideas for Beautiful DIY Mother’s Day Cards

    Would you like to experiment with a design like this? You’ll find a supply list below, including a link to the stencils I used from A Colorful Life Designs.  Follow the link and use discount code ChrisFan10 to save 10% on your entire order! (Master Creator Bundles are excluded as they already have a 20% discount built in.)

    Let’s get Started:

    Card Base: 5.5 x 8.5, scored and folded at 4.25

    Card Face:  5.5 x 4 (patterned paper)

    Card Face:

    • I began by laying the patterned paper on the Grip Mat and positioning the Love You stencil.
    • I used medium purple ink and a light hand to apply ink across all exposed areas.
    • After removing this stencil,  I replaced it with the Heart of Hearts stencil positioned at an angle and towards the left of the card face.
    • I applied the same purple ink with a heavier hand, allowing it to stand out against the first layer of stencilling.
    • I applied additional layers of ink to the left-hand side of the stencil,  building up intensity and depth.
    • I used gold watercolour paint to add a fine spatter to the card face.

    Other:

    • I stamped the sentiment with Versamark Embossing Ink, added gold embossing powder and set it with the heat gun.
    •  I cut this out with an oval die.

    Assembly

    • I glued the card face to the card base, centering vertically.
    • I put a thin strip of gold foil on both top and bottom of the card face.   This left me with a very narrow strip of the card base visible, which I didn’t care for.   I dealt with that by running an embossing pen along the strip, sprinkling gold embossing powder over top and setting it with my heat gun. 
    • I used double-faced tape to add metallic gold thread to the back of the sentiment.  I added a piece of foam tape as well,  and put it in place as shown.

    Final Thoughts:

    This patterned paper is so pretty with the gold marbling:  the gold accents I included in the design echo this very well.

    I was very happy with this card in the end.

    Supplies: (and links where possible)

       I have listed which products I have used, and where they may be purchased. It’s a huge marketplace and in most instances, there are multiple sources and many alternatives to choose from.

    Stencils:

        Love You:  A Colorful Life Designs

        Heart of Hearts,  A Colorful Life Designs

    Waffle Flower Grip Mat, 8.5 x 6.5, Scrapbook.com

    Embossing Pen: Ranger,  Amazon

    Gold  Embossing Powder:  Wow,  R&R Scrapbooking

    Metallic Watercolour: Amazon

    Dies:  Nesting Oval Dies,  Hero Arts

    Ink: Stampin’ Up!

    Blending Brushes: Stampin’ Up! 

    Versafine Onyx, Simon Says Stamp

    Adhesive: Tombow Aqua, Michaels

    Card Base & Card Face: Accent 100 lb., Amazon

    Do you have comments or thoughts to share on this design?  Drop me a line in the Comments Section below –  I’d love to hear from you!

    You can also use the Comments Section  to be added to the list, and notified when I release new work.

  • Design Techniques for Unique Greeting Cards are something to CHIRP about!

    Design Techniques for Unique Greeting Cards are something to CHIRP about!

    Would you like to experiment with a design like this? You’ll find a supply list below, including a link to the stencil I used from A Colorful Life Designs.  Follow the link and use discount code ChrisFan10 to save 10% on your entire order! (Master Creator Bundles are excluded as they already have a 20% discount built in.)

    I never feel that my day is something to chirp about until I’m caffeinated!

    Let’s get Started:

    Card Base:  5.5 x 8.5, scored and folded at 4.25

    Card Face:  5.25 x 4.25

    Card Face:

    • I placed the card face in my stamp positioner and stamped the focal image a couple of times with black Memento ink.
    • I coloured the image with alcohol markers. This caffeinated fella is ready to take center stage on the card!
    • After laying the card face on the Grip Mat,  I positioned the stencil, using a brayer to ensure good contact with the sticky surface of the mat.
    • I applied navy blue and teal ink across the exposed areas on the stencil, taking care to avoid the coloured image.

    Other:

    • I looked through my sentiment binder and found this pair – they are perfectly suited to the image!

    Assembly

    • I glued the card face to the card base,centering the vertical edges.
    • I created faux borders on the card by using a blue marker and a ruler. (The marker matched one of the blues used on the bird.)
    • I glued the sentiments in place as shown.
    • I drew brackets around the sentiment on the bottom, using a black fineliner.

    Final Thoughts:

    It’s odd what I don’t see when creating a card: for instance,  I see now that I forgot to create the outer border on the left of the card!   I will fix that up before sending it on.

    I love this sentiment,  and I like the concept of the brackets around the second half of it,  but if I recreate this card I will handwrite that one as I don’t like the combination of hand drawn brackets with the glued on sentiment.

    (but now that this fella is fully caffeinated, he’ll have more of a chance of remembering that question, LOL.)

    Supplies: (and links where possible)

       I have listed which products I have used, and where they may be purchased. It’s a huge marketplace and in most instances, there are multiple sources and many alternatives to choose from.

    Stencil: Square Swirl,  A Colorful Life Designs

    Waffle Flower Grip Mat, 8.5 x 6.5, Scrapbook.com

    Stamps:

        Coffee Doodle Doo,  Unity Stamps

         Simple Strips, Coffee: Taylored Expressions

    Dies:   Simple Strips Die, Taylored Expressions

    Ink: Stampin’ Up!

    Blending Brushes: Stampin’ Up! 

    Memento Ink: Stampin’ Up!

    Alcohol Markers:

         Stampin’ Blends: Stampin’ Up!

         Copics:  Wallacks

    Fineliner: Amazon

    Adhesive: Tombow Aqua, Michaels

    Card Base & Card Face: Accent 100 lb., Amazon

    Do you have comments or thoughts to share on this design?  Drop me a line in the Comments Section below –  I’d love to hear from you!

    You can also use the Comments Section  to be added to the list, and notified when I release new work.