A card for Christmas 2026! My goal is to be ahead of the game next year: I hope to make Christmas cards here and there between now and next November.
Card Face:
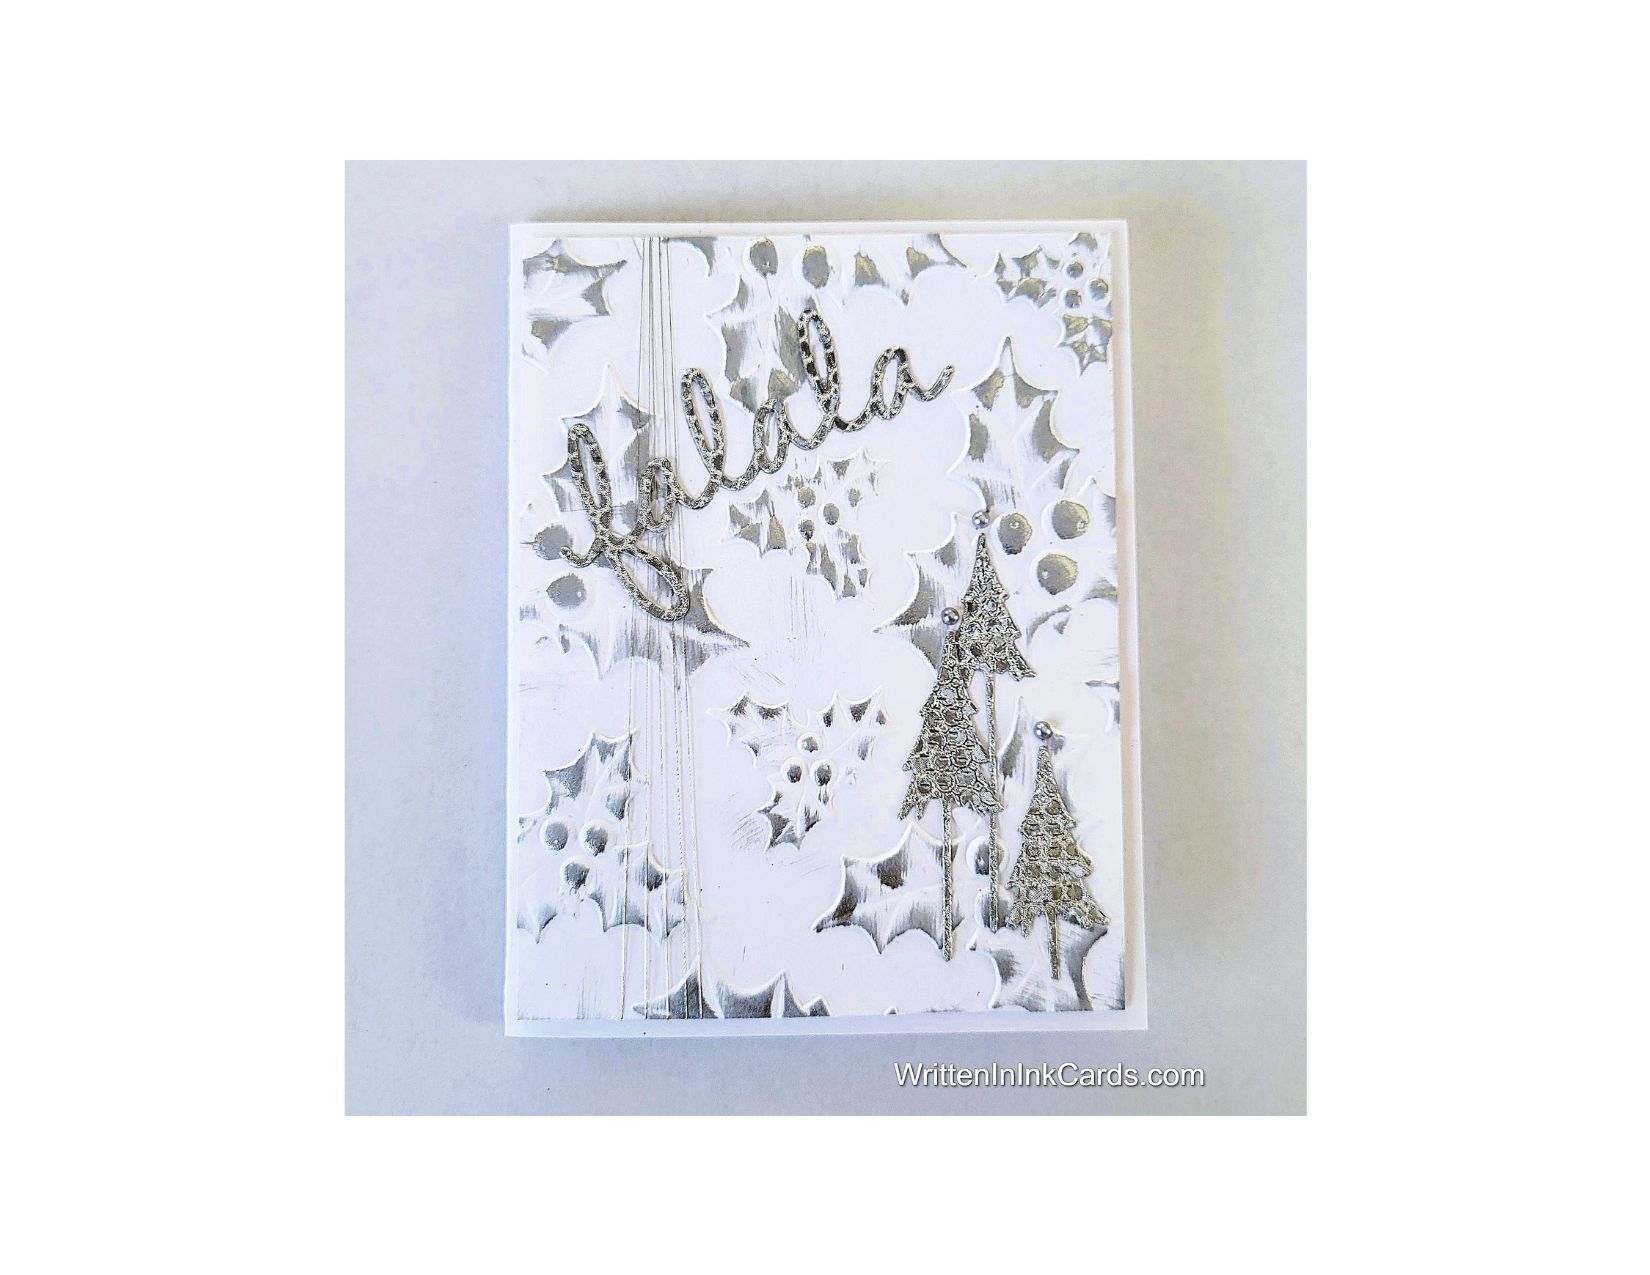
I inserted the card face into the embossing folder and ran it through the Big Shot.
I removed the paper from the folder and ran a silver ink pad lightly over the raised surfaces.
I secured silver metallic thread to the back of the cardface, at the top left.
I wound the thread around the card face 5 times, allowing it to gather at the top and fan out at the bottom. I snipped the thread and secured the end with scotch tape.
Other:
I had remnants of a patterned metallic silver paper that I used to die-cut the trees and the sentiment.
Assembly
I put dimensional foam on the back of the card face and centered it on the card base.
I glued the three trees in place as shown.
I glued the sentiment in place, allowing the left-hand side to overlap the silver threads.
I added a small silver pearl to the top of each tree.
Final Thoughts:
The silver ink used to highlight the embossing has a gorgeous gleam, and the die-cut silver elements on the card have a shine: the contrast between the two is fabulous.
Supplies: (and links where possible)
I have listed the products I have used and where they can be purchased. It’s a huge marketplace, and in most instances, there are multiple sources and many alternatives to choose from.
Embossing Folder: Holly Leaves and Berrys, Nellie’s Choice, Ecstasy Crafts
Would you like to experiment with a design like this? You’ll find a supply list below, including a link to the stencil I used from A Colorful Life Designs. Follow the link and use discount code ChrisFan10 to save 10% on your entire order! (Master Creator Bundles are excluded as they already have a 20% discount built in.)
Let’s get Started:
Card Base: 5.5 x 8.5, scored and folded at 4.25
Card Face: 5.25 x 4
I am trying to make a few Christmas cards as I go along this year, to avoid the rush in November. We’ll see if I am successful as the year goes on.
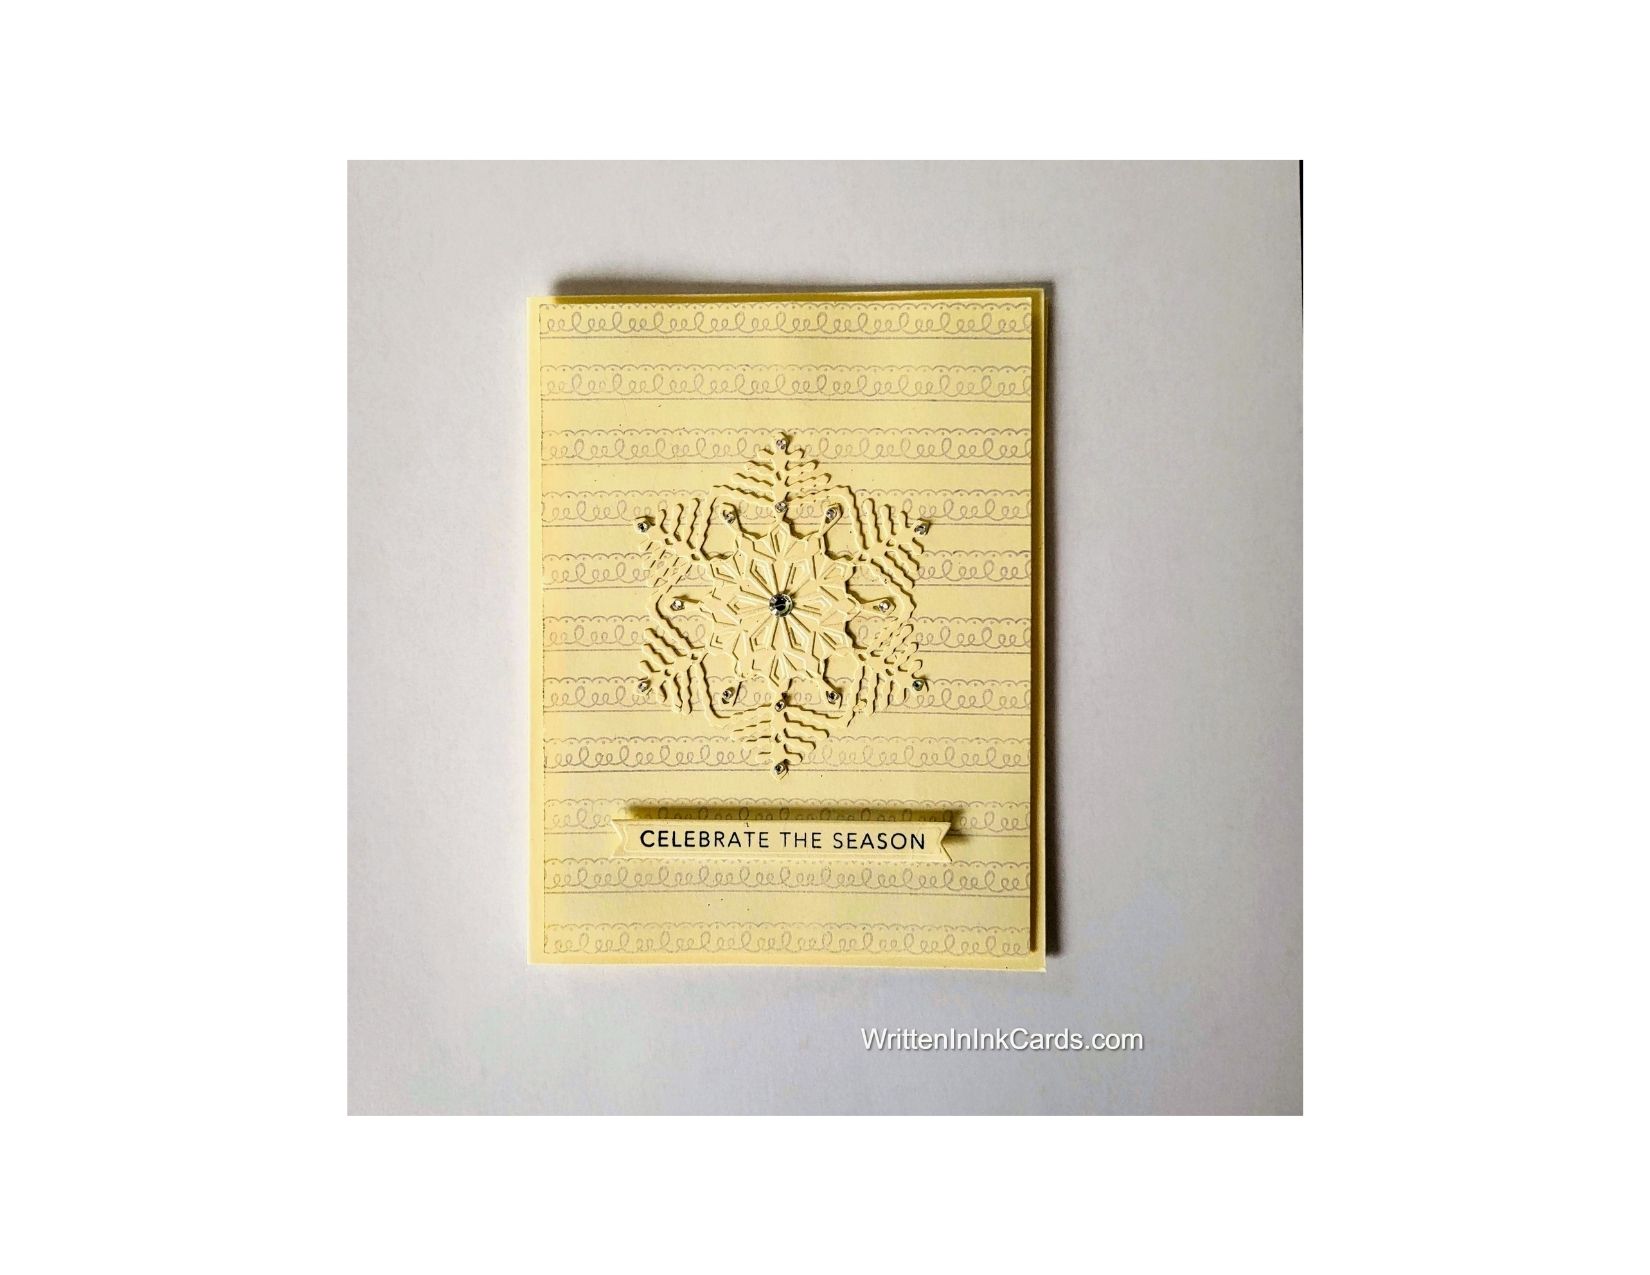
Card Face:
I placed the card face in my stamp positioner and positioned the stamp at the bottom of the paper.
I stamped in soft blue ink, moved the card face down ½” and stamped again.
I repeated this process until I reached the top of the page.
One advantage of a stamp positioner is its ability to create a background pattern or feature with a single stamp.
Other:
I had previously created both the snowflake and the sentiment; it was fast and easy to retrieve them from my binders. (I have two: one for sentiments and one for shapes and precut /coloured images.They are great time savers!)
Assembly
I put dimensional foam on the back of the card face, and then centered it on the card base.
I glued the snowflake into the center of the card face. I added tiny, iridescent rhinestones around the snowflake, and a larger one in the center.
I put a strip of dimensional foam on the back of the sentiment and positioned it under the snowflake, as shown.
Final Thoughts:
This card is very simple and has a delightfully rustic feel, created by that background. It almost takes on the look of lined paper. Varying the background would change the style of the card entirely: elegant, contemporary or grunge could all be easily achieved.
Supplies: (and links where possible)
I have listed which products I have used, and where they may be purchased. It’s a huge marketplace and in most instances, there are multiple sources and many alternatives to choose from.
Would you like to experiment with a design like this? You’ll find a supply list below, including a link to the stencil I used from A Colorful Life Designs. Follow the link and use discount code ChrisFan10 to save 10% on your entire order! (Master Creator Bundles are excluded as they already have a 20% discount built in.)
Let’s get Started:
Card Base: 5.5 x 8.5, scored and folded at 4.25
Border Layer: 5.5 x 4.25
Card Face: 5.5 x 4
Card Face:
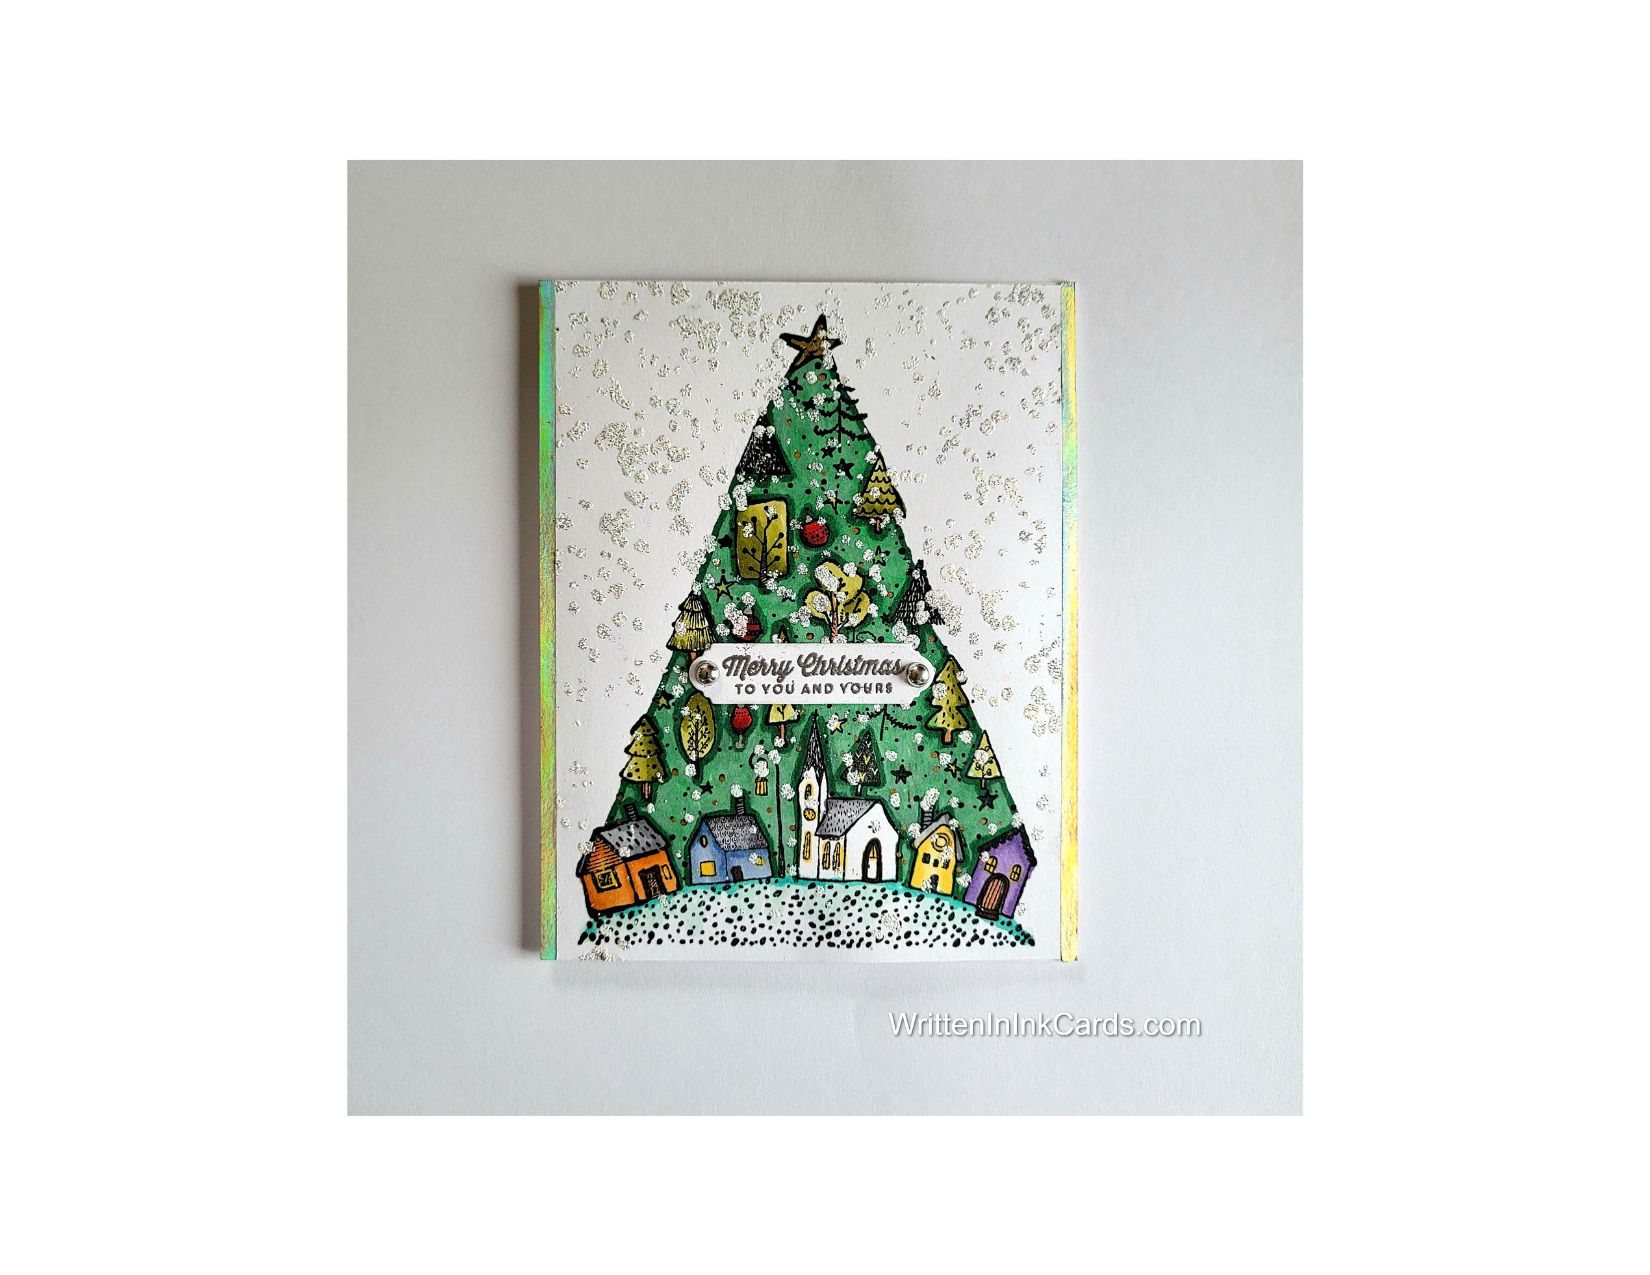
I stamped the tree with Memento Black ink and used alcohol markers to colour it.
I outlined the elements on the tree with gray ink to make them stand out from the background.
I placed the stencil over the image and pressed my Versamark embossing ink pad firmly over all exposed areas, going over each area more than once to ensure good coverage.
I sprinkled white glitter embossing powder over the surface and set it with my heat gun.
Other:
I looked through my sentiments binder and chose one that fit the mood of the piece and was the correct size.
Assembly
I glued the holographic border layer to the card base, and then glued the card face on top, centering vertically.
I added the sentiment as shown, and then added a small silver pearl to both ends of the sentiment.
Final Thoughts:
This is a fun image with a contemporary feel: after I had coloured it I had a hard time deciding how to finish it off. In the end, a bit of sparkly snow was the perfect finishing touch.
Supplies: (and links where possible)
I have listed which products I have used, and where they may be purchased. It’s a huge marketplace and in most instances, there are multiple sources and many alternatives to choose from.
Would you like to experiment with a design like this? You’ll find a supply list below, including a link to the stencil I used from A Colorful Life Designs. Follow the link and use discount code ChrisFan10 to save 10% on your entire order! (Master Creator Bundles are excluded as they already have a 20% discount built in.)
Let’s get Started:
Card Base: 5.5 x 8.5, scored and folded at 4.25
Card Face: 5.5 x 4
Focal die cut: 3×3 gold foil (after die cutting)
Scraps of cardstock for die-cut trees
Transfer foil cut to 5.5 x 4
Card Face:
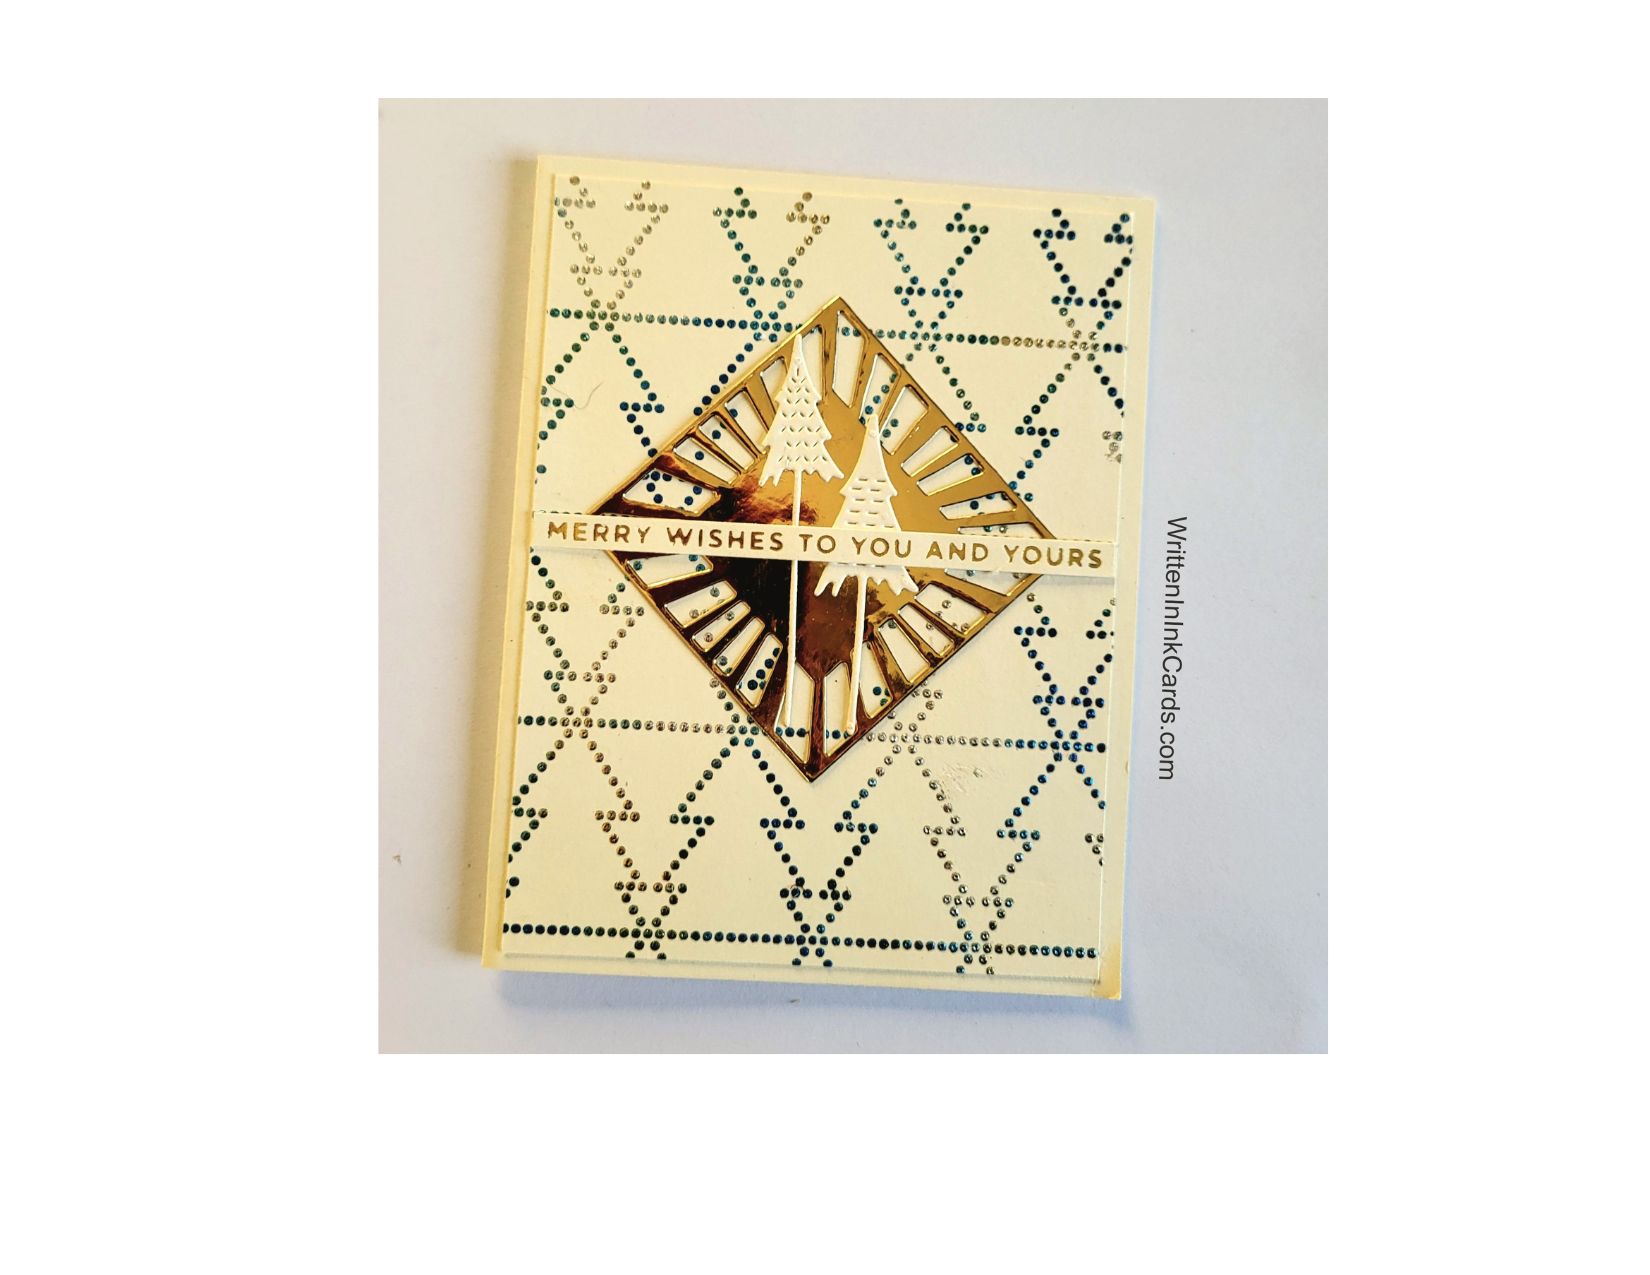
I placed the card face onto a piece of scrap paper, positioned the stencil and secured it with Mint Tape.
I have seen content producers use duo gel/embossing pastes with their Grip Mat, and everything turns out just fine. I don’t like to risk anything drying on my mat, so I prefer to play it safe and use scrap computer paper.
I spread Duo Gel across all exposed areas, carefully removed the stencil, and set the card face down to dry.
Duo gel dries into a very,very sticky adhesive – so the stencil went into water immediately, to be scrubbed when my session was over. This prevents the gel from drying on the stencil – it’s almost impossible to remove at that point.
Once the gel had dried, I carefully laid the transfer foil onto the card face and ran it through the Big Shot. When I removed the foil the sticky Duo Gel caused the stencilled pattern to stay behind.
Other:
I placed the die onto the gold foil and ran it through the Big Shot.
I used two tree dies and the cardstock scraps, combining these with the Big Shot to create the small trees.
I looked through my sentiment binder to find a great sentiment for this card.
Assembly
I glued the card face onto the card base, centering vertically.
I turned the die-cut gold square to create a diamond, and glued that into the center of the card face, and then glued the trees on top of this.
I positioned the sentiment strip across the center of the card face.
Final Thoughts:
This is a very structured card, softened by the foil on the card face. Between that and the die cut from gold foil, the end result has a lovely shine and shimmer.
Supplies: (and links where possible)
I have listed which products I have used, and where they may be purchased. It’s a huge marketplace and in most instances, there are multiple sources and many alternatives to choose from.
Black is an unusual choice for a holiday card, but so distinctive!
Would you like to experiment with a design like this? You’ll find a supply list below, including a link to the stencil I used from A Colorful Life Designs. Follow the link and use discount code ChrisFan10 to save 10% on your entire order! (Master Creator Bundles are excluded as they already have a 20% discount built in.)
Let’s get Started:
Card Base: 5.5 x 8.5, scored and folded at 4.25
Card Face: 5 ⅛ x 3 7/8
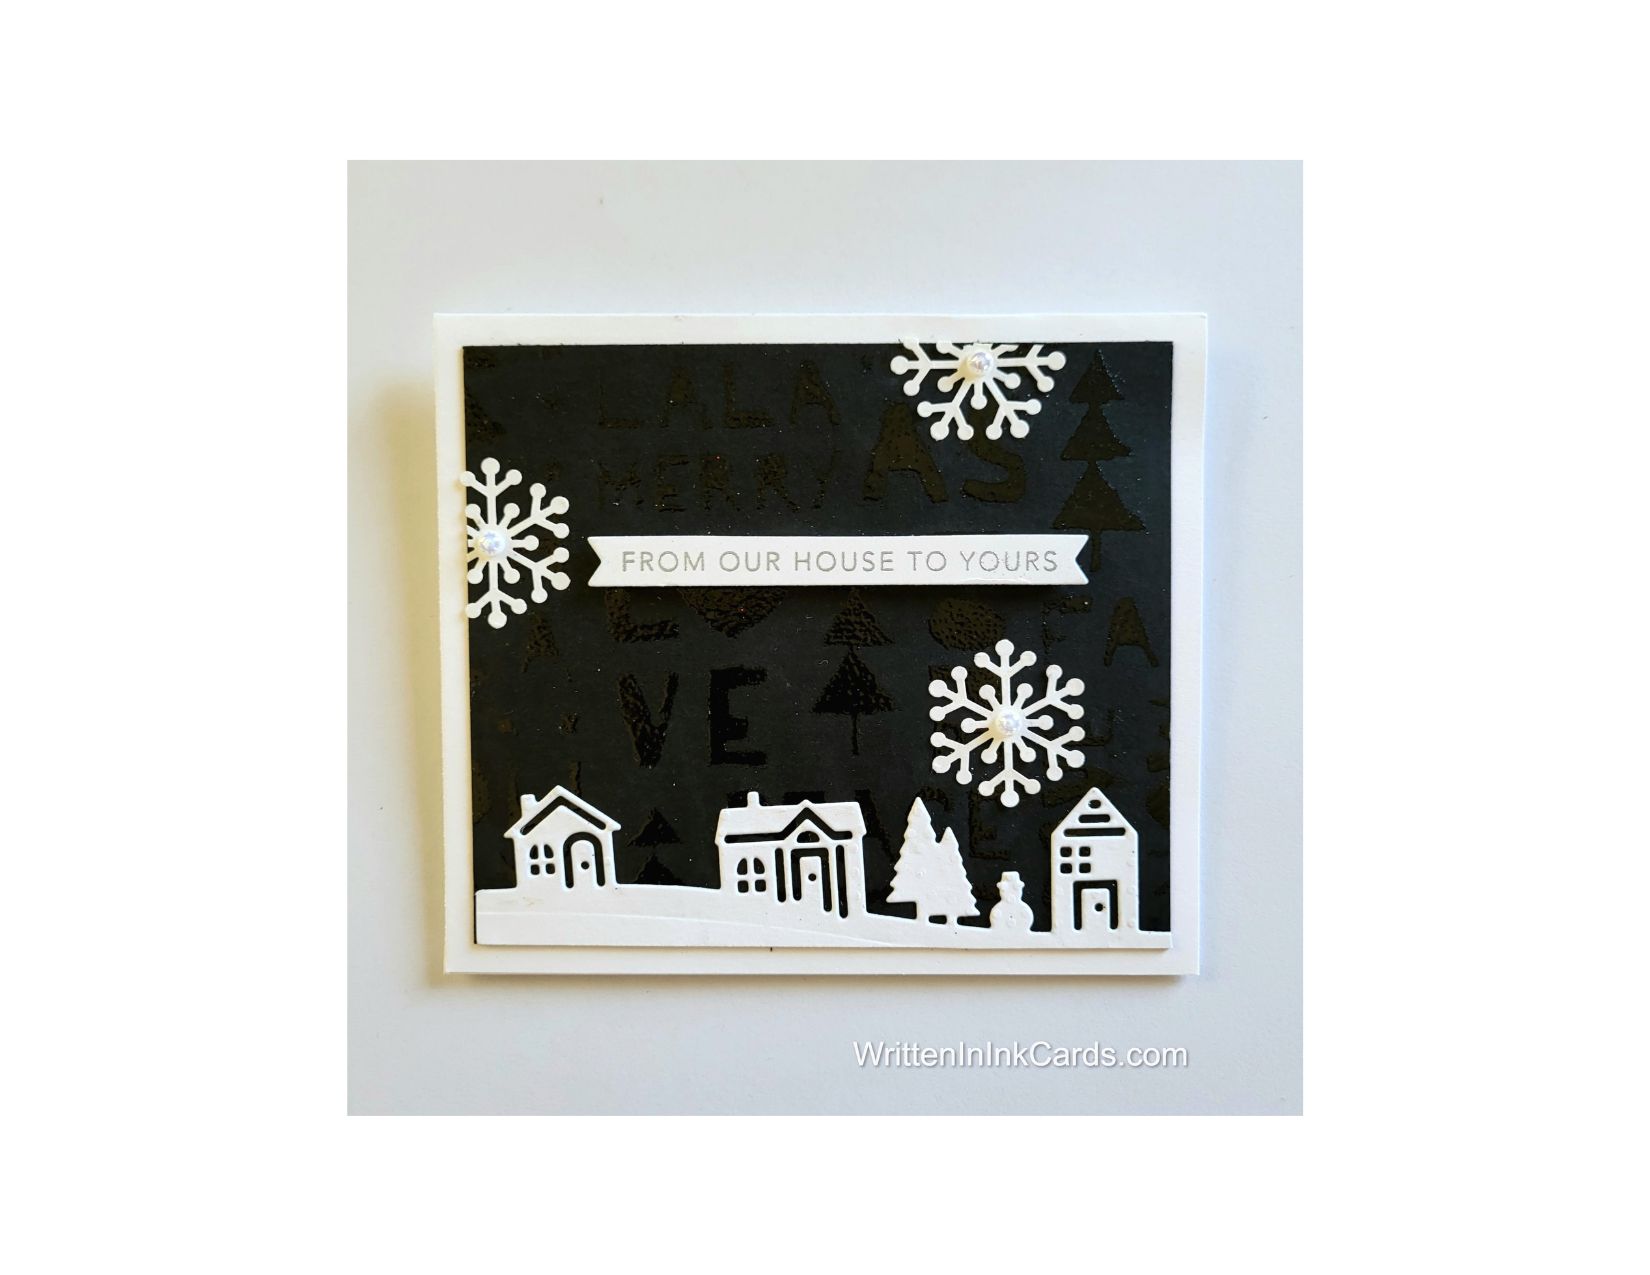
Card Face:
I laid the black card face onto the Grip Mat and positioned the stencil.
I pressed my Versamark embossing ink pad firmly into the openings, moving as needed and covering the entire surface twice to ensure good coverage.
After removing the stencil I sprinkled clear embossing powder over the card face, setting it with my heat gun.
Other:
I looked through my “someday” binder, and struck gold with both the houses and the snowflakes.
Then I looked through my sentiment binder and selected the one you see in the photo – it worked well with the design.
Assembly
I glued the strip with the houses to the bottom of the card face.
I glued the sentiment into (approximately) the center of the card face.
I added the snowflakes to the sky as shown, then placed a pearl in the center of each snowflake.
I glued the card face to the card base, centering on all sides.
Final Thoughts:
I love a card that has a hidden surprise, as this one does. Seen from the front, it’s a simple scene of houses in snowfall; however, when you tilt it just slightly, the light catches the clear heat embossing, revealing the stencilled pattern.
Supplies: (and links where possible)
I have listed which products I have used, and where they may be purchased. It’s a huge marketplace and in most instances, there are multiple sources and many alternatives to choose from.
Would you like to experiment with a design like this? You’ll find a supply list below, including a link to the stencil I used from A Colorful Life Designs. Follow the link and use discount code ChrisFan10 to save 10% on your entire order! (Master Creator Bundles are excluded as they already have a 20% discount built in.)
Let’s get Started:
Card Base: 5.25 x 10.5, scored and folded at 5.25
Cream Border Layer: 5. X 5
Red Border Layer 4 x 4
Card Face: 3.75 x 3.75
Scraps of cream and red cardstock for the banner and birds
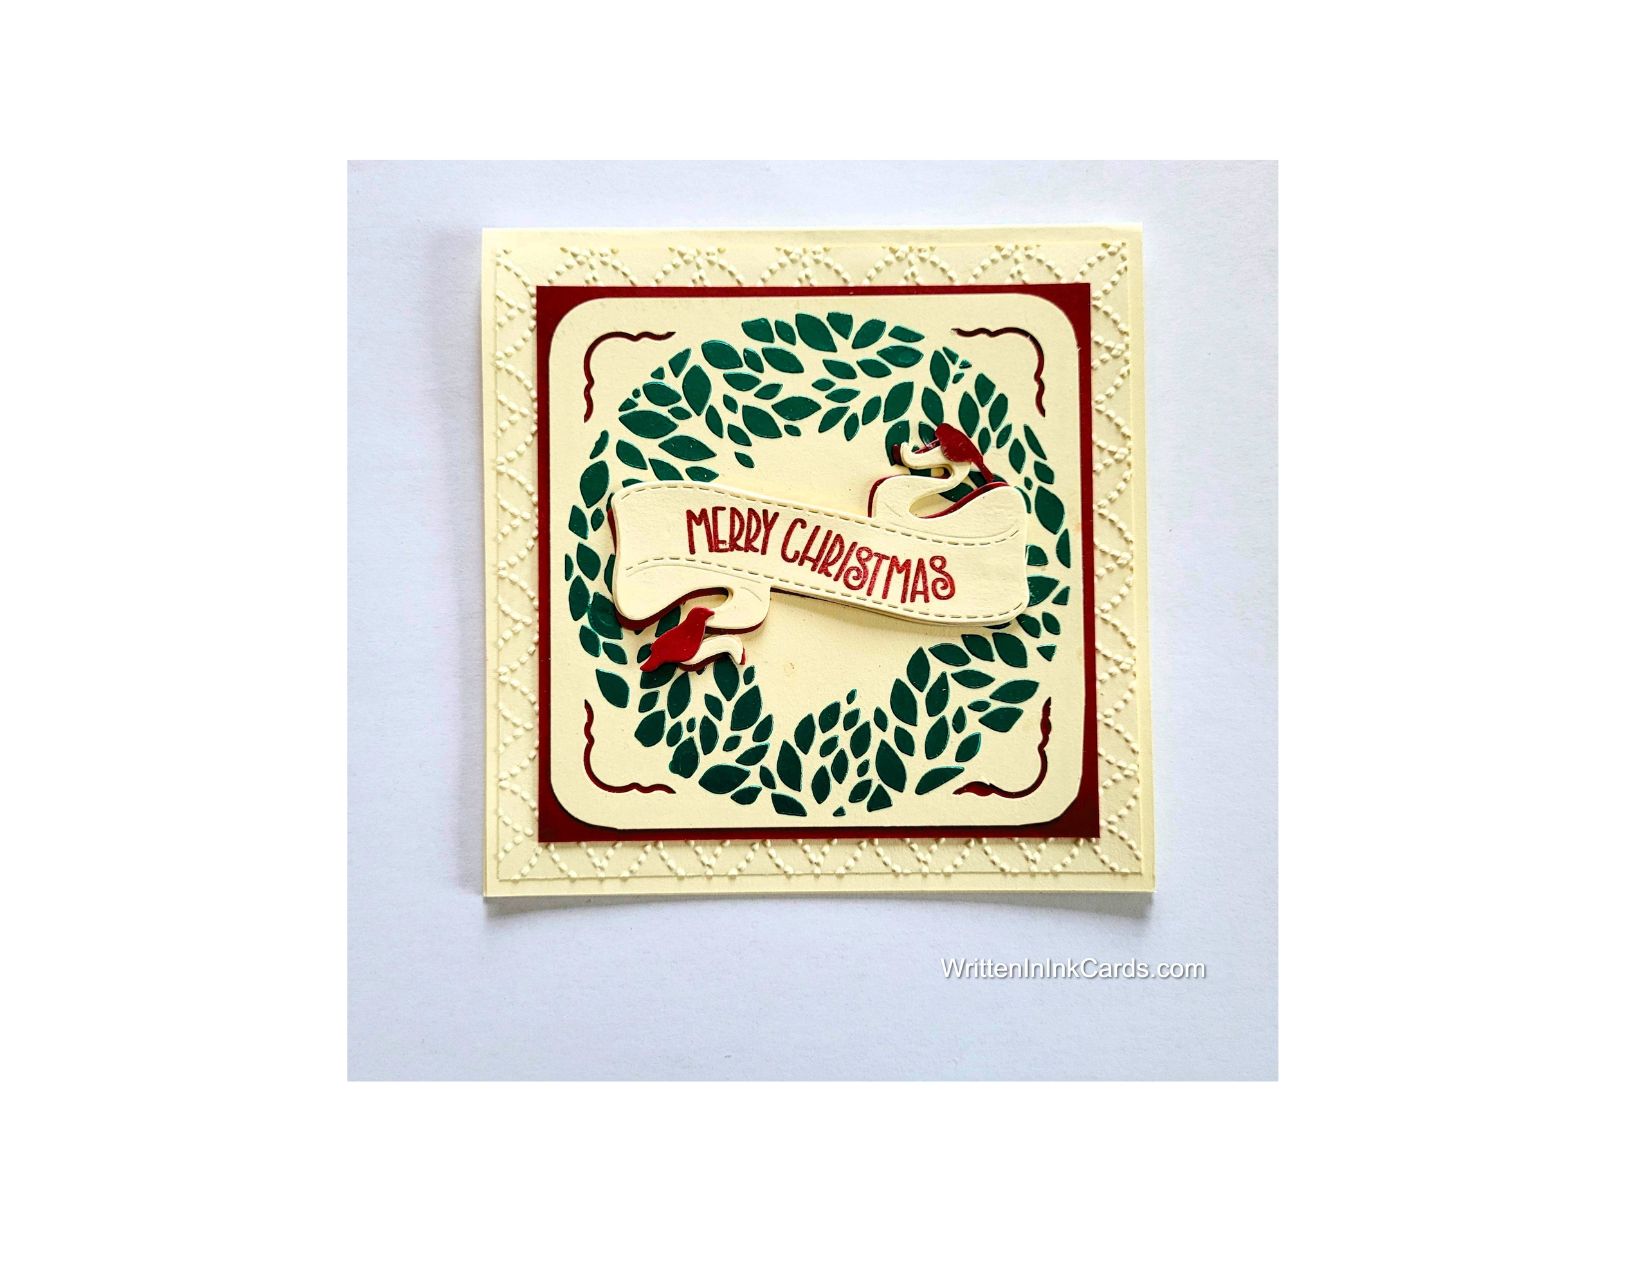
Card Face:
I laid the card face down onto scrap paper and positioned the stencil. I applied green embossing paste to all exposed areas.
I removed the stencil carefully and put it into water immediately (to prevent the paste from drying on the surface).
I put the card face aside to dry. Once dry, I used a corner punch on each corner, which created both the rounded edge and the peek-a-boo slot in the card face.
Other:
I die-cut the banner 2x from cream cardstock and once from red.
I glued the two cream banners together, then added the red one behind, offsetting it just slightly.
I die-cut the tiny cardinals from the same red cardstock.
I put the banner in my stamp positioner and stamped Merry Christmas in red ink.
I put the cream border into an embossing folder and ran it through my Big Shot.
Assembly
I glued the embossed, cream border to the card base, centering it on all sides.
I glued the card face to the red border layer, again centering it on all sides.
I glued these two layers together, again (of course!) centering on all sides.
I glued the banner into the center of the wreath.
I added the tiny cardinals as shown.
Final Thoughts:
I had such a time with that banner! The first time I tried to glue it down I hadn’t allowed enough time for the ink to dry and smudged the red in the process. The second attempt, I had glue on my finger, touched the red ink … and of course smudged it again. At that point I put it aside for a couple of days – I was tired of looking at it!
When I returned to it I once again die cut a banner and stamped it, and very carefully glued it on top of what was there … and I finally managed to get the task done without smudging it!
Luckily, I like the result, LOL. The embossing paste has a lovely gleam and creates a wonderful backdrop for the banner and birds.
Supplies: (and links where possible)
I have listed which products I have used, and where they may be purchased. It’s a huge marketplace and in most instances, there are multiple sources and many alternatives to choose from.
Would you like to experiment with a design like this? You’ll find a supply list below, including a link to the stencil I used from A Colorful Life Designs. Follow the link and use discount code ChrisFan10 to save 10% on your entire order! (Master Creator Bundles are excluded as they already have a 20% discount built in.)
Let’s get Started:
Card Base: 5.5 x 8.5, scored and folded at 4.25
Black Border Layer: 5.5 x 4.25
Card Face: 5.25 x 4
Card Face:
I laid the card face onto my grip mat and positioned the stencil with the ivy swag where I wanted it. I used a small blending brush and green ink over this part of the stencil, being careful to avoid ink in other open areas on the stencil.
I moved the stencil and added ivy to other sections of the card face randomly.
I wiped the stencil down to remove the green ink. I added the poinsettias with red ink, switching to the small brush designated for that colour.
The stencilling was complete, but I wanted more detail in the background, so I added two different backgrounds stamps with light brown ink.
To use a background stamp:
It can be difficult to get a good impression with a background stamp – there’s a lot of area to cover. I get good results with this method – I’m quite certain I saw it on Youtube, but cannot remember who to give credit to.
I lay the stamp on my work surface and ink it up thoroughly, going over it more than once to be certain I’ve got good coverage.
I lay my card face directly on this, carefully lining up the edges so that it’s straight. I hold it down with one hand to be certain that it doesn’t move.
I place a piece of copy paper over the card face very carefully, not allowing any movement.
I run my fingers or palm over the copy paper, switching hands as necessary – one holding everything still and the other transferring ink.
When I’m satisfied I remove the copy paper and then the card face, careful not to smudge.
I use the copy paper to keep ink off of my hands – it will inevitably transfer to the card face! (The stamps are larger than the card face, so there is exposed ink.)
This method allows me to vary pressure or skip over parts of the image if I don’t want solid inking.
I often use a slightly larger piece of cardstock than I need: if I don’t get it quite straight, I can trim it down and fix that.
With the background complete I put the card face into my stamp positioner and added the bakers twine and bow images using Versafine Onyx ink.
I used a corner rounder punch on each corner.
Other:
I looked through my sentiment binder and found these wee gift tags which had been created and saved for future use … it saves so much time to have things like this ready and waiting.
Assembly
I glued the black border layer to the card base, and then centered the card face on top of these.
I added the tiny gift tags as shown.
Final Thoughts:
I think this card face would have been good with only one background stamp rather than two: if I recreate the design I will try that.
I was trying for the look of a retro Christmas gift with this card – not as successfully as hoped, but it’s a fun card anyway.
Supplies: (and links where possible)
I have listed which products I have used, and where they may be purchased. It’s a huge marketplace and in most instances, there are multiple sources and many alternatives to choose from.
Would you like to experiment with a design like this? You’ll find a supply list below, including a link to the stencil I used from A Colorful Life Designs. Follow the link and use discount code ChrisFan10 to save 10% on your entire order! (Master Creator Bundles are excluded as they already have a 20% discount built in.)
Let’s get Started:
Card Base: 5.5 x 8.5, scored and folded at 4.25
Red Candy Cane Border: 5.5 x 3 (before die-cutting)
Card Face: 5.25 x 4
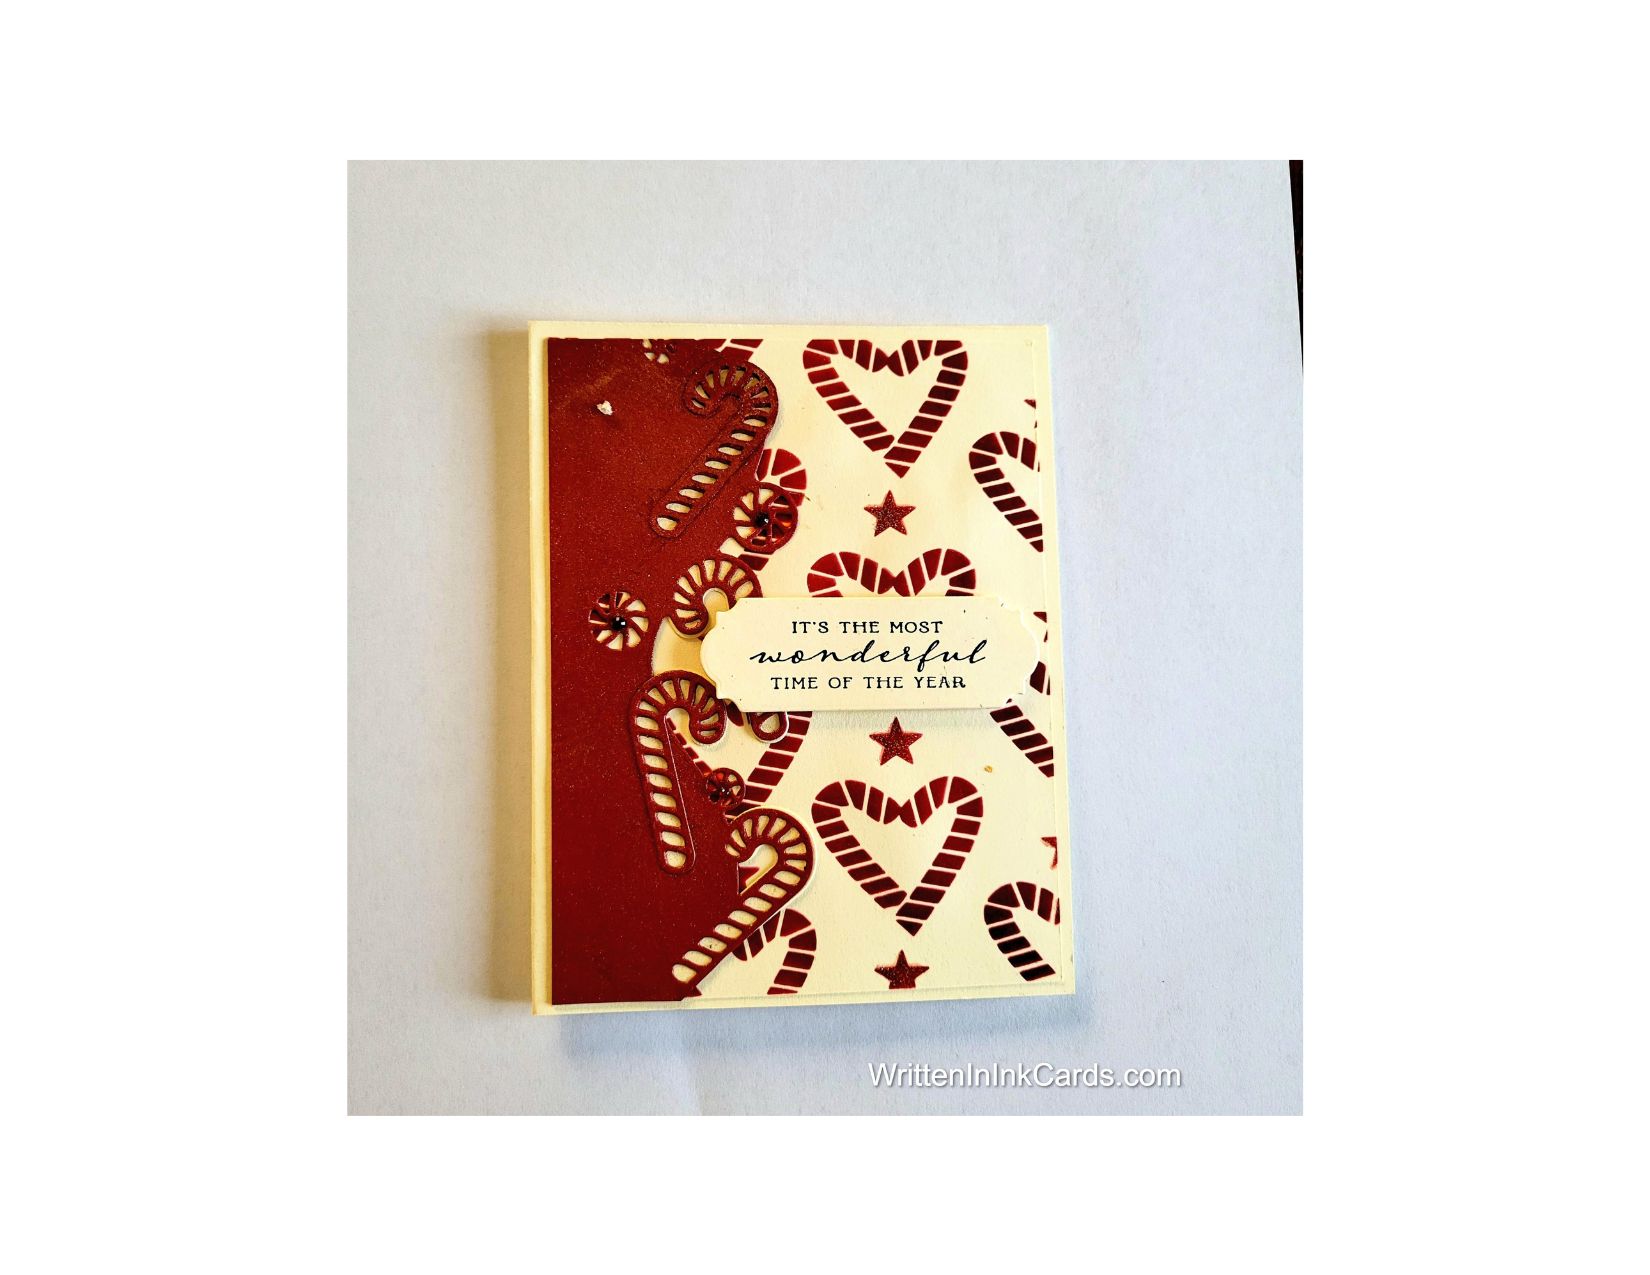
Card Face:
I laid the card face onto my Grip Mat, positioned the stencil, and applied red ink across the exposed areas.
I put the card face aside to dry.
I put the stencil back in place I went back to each of the small stars and filled them in with an embossing pen.
I sprinkled holographic embossing powder over them and set this with my heat gun. (not really visible in the picture, but pretty with card in hand.)
Other:
Before beginning, I had sprayed the piece of red cardstock with gold shimmer spray and put it aside to dry.
I positioned a candy cane border die on this and ran it through my Big Shot.
I stamped the sentiment on a scrap of cardstock with Versafine Onyx. I cut this out with a die to give it a finished look.
Assembly
I positioned the candy cane border layer to the left of the card face so that it extended approximately 1.75” into the design, trimming the excess off flush with the left-hand edge of the card face. I glued this down.
I glued the card face to the card base, centering on all sides.
I put dimensional foam on the back of the sentiment and positioned it on the card as shown.
Final Thoughts:
Lots of possibility with this stencil! I decided to put it to use along with my border die, giving me an opportunity to give that fun die some time on my desk.
Supplies: (and links where possible)
I have listed which products I have used, and where they may be purchased. It’s a huge marketplace and in most instances, there are multiple sources and many alternatives to choose from.
Would you like to experiment with a design like this? You’ll find a supply list below, including a link to the stencils I used from A Colorful Life Designs. Follow the link and use discount code ChrisFan10 to save 10% on your entire order! (Master Creator Bundles are excluded as they already have a 20% discount built in.)
Let’s get Started:
Card Base: 5.5 x 8.5, scored and folded at 4.25
Card Face: 5 ⅛ x 3 7/8
Card Face:
I laid the card face onto my grip mat and positioned the postage stamp mask, centering it carefully. I inked around the outside edges with a heavy hand and dark blue ink.
I placed the corresponding stencil around the mask, then removed the mask (exposing the center of the cardstock while protecting the sectionalready inked).
I put the Angular Trees stencil over the Postage Stamp stencil and added the three trees in shades of green, using a smaller brush and masking as necessary to prevent colours from mixing.
After removing the Angular Trees stencil, I placed the Tree Edger #5 mask at the top of the opening and added purple ink with a light hand. Then I added blue ink, pulling it down from the top and in from the sides. When I removed the mask, I had created a white mountain range and a night sky.
Leaving the Postage Stamp stencil in place, I positioned the Tree Line Edger #3 stencil so the bottom of the trees was slightly below the halfway mark. Masking off the Angular trees as necessary, I added blue ink, making the trees very intense at the top but allowing the colour to fade as it moved down the tree.
I used a piece of torn paper and a soft hand with the same blue ink to create the look of snow and shadows on the ground.
My final stencil was the Christmas Postmark: I positioned it at an angle over the scene and added it with dark gray ink.
I inked up a tiny bird stamp with red ink and positioned it on the snow.
I used a light hand and the residual ink on my light blue brush over the white mountain range at the top of the card face – this softened the area, removing the stark contrast.
I used a white gel pen to add snow to the scene.
Assembly
I glued the card face in the center of the card base.
Final Thoughts:
I am so happy with this card: each step was an experiment and could have gone wrong, but in this instance everything worked together to create the result I was hoping for.
Supplies: (and links where possible)
I have listed which products I have used, and where they may be purchased. It’s a huge marketplace and in most instances, there are multiple sources and many alternatives to choose from.
Would you like to experiment with a design like this? You’ll find a supply list below, including a link to the stencil I used from A Colorful Life Designs. Follow the link and use discount code ChrisFan10 to save 10% on your entire order! (Master Creator Bundles are excluded as they already have a 20% discount built in.)
Let’s get Started:
Card Base: 5.5 x 8.5, scored and folded at 4.25
Green Border Layer: 5.5 x 4
Card Face: 5.5 x 5.25 (before tearing)
Scraps of holographic cardstock
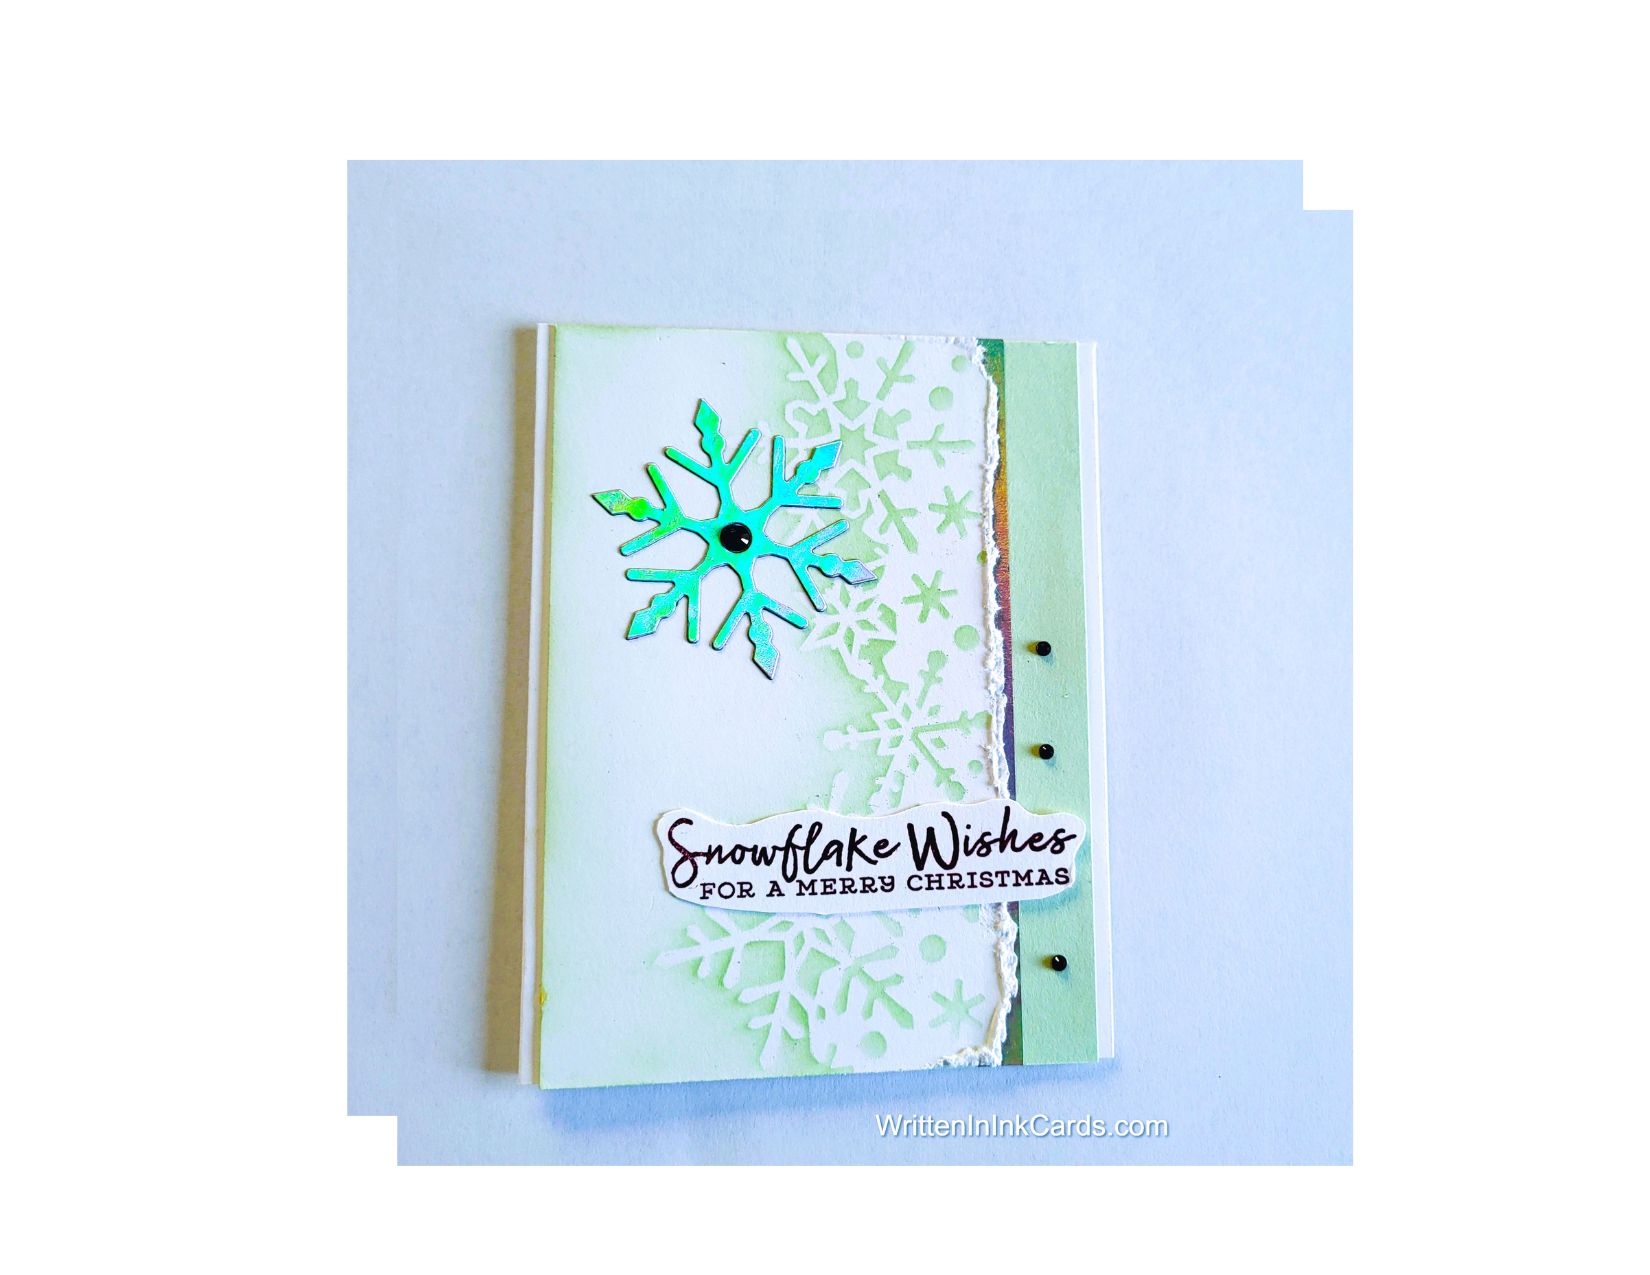
Card Face:
I laid the card face on my Grip Mat and positioned the stencil. I added green ink around the snowflakes as well as the edges – leaving the center white.
I tore the un-inked edge of the cardstock at approximately 3” and used my scissors to roughen the edges.
Other:
I die cut a snowflake from the holographic cardstock, as well as a 5.5 x .25” strip.
I stamped the sentiment on a scrap of cardstock and fussy cut around it.
Assembly
I glued the green border layer to the card base, centering vertically.
I added the card face on top of this, lining it up with the green layer on the left-hand side (this did not allow any of the green to show, but since I had added green ink to the edges of the card face, that wasn’t necessary.
I slipped the narrow holographic strip under the right-hand edge of the card face.
I added the sentiment as shown.
I added three small green gems to the white border on the right, and a larger green gem to the center of the snowflake.
Final Thoughts:
I really like the combination of this lovely stencil with the soft green – the result of this mixture is a very pretty card.
Supplies: (and links where possible)
I have listed which products I have used, and where they may be purchased. It’s a huge marketplace and in most instances, there are multiple sources and many alternatives to choose from.