Category: Mixed Media

  • Create a one of a kind, elegant Thanksgiving card

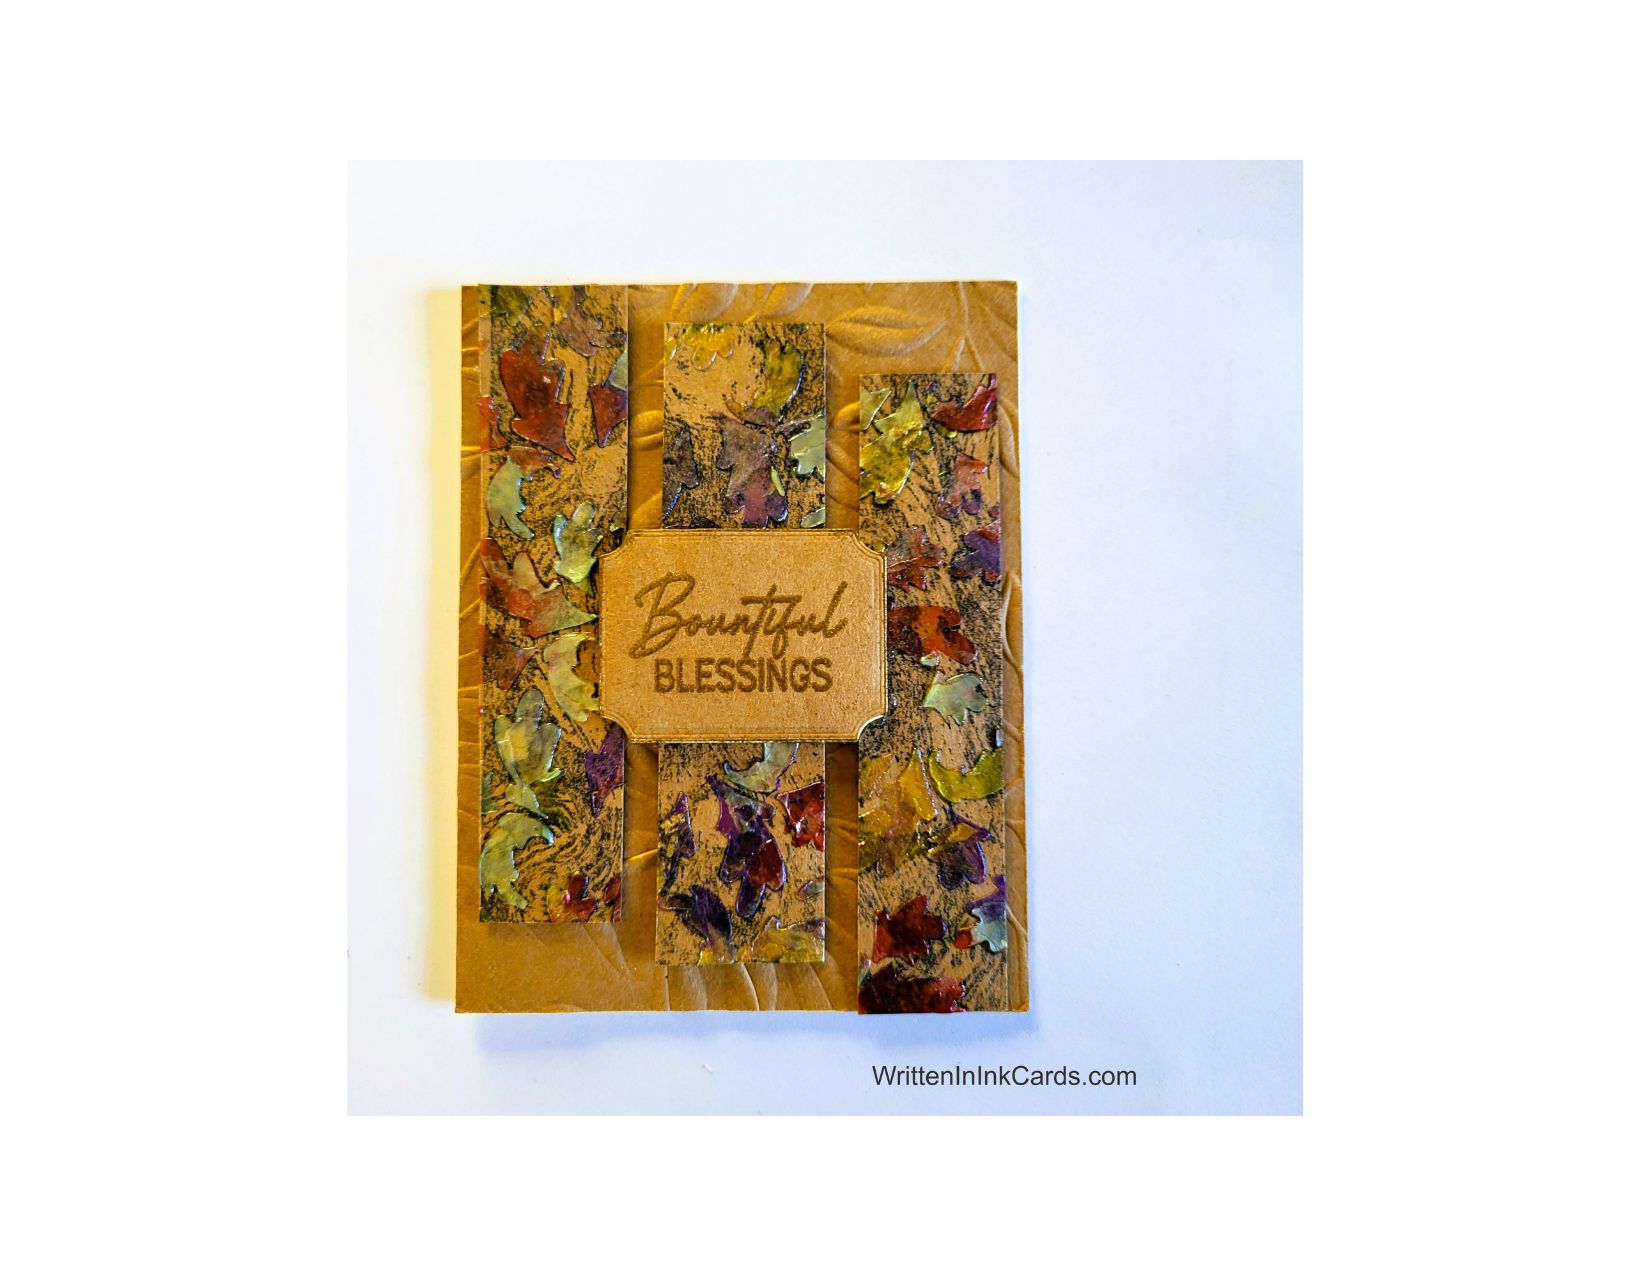
    Create a one of a kind, elegant Thanksgiving card

    Would you like to experiment with a design like this? You’ll find a supply list below, including a link to the stencil I used from A Colorful Life Designs.  Follow the link and use discount code ChrisFan10 to save 10% on your entire order! (Master Creator Bundles are excluded as they already have a 20% discount built in.)

    Let’s get Started:

    Card Base: 5.5 x 8.5, scored and folded at 4.25

    Border Layer: 5.5 x 4.25

    Card Face:  5.5 x 4.25  (before cutting)

    Card Face:

    • I used a background stamp and black ink to provide additional texture on this layer.

    My standard practice with background stamps is to lay the stamp on my work surface, ink it, and then carefully lay the cardstock on top.  I cover this with a piece of scrap paper and rub the surface gently with my fingers to transfer the ink, always holding the paper absolutely still with my other hand. (The scrap paper serves to keep any excess ink off of my hands, and it is sure to transfer to the card face!)

    • I placed the card face down on the Grip Mat and positioned the stencil.  I applied a variety of embossing pastes through this, mixing the colours randomly.  
    • I removed the stencil and immediately put it in water,  and put the card face aside to dry.
    • Once the paste had dried completely, I trimmed it into three equal pieces measuring 1” x 4.75” each.
    • I put dimensional foam on the back of each of these strips.

    Other:

    • I put the border layer into an embossing folder and ran it through the Big Shot.
    • I stamped the sentiment with Versamark embossing ink, added gold embossing powder and set it with the heat gun.  I used a die to create the final size and shape.
    • Then I ran each side of this die cut lightly over the Versamark pad,  added gold embossing powder and set it with my heat gun.  This added a very fine gold edging to the die cut.

    Assembly

    • I glued the border layer to the card base,
    • I removed the backing from each strip and put them in place as shown.
    • I glued the die-cut sentiment into the middle of the card.

    Final Thoughts:

    The border layer for this actually started with a stamped image that I wasn’t happy with:  it was a new stamp, and the image hadn’t transferred as well as hoped.  Rather than waste this,  I made use of that paper and ink to create a background for this card.

    The card is so beautiful in real life – that embossing paste dries with a lovely sheen which is gorgeous with all that mixed colour.

    The use of the embossing folder on this card makes a subtle but massive difference to the end result – the additional depth and texture really elevated the card.

    Supplies: (and links where possible)

       I have listed which products I have used, and where they may be purchased. It’s a huge marketplace and in most instances, there are multiple sources and many alternatives to choose from.

    Stencil: Blowing Leaves,  A Colorful Life Designs

    Waffle Flower Grip Mat, 8.5 x 6.5, Scrapbook.com

    Versamark Embossing Ink: Simon Says Stamp

    Gold Embossing Powder,  Wow,  R&R Scrapbooking

    Stamps:   Impression Obsession (no longer in business)

    Ink: Stampin’ Up!

    Blending Brushes: Stampin’ Up! 

    Adhesive: Tombow Aqua, Michaels

    Card Base & Card Face: Accent 100 lb., Amazon

    Do you have comments or thoughts to share on this design?  Drop me a line in the Comments Section below –  I’d love to hear from you!

    You can also use the Comments Section  to be notified when I release new work.

    Blowing Leaves by A Colorful Life Designs

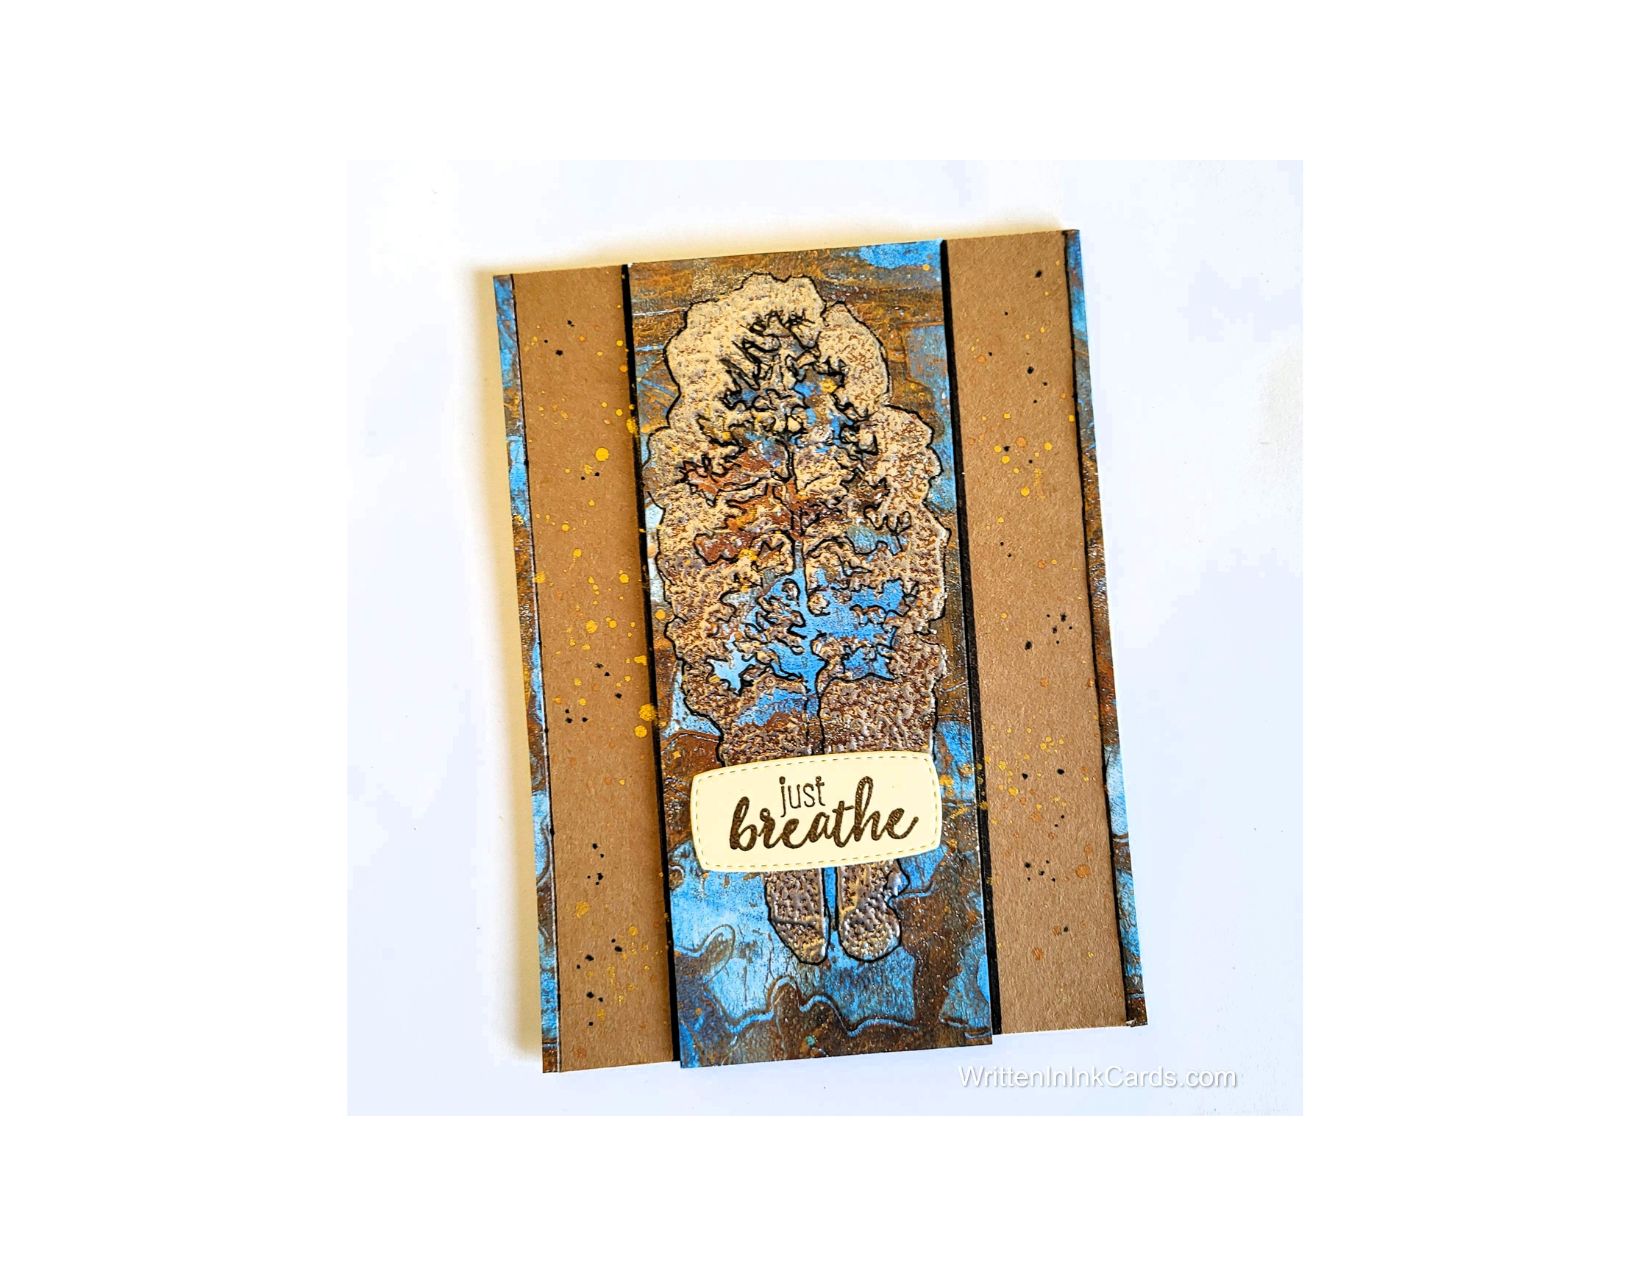
  • From Busy Backgrounds to Remarkable Results in Card Design

    From Busy Backgrounds to Remarkable Results in Card Design

    Got a busy, chaotic print to use? Tame it, and create beauty in the process.

    Would you like to experiment with a design like this? You’ll find a supply list below, including a link to the stencil I used from A Colorful Life Designs.  Follow the link and use discount code ChrisFan10 to save 10% on your entire order! (Master Creator Bundles are excluded as they already have a 20% discount built in.)

    Let’s get Started:

    Card Base: 5.5 x 8.5, scored and folded at 4.25

    Kraft Border Layer: 5.5 x 4

    Card Face:  Gel Print: 5.5 x 4.25 (before trimming down)

    Narrow Black Border:  5.5 x 2.5

    Card Face:

    • I laid the Gel Print in my stamp positioner and stamped the image with Versamark embossing ink.
    • After removing it from the positioner,I added gold embossing powder and set it with my heat gun.
    • I used a microliner to trace around the negative image of the tree on the inside of the embossed area,  and then outlined outer edges as well.
    • I trimmed the gel print down to 5.5 x 2.25.
    • Other:
    • I spattered the Kraft cardstock with black and gold ink.
    • I looked through my sentiment binder and found one that was a great size and “feel”  for this card.
    • From the remaining pieces of the gel print I trimmed two 5.5 x ⅛” strips.

    Assembly

    • I centered and glued the kraft layer on the card base.
    • I glued the narrow strips on either side of the kraft layer, filling in the remaining space on the card base.
    • I centered and glued the card face to the narrow black border.
    • I added dimensional foam tape to the back of this and centered it on the kraft border layer.
    • I glued the sentiment towards the bottom of the card face, as shown.
    • I used a micro liner to add a fine black border to each side of the kraft layer.

    Final Thoughts:

    • This started as a gel print that I really didn’t care for,  but ended up as a card that I quite like –  yay!
    • I did not initially plan to outline the embossed areas,  but the image needed additional definition against that busy background.  

    Supplies: (and links where possible)

       I have listed which products I have used, and where they may be purchased. It’s a huge marketplace and in most instances, there are multiple sources and many alternatives to choose from.

    Waffle Flower Grip Mat, 8.5 x 6.5, Scrapbook.com

    Versamark Embossing Ink: Simon Says Stamp

    Gold Embossing Powder: Wow, R&R Scrapbooking

    Stamps:  Amazing Silhouettes, Stampin’ Up! (retired)

    Microliners:  Amazon

    Adhesive: Tombow Aqua, Michaels

    Card Base & Card Face: Accent 100 lb., Amazon

    Do you have comments or thoughts to share on this design?  Drop me a line in the Comments Section below –  I’d love to hear from you!

    You can also use the Comments Section  to be notified when I release new work

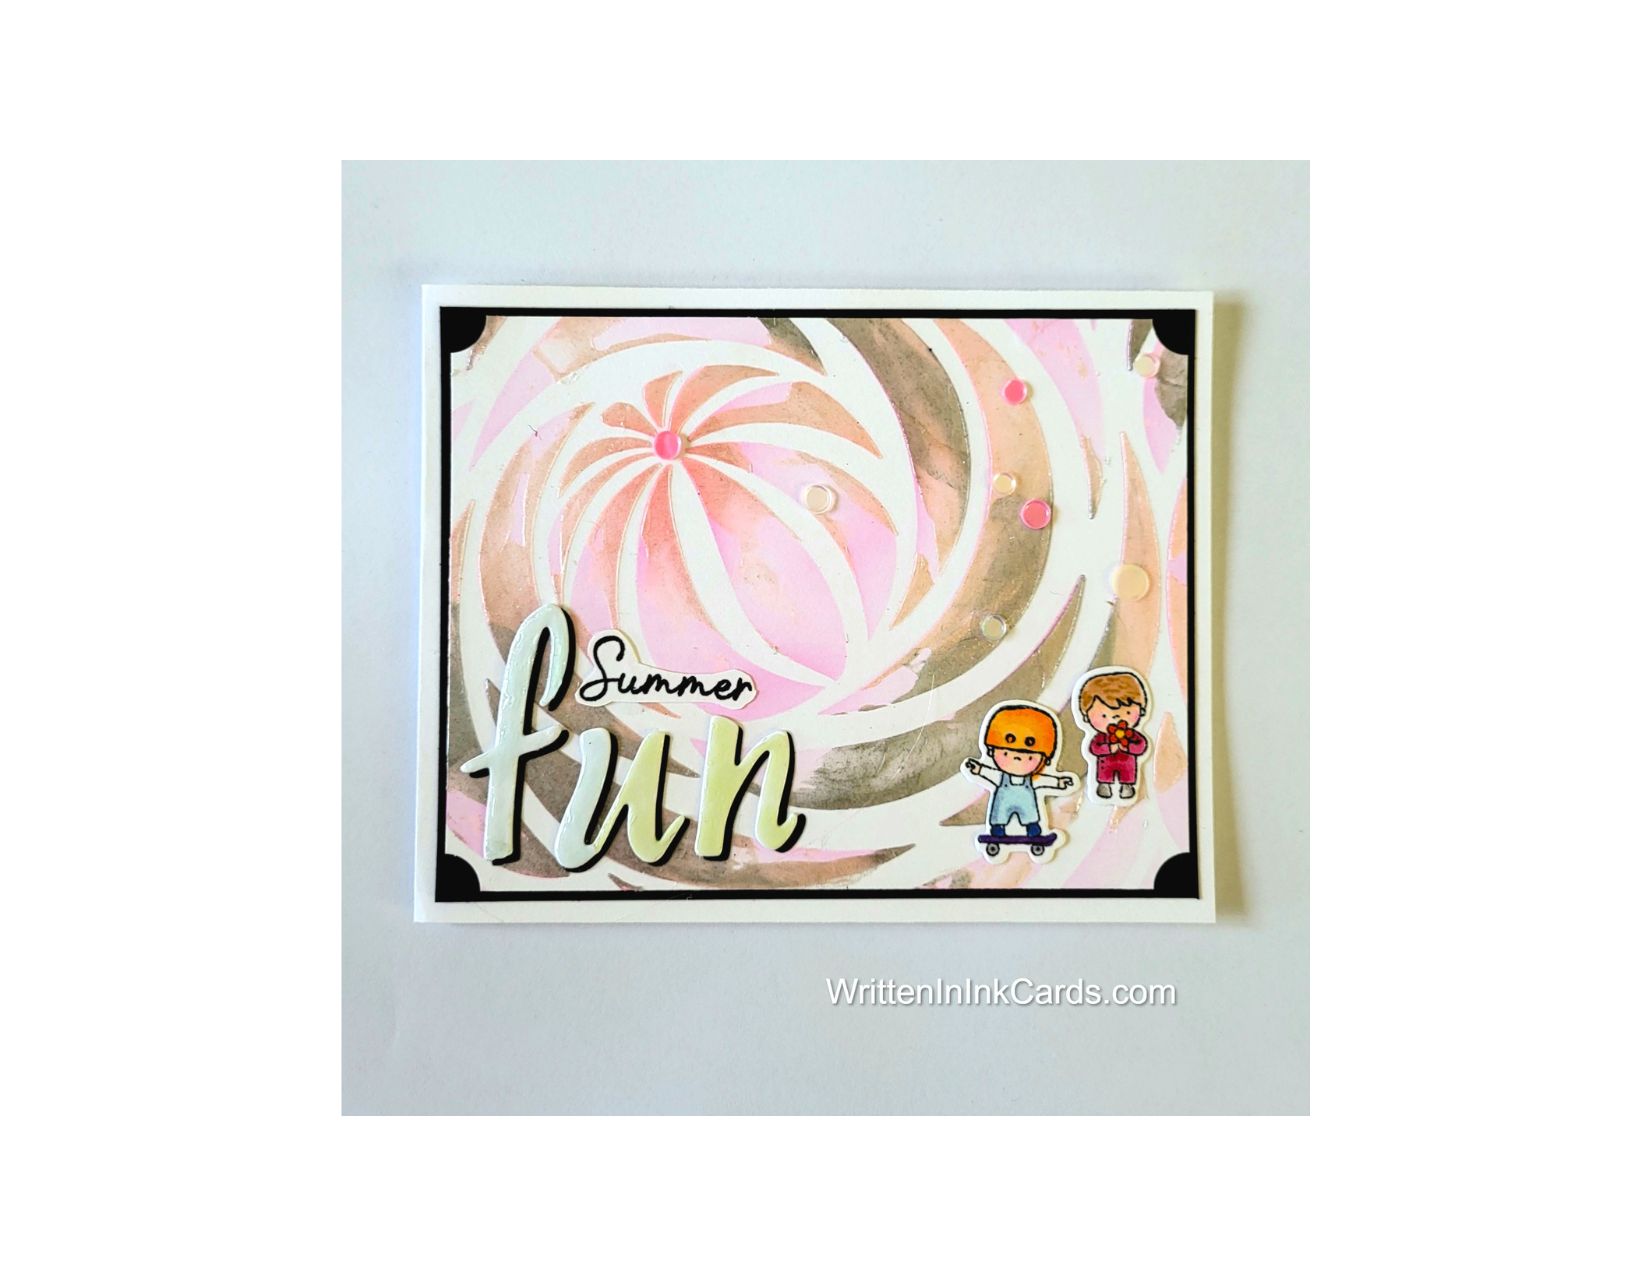
  • Make a card full of summertime fun

    Make a card full of summertime fun

    Would you like to experiment with a design like this? You’ll find a supply list below, including a link to the stencil I used from A Colorful Life Designs.  Follow the link and use discount code ChrisFan10 to save 10% on your entire order! (Master Creator Bundles are excluded as they already have a 20% discount built in.)

    Let’s get Started:

    Card Base: 5.5 x 8.5, scored and folded at 4.25

    Border Layer: 5.25 x 4

    Card Face:  5 ⅛ x 3 ⅞

    Scraps of black and white cardstock for the letters, and the two children

    Card Face:

    • I laid the card face on the Grip Mat,  and then positioned the stencil over top.  
    • I went over the exposed areas with light pink ink.
    • Leaving the stencil in place,  I added platinum coloured embossing paste here and there.
    • I carefully removed the stencil,  putting it immediately into water. 
    • I set the card face aside to dry, and then used a corner chomper on each of the four corners.

    Other:

    • I stamped the two kiddies with black memento ink, and coloured them with alcohol markers
    • I used a corresponding die to cut them out.
    • I stamped “summer”  with Versafine onyx, I immediately coated the wet ink with clear embossing powder, setting this with my heat gun.  I used my snips to fussy cut around this word, creating an irregular border.
    • I die cut F, U and N  from heavy white card stock, twice.  I used translucent green and blue embossing powder  on one set of these letters ( they are very pale pastel colours,  but pretty with card in hand).  I glued the two sets of letters together.
    • I cut a third set of the letters from black cardstock and glued them under the white ones, offsetting them down and to the right just slightly

    Assembly

    • I glued the black border layer to the card base and then added the card face on top of these, centering both layers.
    • I glued the F,U and N in place as shown,  and then nestled the “summer” into the spot created by the natural shape of the word.
    • I glued the two children in the lower right-hand section.

    Final Thoughts:

    The embossing paste has a beautiful sheen: although it isn’t visible in the image it adds a very pretty detail to the card.  This sheen is echoed in the embossing powder used on “FUN”.

    Supplies: (and links where possible)

       I have listed which products I have used, and where they may be purchased. It’s a huge marketplace and in most instances, there are multiple sources and many alternatives to choose from.

    Stencil: Maelstrom,  A Colorful Life Designs

    Waffle Flower Grip Mat, 8.5 x 6.5, Scrapbook.com

    Versamark Embossing Ink: Simon Says Stamp

    Clear Embossing Powder,  Wow,  Simon Says Stamp

    Stamps & Dies:  Mini Boy,  Hampton Arts,  Amazon

    Ink: Stampin’ Up!

    Embossing Paste:  DIY

    Blending Brushes: Stampin’ Up! 

    Versafine Onyx, Simon Says Stamp

    Memento Ink: Stampin’ Up!

    Alcohol Markers:

         Stampin’ Blends: Stampin’ Up!

         Copics:  Wallacks

    Adhesive: Tombow Aqua, Michaels

    Card Base & Card Face: Accent 100 lb., Amazon

    Do you have comments or thoughts to share on this design?  Drop me a line in the Comments Section below –  I’d love to hear from you!

    You can also use the Comments Section  to be notified when I release new work

    Maelstrom by A Colorful Life Designs

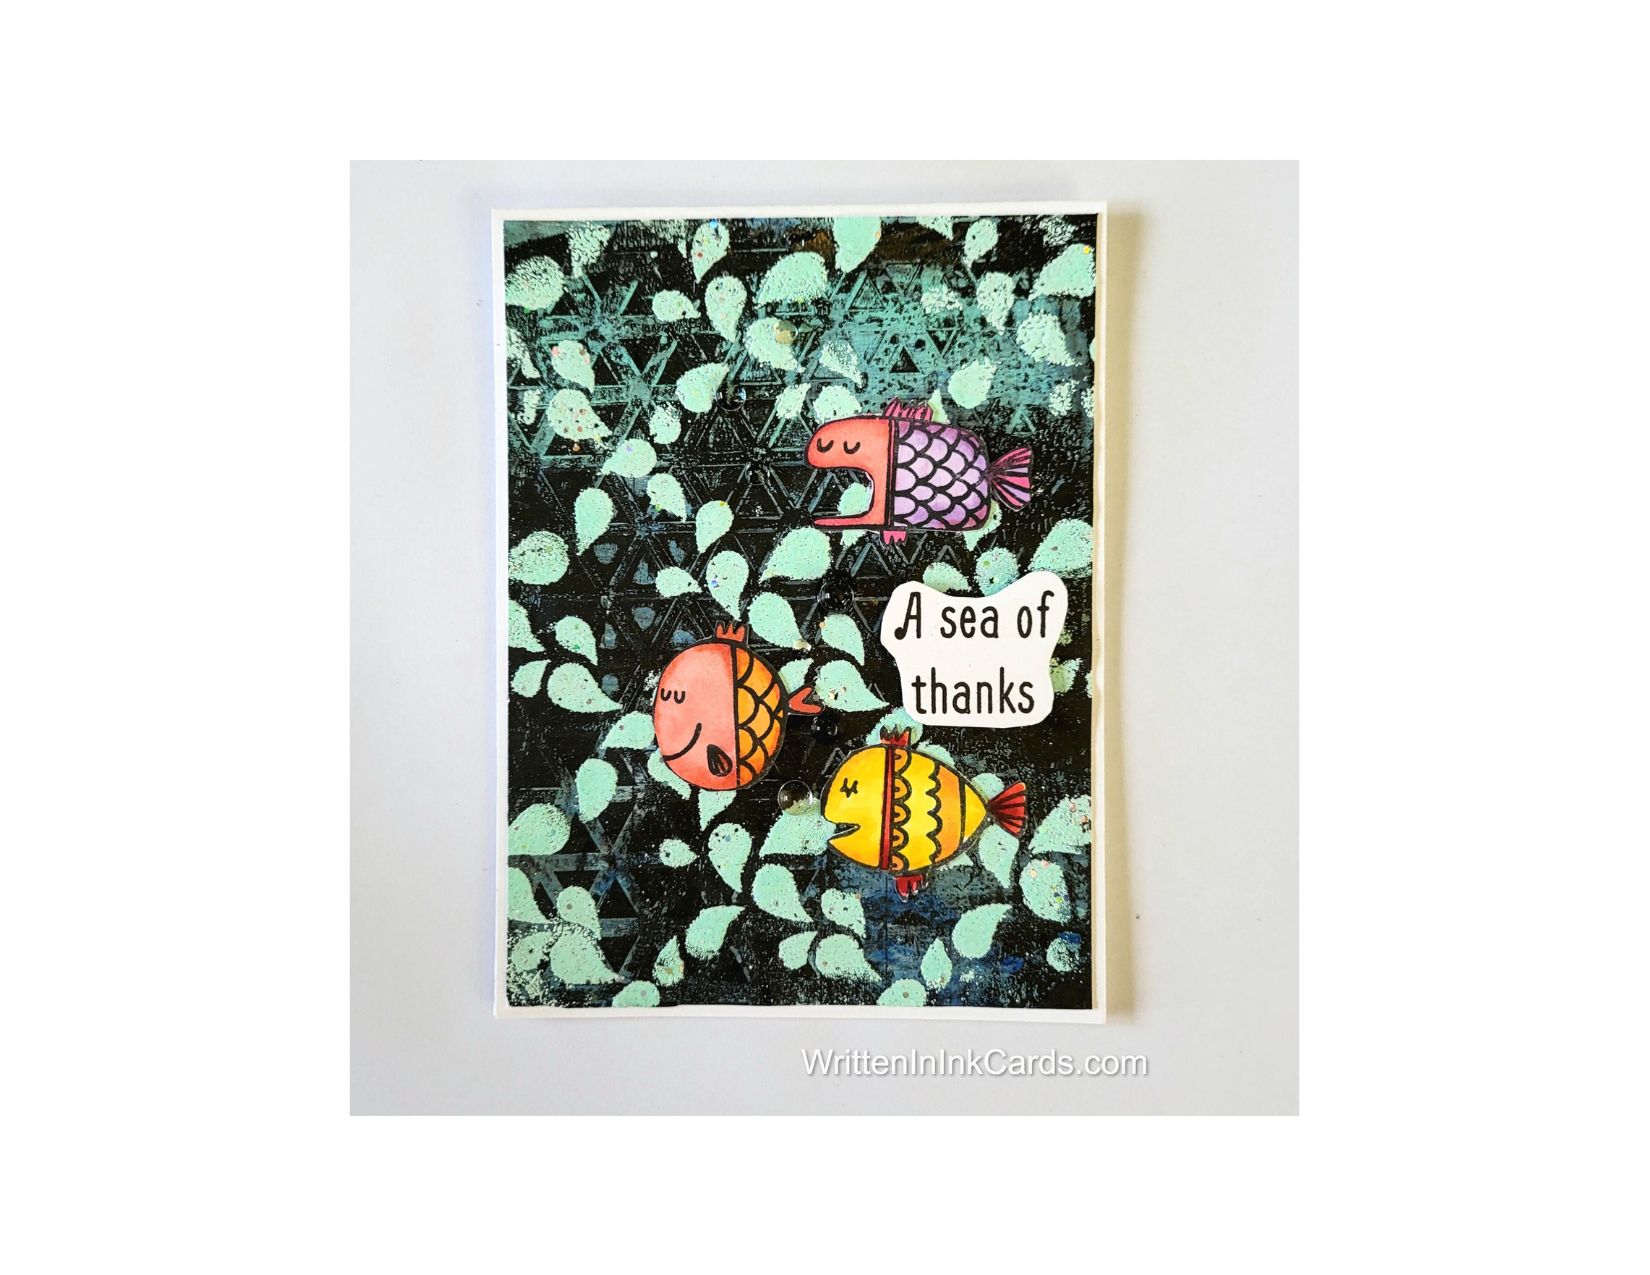
  • Make and send sea of thanks

    Make and send sea of thanks

    Would you like to experiment with a design like this? You’ll find a supply list below, including a link to the stencil I used from A Colorful Life Designs.  Follow the link and use discount code ChrisFan10 to save 10% on your entire order! (Master Creator Bundles are excluded as they already have a 20% discount built in.)

    Let’s get Started:

    Card Base: 5.5 x 8.5, scored and folded at 4.25

    Card Face: gel print,  5 1/8 x 4 1/8

    Card Face:

    • I placed the card face on the Grip Mat and positioned the stencil.
    • I pressed my Versamark embossing ink pad through the stencil firmly,  making sure that there was good ink transfer across the exposed surface.
    • After removing the stencil I sprinkled the card face with sparkly mint green embossing powder,  and then used my heat gun to set it.

    Other:

    • I looked through my Ready to Go binder,  and grabbed three wee fish which had already been coloured with alcohol markers and then cut out.
    • I stamped the sentiment using Versafine Onyx, sprinkled on some clear embossing powder and set it with the heat gun.  I used snips to fussy cut the sentiment.

         Versafine Onyx is a pigment ink and takes longer to dry:  this allows time for heat embossing which intensifies the stamping.

    Assembly

    I glued the card face to the card base, centering on all sides.  

    I glued each of the fish down individually, and then put dimensional foam on the back of the sentiment before putting it in place.

    I used clear acrylic dots to represent bubbles coming from the fish,  creating a stream coming from two of the three fish  (visible in the close up image, but not in the full shot).

    Final Thoughts:

    The embossing powder stands out nicely against the dark gel print background,  and the pattern in the gel print provides a lot of depth and additional interest.

    The end result created a cute watery environment for the fish.

    Supplies: (and links where possible)

       I have listed which products I have used, and (if possible) where they may be purchased. It’s a huge marketplace and in most instances, there are multiple sources and many alternatives to choose from.

    Stencil:  Droplet Grid,  A Colorful Life Designs

    Waffle Flower Grip Mat, 8.5 x 6.5, Scrapbook.com

    Versamark Embossing Ink: Simon Says Stamp

    Clear Embossing Powder:  Wow,  Simon Says Stamp

    Green Embossing Powder:  Michaels  (retired)

    Stamps: Bite Me, A Colorful Life Designs (retired)

    Ink: Stampin’ Up!

    Blending Brushes: Stampin’ Up! 

    Versafine Onyx, Simon Says Stamp

    Memento Ink: Stampin’ Up!

    Alcohol Markers:

         Stampin’ Blends: Stampin’ Up!

         Copics:  Wallacks

    Adhesive: Tombow Aqua, Michaels

    Card Base: Accent 100 lb., Amazon

    Do you have comments or thoughts to share on this design?  Drop me a line in the Comments Section below –  I’d love to hear from you!

    You can also use the Comments Section  to be notified when I release new work

    Droplet Grid from A Colorful Life Designs

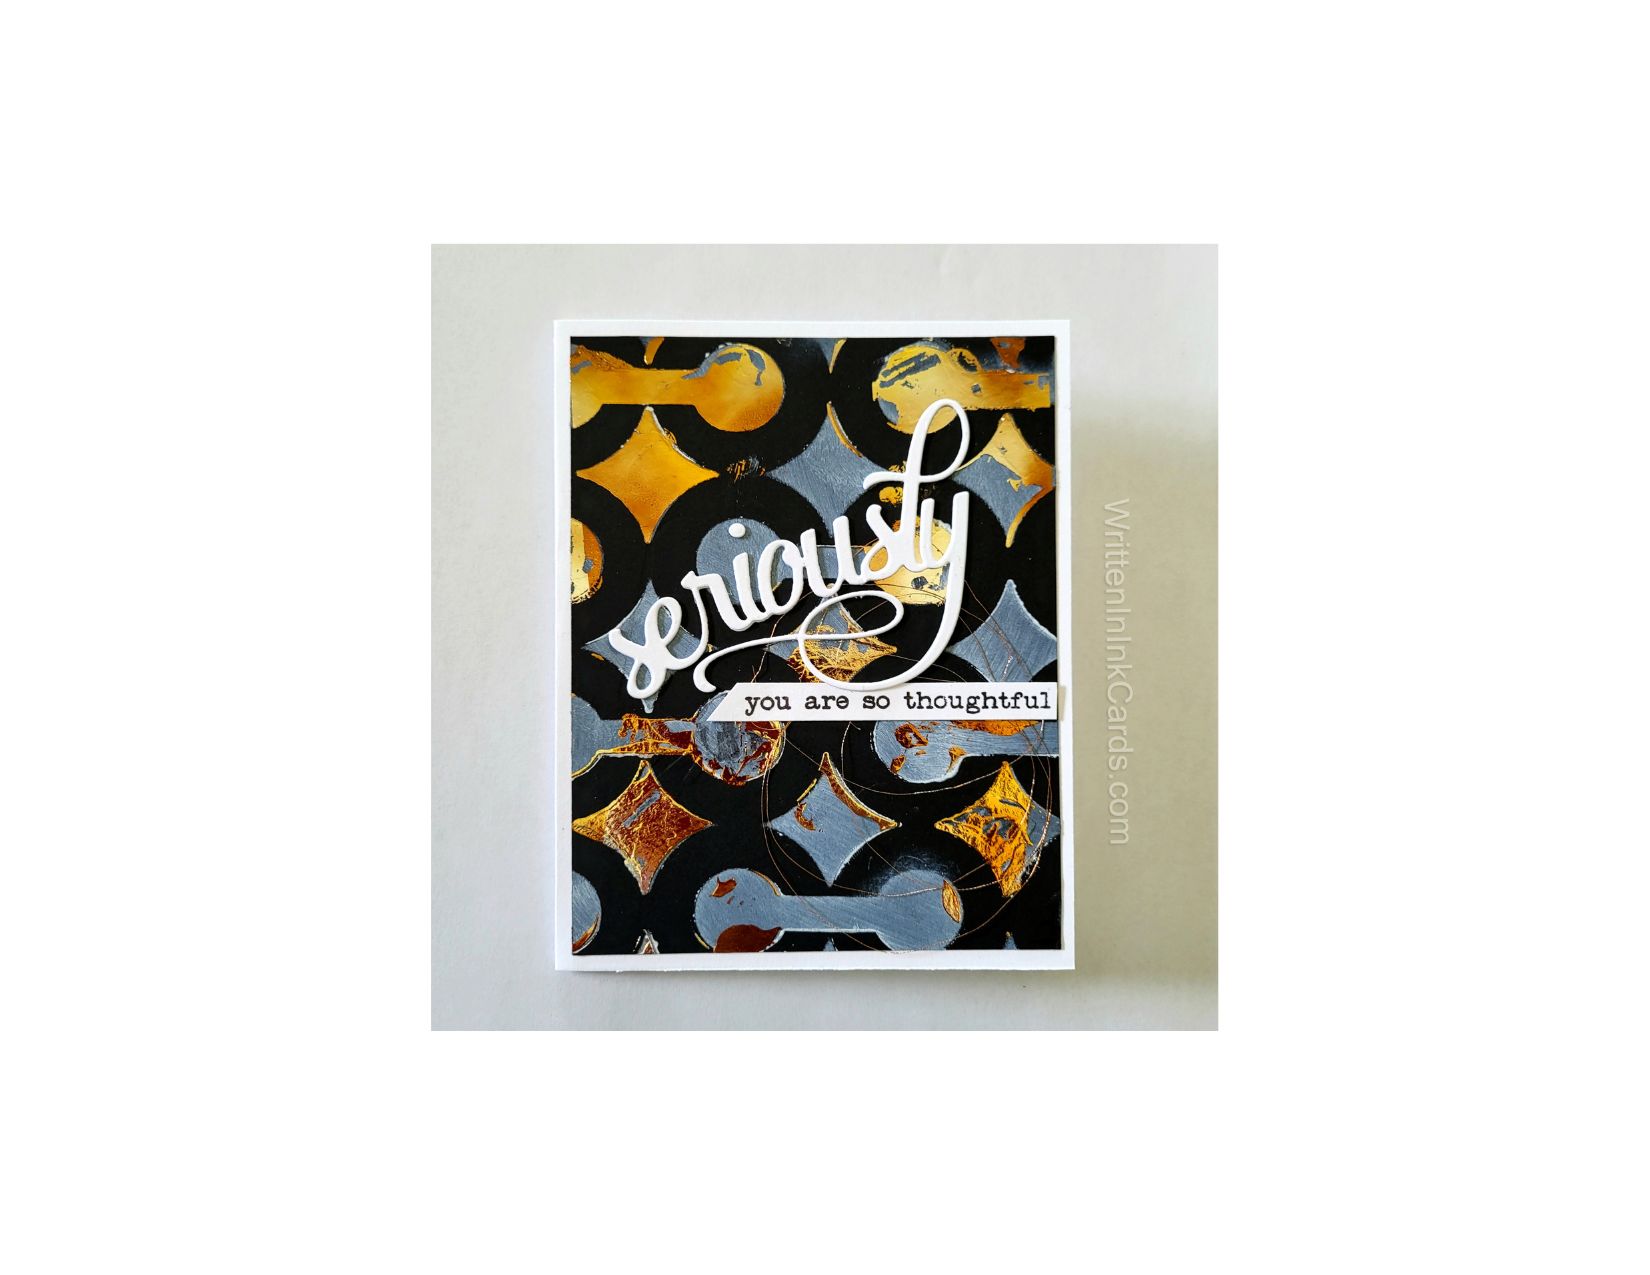
  • Make an Impression with an Exciting Mixed-Media Card

    Make an Impression with an Exciting Mixed-Media Card

    Would you like to experiment with a design like this? You’ll find a supply list below, including a link to the stencil I used from A Colorful Life Designs.  Follow the link and use discount code ChrisFan10 to save 10% on your entire order! (Master Creator Bundles are excluded as they already have a 20% discount built in.)

    Let’s get Started:

    Card Base: 5.5 x 8.5, scored and folded at 4.25

    Card Face: 5.25 x 4

    Card Face:

    • After laying the black cardstock onto the grip mat,  I positioned the stencil.
    • I used white pigment ink across the exposed surface, repeating a couple of times to build intensity. I had used pigment ink, so  I put this aside for several hours to allow the ink to dry fully.
    • I put the stencil back in place, lining the pattern up carefully; and then added Duo Gel randomly on the inked areas.
    • I placed the stencil water immediately,  and once again put the card face aside to dry.
    • Once the gel had dried (it goes on white,  but is transparent when dry), I added a piece of transfer foil and ran it through my Big Shot.  After pulling the foil away I was left with a wonderfully shiny, random, addition to to the pattern.

    Other:

    • I die cut the Seriously from white card stock twice, and glued them together.
    • I stamped the rest of the sentiment and used my trimmer to cut it down to the final size.

    Assembly

    • I glued the card face to the card base.
    • I glued the large die cut to the card face,  and then positioned the smaller rectangle underneath.

    Final Thoughts:

    I love the look of the stencilled pattern on black cardstock, and also the combination that created the sentiment for the card.

    Supplies: (and links where possible)

       I have listed which products I have used, and where they may be purchased. It’s a huge marketplace and in most instances, there are multiple sources and many alternatives to choose from.

    Stencil: Open Coils,  A Colorful Life Designs

    Waffle Flower Grip Mat, 8.5 x 6.5, Scrapbook.com

    Versamark Embossing Ink: Simon Says Stamp

    Dies:  Seriously,  Picket Fences (retired)

    Ink: Stampin’ Up!

    Blending Brushes: Stampin’ Up! 

    Versafine Onyx, Simon Says Stamp

    Deco Gel:  Therm O Web, Amazon

    Transfer Foil: Deco Foil, Therm O Web, Amazon

    Adhesive: Tombow Aqua, Michaels

    Card Base & Card Face: Accent 100 lb., Amazon

    Do you have comments or thoughts to share on this design?  Drop me a line in the Comments Section below –  I’d love to hear from you!

    You can also use the Comments Section  to be notified when I release new work

    Open Coils from A Colorful Life Designs

  • DIY a Card that Celebrates the Dreamer in your Life.

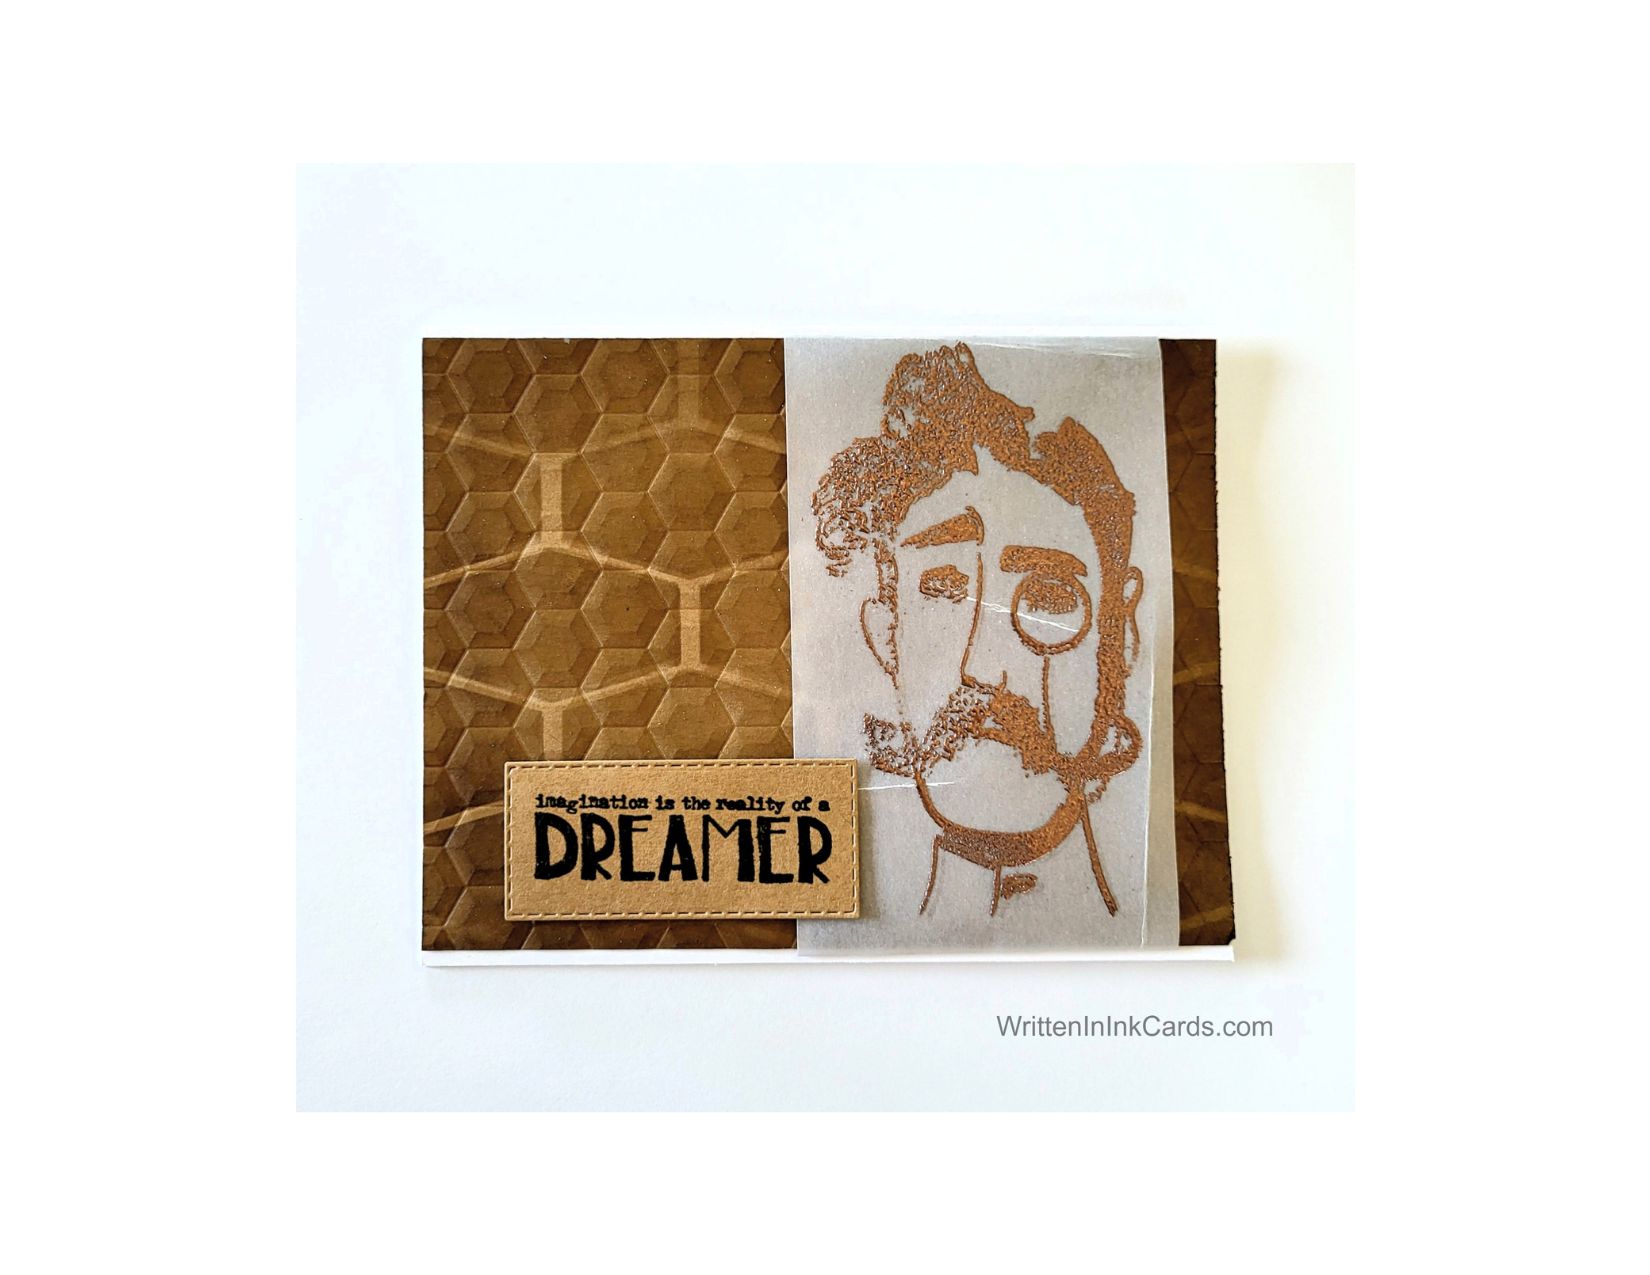
    DIY a Card that Celebrates the Dreamer in your Life.

    Would you like to experiment with a design like this? You’ll find a supply list below, including a link to the stencil I used from A Colorful Life Designs.  Follow the link and use discount code ChrisFan10 to save 10% on your entire order! (Master Creator Bundles are excluded as they already have a 20% discount built in.)

    Let’s get Started:

    Card Base:  5.5 x 8.5, scored and folded at 4.25

    Kraft Card Face:  : 5.5 x 4.25

    Vellum:   2 x 4.5

    Card Face:

    • I laid the card face down onto my grip mat and positioned the stencil.  I used tan coloured ink and a soft hand over the exposed areas to create the pattern.
    • Removing the stencil and setting it aside,  I brushed the same ink around the edges of the card face.
    • I placed the card face in an embossing folder and ran it through my Big Shot.
    • I added several creases to the vellum to create additional texture and visual interest.

    Other:

    • I dusted the vellum liberally with anti-static powder.
    • I used Versamark embossing ink to stamp the image onto the vellum.
    • I sprinkled on copper embossing powder and then set it with my heat gun.

       **  when heat embossing vellum make sure that you have your heat gun really hot before starting and move the gun continually to avoid scorching the vellum.

    • I stamped the sentiment on a piece of Kraft cardstock using Versafine Onyx.  I sprinkled clear embossing powder over this and set it with my heat gun.
    • I used a stitched rectangle die to cut this to the finished size.

    Assembly

    • I wrapped the vellum around the card face towards the right as shown,  securing the ends with scotch tape.
    • I glued the card face to the card base.
    • I put foam tape on the back of the sentiment and placed it towards the bottom left of the card face.

    Final Thoughts:

    I quite like this combination of products –  they play together very nicely.

    After this picture was taken I added a “Happy Graduation”  sentiment above the one shown in the picture.  It makes a very nice masculine graduation card.

    Supplies: (and links where possible)

       I have listed which products I have used, and where they may be purchased. It’s a huge marketplace and in most instances, there are multiple sources and many alternatives to choose from.

    Stencil: Trim Octagon, A Colorful Life Designs

    Waffle Flower Grip Mat, 8.5 x 6.5, Scrapbook.com

    Versamark Embossing Ink: Simon Says Stamp

    Clear Embossing Powder: Wow,  R&R Scrapbooking

    Copper Embossing Powder: Wow , Glitter & Ink

    Stamps:  Observations, Tim Holtz, Stampers Anonymous

    Dies:  Stitched Rectangle, Stampin’ Up!  (retired)

    Ink: Stampin’ Up!

    Blending Brushes: Stampin’ Up! 

    Versafine Onyx, Simon Says Stamp

    Adhesive: Tombow Aqua, Michaels

    Card Base & Card Face: Accent 100 lb., Amazon

    Do you have comments or thoughts to share on this design?  Drop me a line in the Comments Section below –  I’d love to hear from you!

    You can also use the Comments Section  to be added to the list, and notified when I release new work.

    Trim Octagon by A Colorful Life Designs
  • Easy Stencil Ideas for Beautiful DIY Mother’s Day Cards

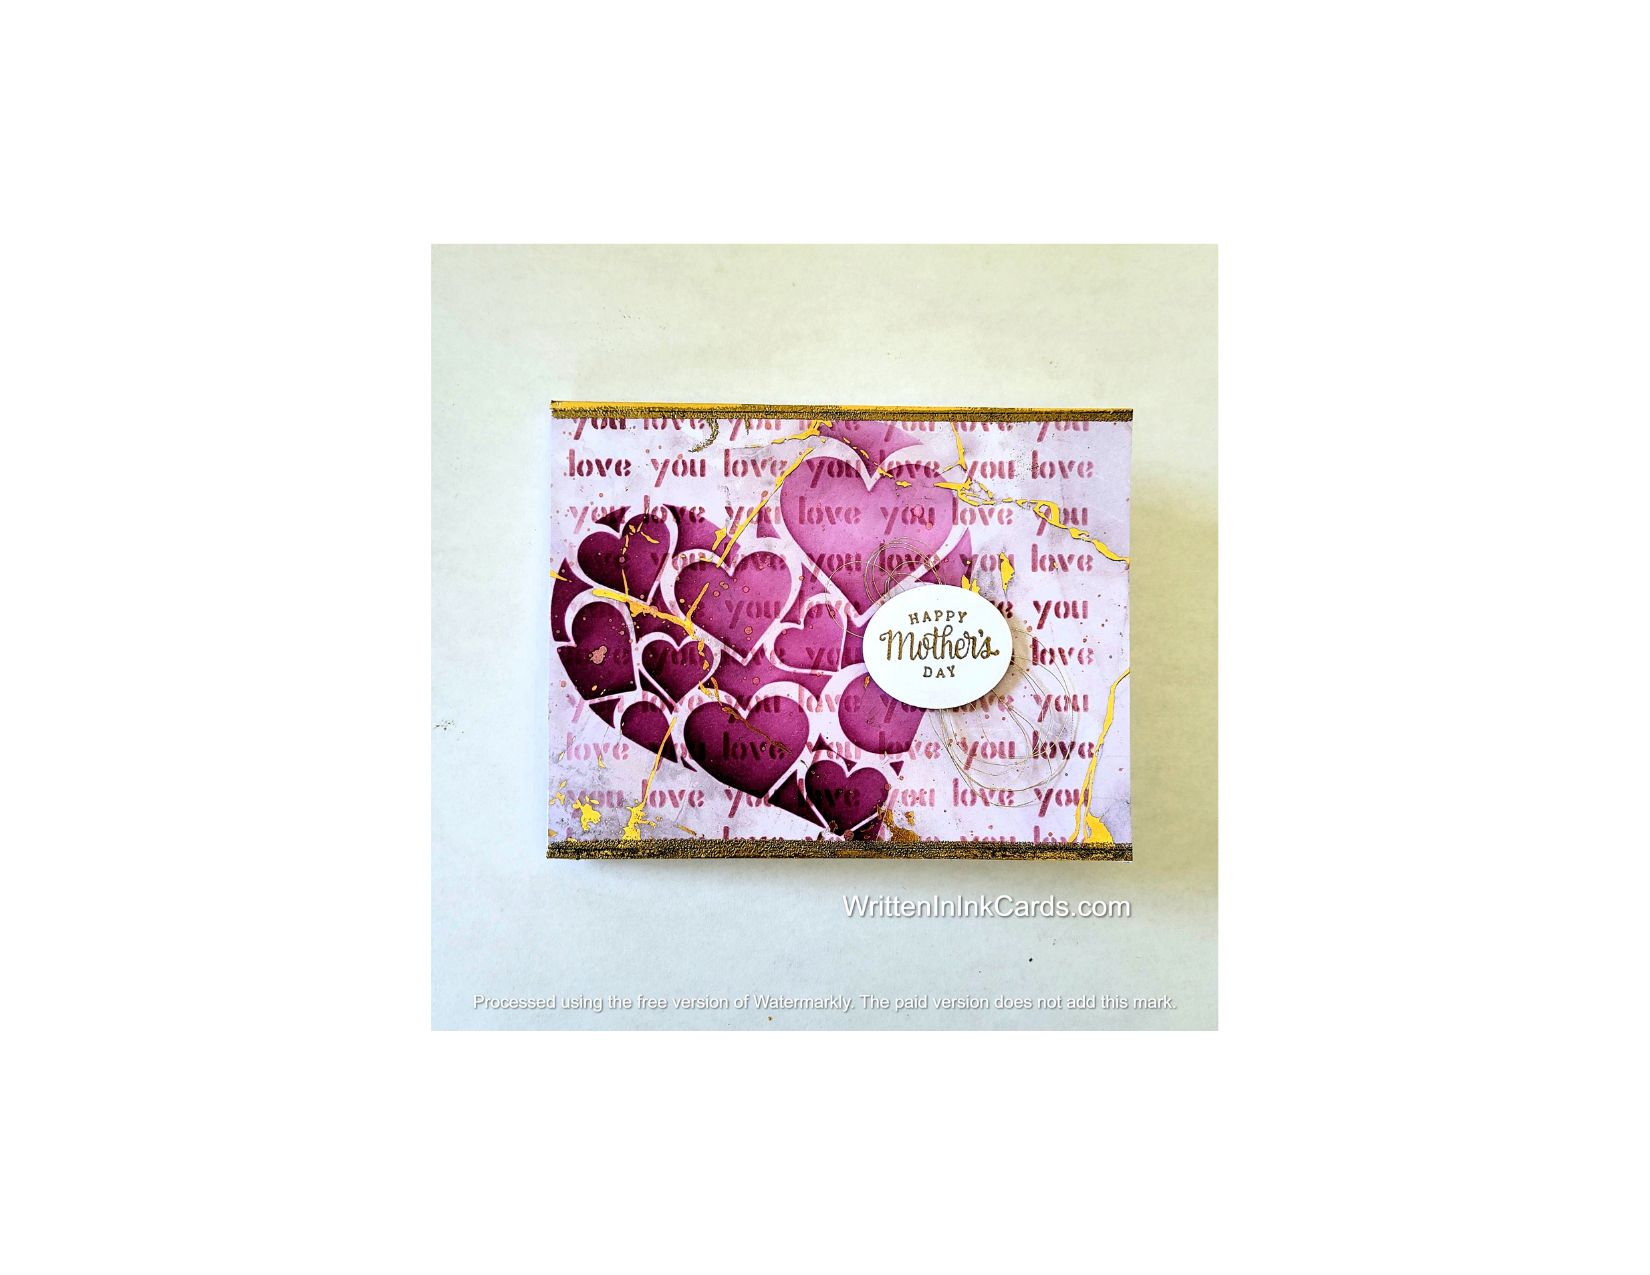
    Easy Stencil Ideas for Beautiful DIY Mother’s Day Cards

    Would you like to experiment with a design like this? You’ll find a supply list below, including a link to the stencils I used from A Colorful Life Designs.  Follow the link and use discount code ChrisFan10 to save 10% on your entire order! (Master Creator Bundles are excluded as they already have a 20% discount built in.)

    Let’s get Started:

    Card Base: 5.5 x 8.5, scored and folded at 4.25

    Card Face:  5.5 x 4 (patterned paper)

    Card Face:

    • I began by laying the patterned paper on the Grip Mat and positioning the Love You stencil.
    • I used medium purple ink and a light hand to apply ink across all exposed areas.
    • After removing this stencil,  I replaced it with the Heart of Hearts stencil positioned at an angle and towards the left of the card face.
    • I applied the same purple ink with a heavier hand, allowing it to stand out against the first layer of stencilling.
    • I applied additional layers of ink to the left-hand side of the stencil,  building up intensity and depth.
    • I used gold watercolour paint to add a fine spatter to the card face.

    Other:

    • I stamped the sentiment with Versamark Embossing Ink, added gold embossing powder and set it with the heat gun.
    •  I cut this out with an oval die.

    Assembly

    • I glued the card face to the card base, centering vertically.
    • I put a thin strip of gold foil on both top and bottom of the card face.   This left me with a very narrow strip of the card base visible, which I didn’t care for.   I dealt with that by running an embossing pen along the strip, sprinkling gold embossing powder over top and setting it with my heat gun. 
    • I used double-faced tape to add metallic gold thread to the back of the sentiment.  I added a piece of foam tape as well,  and put it in place as shown.

    Final Thoughts:

    This patterned paper is so pretty with the gold marbling:  the gold accents I included in the design echo this very well.

    I was very happy with this card in the end.

    Supplies: (and links where possible)

       I have listed which products I have used, and where they may be purchased. It’s a huge marketplace and in most instances, there are multiple sources and many alternatives to choose from.

    Stencils:

        Love You:  A Colorful Life Designs

        Heart of Hearts,  A Colorful Life Designs
    Waffle Flower Grip Mat, 8.5 x 6.5, Scrapbook.com

    Embossing Pen: Ranger,  Amazon

    Gold  Embossing Powder:  Wow,  R&R Scrapbooking

    Metallic Watercolour: Amazon

    Dies:  Nesting Oval Dies,  Hero Arts

    Ink: Stampin’ Up!

    Blending Brushes: Stampin’ Up! 

    Versafine Onyx, Simon Says Stamp

    Adhesive: Tombow Aqua, Michaels

    Card Base & Card Face: Accent 100 lb., Amazon

    Do you have comments or thoughts to share on this design?  Drop me a line in the Comments Section below –  I’d love to hear from you!

    You can also use the Comments Section  to be added to the list, and notified when I release new work.

  • Design Techniques for Unique Greeting Cards are something to CHIRP about!

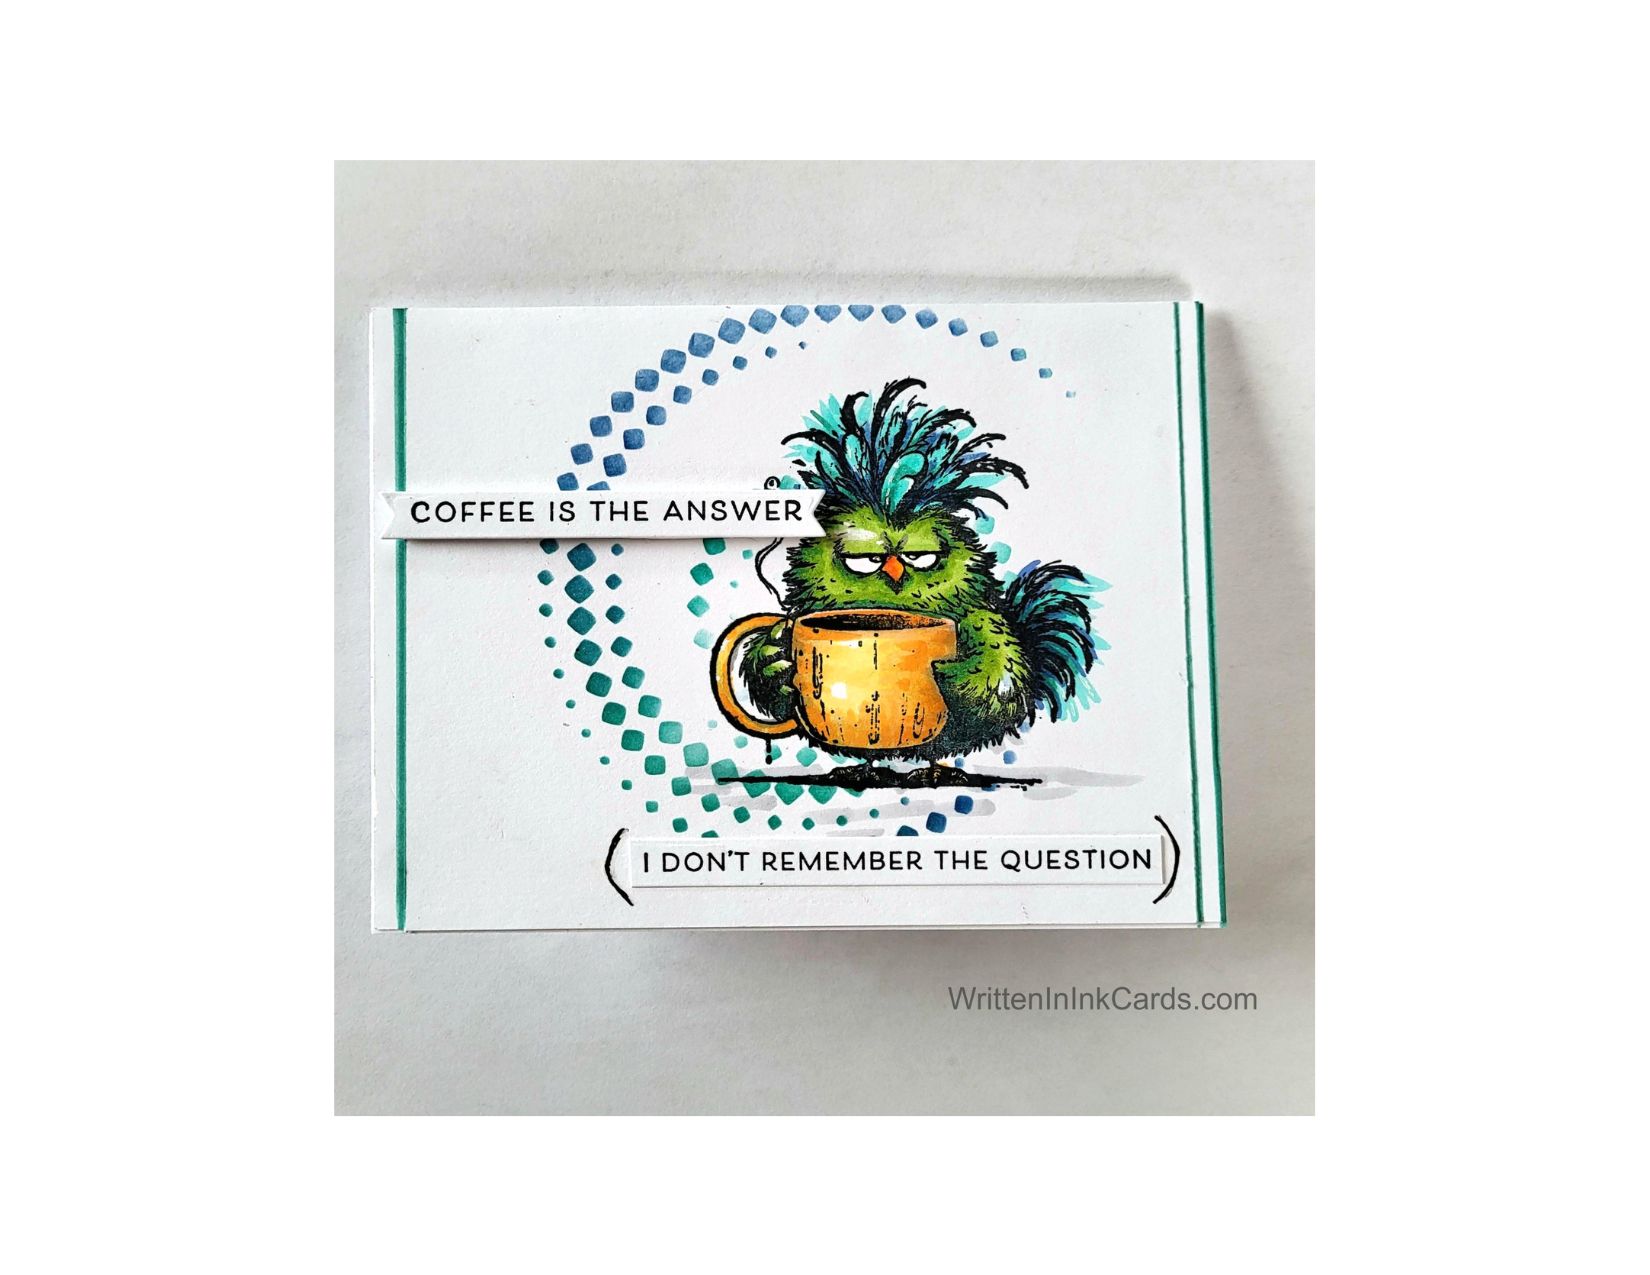
    Design Techniques for Unique Greeting Cards are something to CHIRP about!

    Would you like to experiment with a design like this? You’ll find a supply list below, including a link to the stencil I used from A Colorful Life Designs.  Follow the link and use discount code ChrisFan10 to save 10% on your entire order! (Master Creator Bundles are excluded as they already have a 20% discount built in.)

    I never feel that my day is something to chirp about until I’m caffeinated!

    Let’s get Started:

    Card Base:  5.5 x 8.5, scored and folded at 4.25

    Card Face:  5.25 x 4.25

    Card Face:

    • I placed the card face in my stamp positioner and stamped the focal image a couple of times with black Memento ink.
    • I coloured the image with alcohol markers. This caffeinated fella is ready to take center stage on the card!
    • After laying the card face on the Grip Mat,  I positioned the stencil, using a brayer to ensure good contact with the sticky surface of the mat.
    • I applied navy blue and teal ink across the exposed areas on the stencil, taking care to avoid the coloured image.

    Other:

    • I looked through my sentiment binder and found this pair – they are perfectly suited to the image!

    Assembly

    • I glued the card face to the card base,centering the vertical edges.
    • I created faux borders on the card by using a blue marker and a ruler. (The marker matched one of the blues used on the bird.)
    • I glued the sentiments in place as shown.
    • I drew brackets around the sentiment on the bottom, using a black fineliner.

    Final Thoughts:

    It’s odd what I don’t see when creating a card: for instance,  I see now that I forgot to create the outer border on the left of the card!   I will fix that up before sending it on.

    I love this sentiment,  and I like the concept of the brackets around the second half of it,  but if I recreate this card I will handwrite that one as I don’t like the combination of hand drawn brackets with the glued on sentiment.

    (but now that this fella is fully caffeinated, he’ll have more of a chance of remembering that question, LOL.)

    Supplies: (and links where possible)

       I have listed which products I have used, and where they may be purchased. It’s a huge marketplace and in most instances, there are multiple sources and many alternatives to choose from.

    Stencil: Square Swirl,  A Colorful Life Designs

    Waffle Flower Grip Mat, 8.5 x 6.5, Scrapbook.com

    Stamps:

        Coffee Doodle Doo,  Unity Stamps

         Simple Strips, Coffee: Taylored Expressions

    Dies:   Simple Strips Die, Taylored Expressions

    Ink: Stampin’ Up!

    Blending Brushes: Stampin’ Up! 

    Memento Ink: Stampin’ Up!

    Alcohol Markers:

         Stampin’ Blends: Stampin’ Up!

         Copics:  Wallacks

    Fineliner: Amazon

    Adhesive: Tombow Aqua, Michaels

    Card Base & Card Face: Accent 100 lb., Amazon

    Do you have comments or thoughts to share on this design?  Drop me a line in the Comments Section below –  I’d love to hear from you!

    You can also use the Comments Section  to be added to the list, and notified when I release new work.

  • How to create a  Stunning  Art Deco card

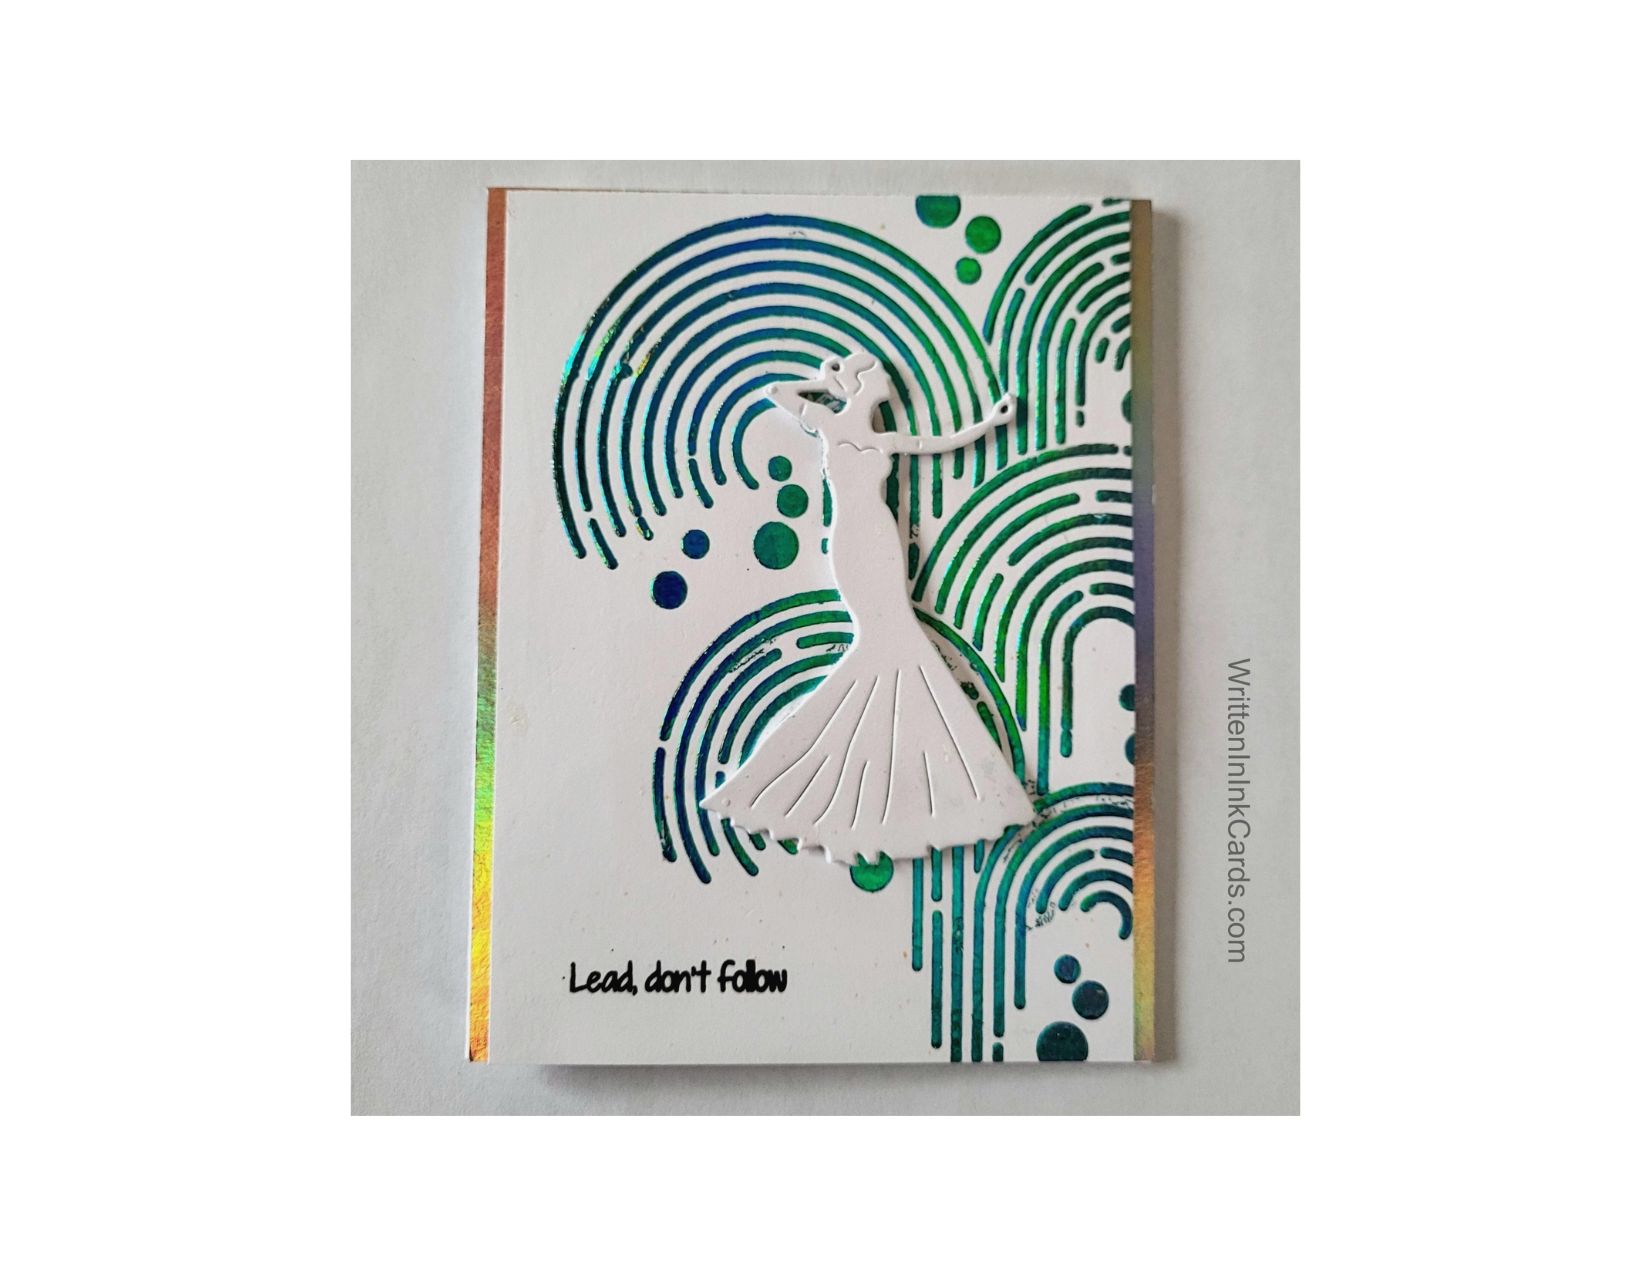
    How to create a Stunning Art Deco card

    dance like nobody’s watching

    The elegance of Art Deco meets the extravagant feel of foil! (And a touch of sass, as an unexpected final touch.)

    Would you like to experiment with a design like this? You’ll find a supply list below, including a link to the stencil I used from A Colorful Life Designs.  Follow the link and use discount code ChrisFan10 to save 10% on your entire order! (Master Creator Bundles are excluded as they already have a 20% discount built in.)

    Are you intrigued by the luxurious feel of foil, but at the same time just a bit intimidated? Me too! or, I was until I discovered Duo gel and transfer foil. No Minc or laminator required, but the same amazing results – and unlimited options.

    Let’s get Started:

    Card Base: 4.25 x 11, scored and folded at 5.5

    Border Layer: 4.25 x 5.5  **

    Card Face:  4 x 5.5 

    ** Budget tip: Rather than a full piece of foiled cardstock,  I used two strips of cardstock that were ⅛ x 5.5 each.  Gluing them snugly alongside the card face gave the look of a full piece,  and is more economical.

    Card Face:

    • I sprayed the back of my stencil with Pixie Spray. This is a temporary adhesive that will ensure that the stencil stays in place on the card face during use.
    • I placed my card face on a piece of cardstock and positioned the stencil.   I used a brayer over the entire surface to ensure good contact with the card face.
    • I applied Duo gel to all exposed areas, carefully removed the stencil and put it into water. I set the card face aside to dry.
    • After the gel had dried (this depends on the thickness of the application,  but I typically leave this 2 – 4 hours) it was time for the magic!   I put a piece of transfer foil over the card face and ran it through my Big Shot.
    • Once this was done I removed the excess foil,  leaving the beautiful pattern behind.
    • This card needed a sentiment, but I wasn’t certain which direction to go in at first – and then I stumbled across this bit of sass, which fit the bill perfectly. So I put the card face into my stamp positioner and added the sentiment with Versafine Onyx, stamping 3x to get a bold result.

    I didn’t use my Grip Mat for this as I don’t like to risk compromising the surface with gels and pastes.  I’ve seen content creators do this successfully:  I’m just not brave enough yet!

    Other:

    • I placed a piece of adhesive dimensional foam on the back of a scrap piece of cardstock and added the die. Then I ran it through the Big Shot.

    Assembly

    • I glued the card face to the card base, centering vertically.
    • I glued a narrow strip of irridescent cardstock to both sides.
    • I added the dancing lady as shown.

    Final Thoughts:

    This stencil was part of a water themed release from A Colorful Life Designs,  but as soon as I saw it I thought of the elegance of Art Deco. This design has been perking away in my head for a while now –  I’m glad to finally have it out and on paper.

    Supplies: (and links where possible)

       I have listed which products I have used, and where they may be purchased. It’s a huge marketplace and in most instances, there are multiple sources and many alternatives to choose from.

    Stencil: Waterspout,  A Colorful Life Designs
    Versamark Embossing Ink: Simon Says Stamp

    Clear Embossing Powder: Wow,  R&R Scrapbooking

    Stamps: Be Yourself, The Frantic Stamper

    Dies:  Carmen, The Frantic Stamper

    Ink: Stampin’ Up!

    Blending Brushes: Stampin’ Up! 

    Versafine Onyx, Simon Says Stamp

    Memento Ink: Stampin’ Up!

    Adhesive: Tombow Aqua, Michaels

    Card Base & Card Face: Accent 100 lb., Amazon

    Do you have comments or thoughts to share on this design?  Drop me a line in the Comments Section below –  I’d love to hear from you!

    You can also use the Comments Section  to be added to the list, and notified when I release new work.

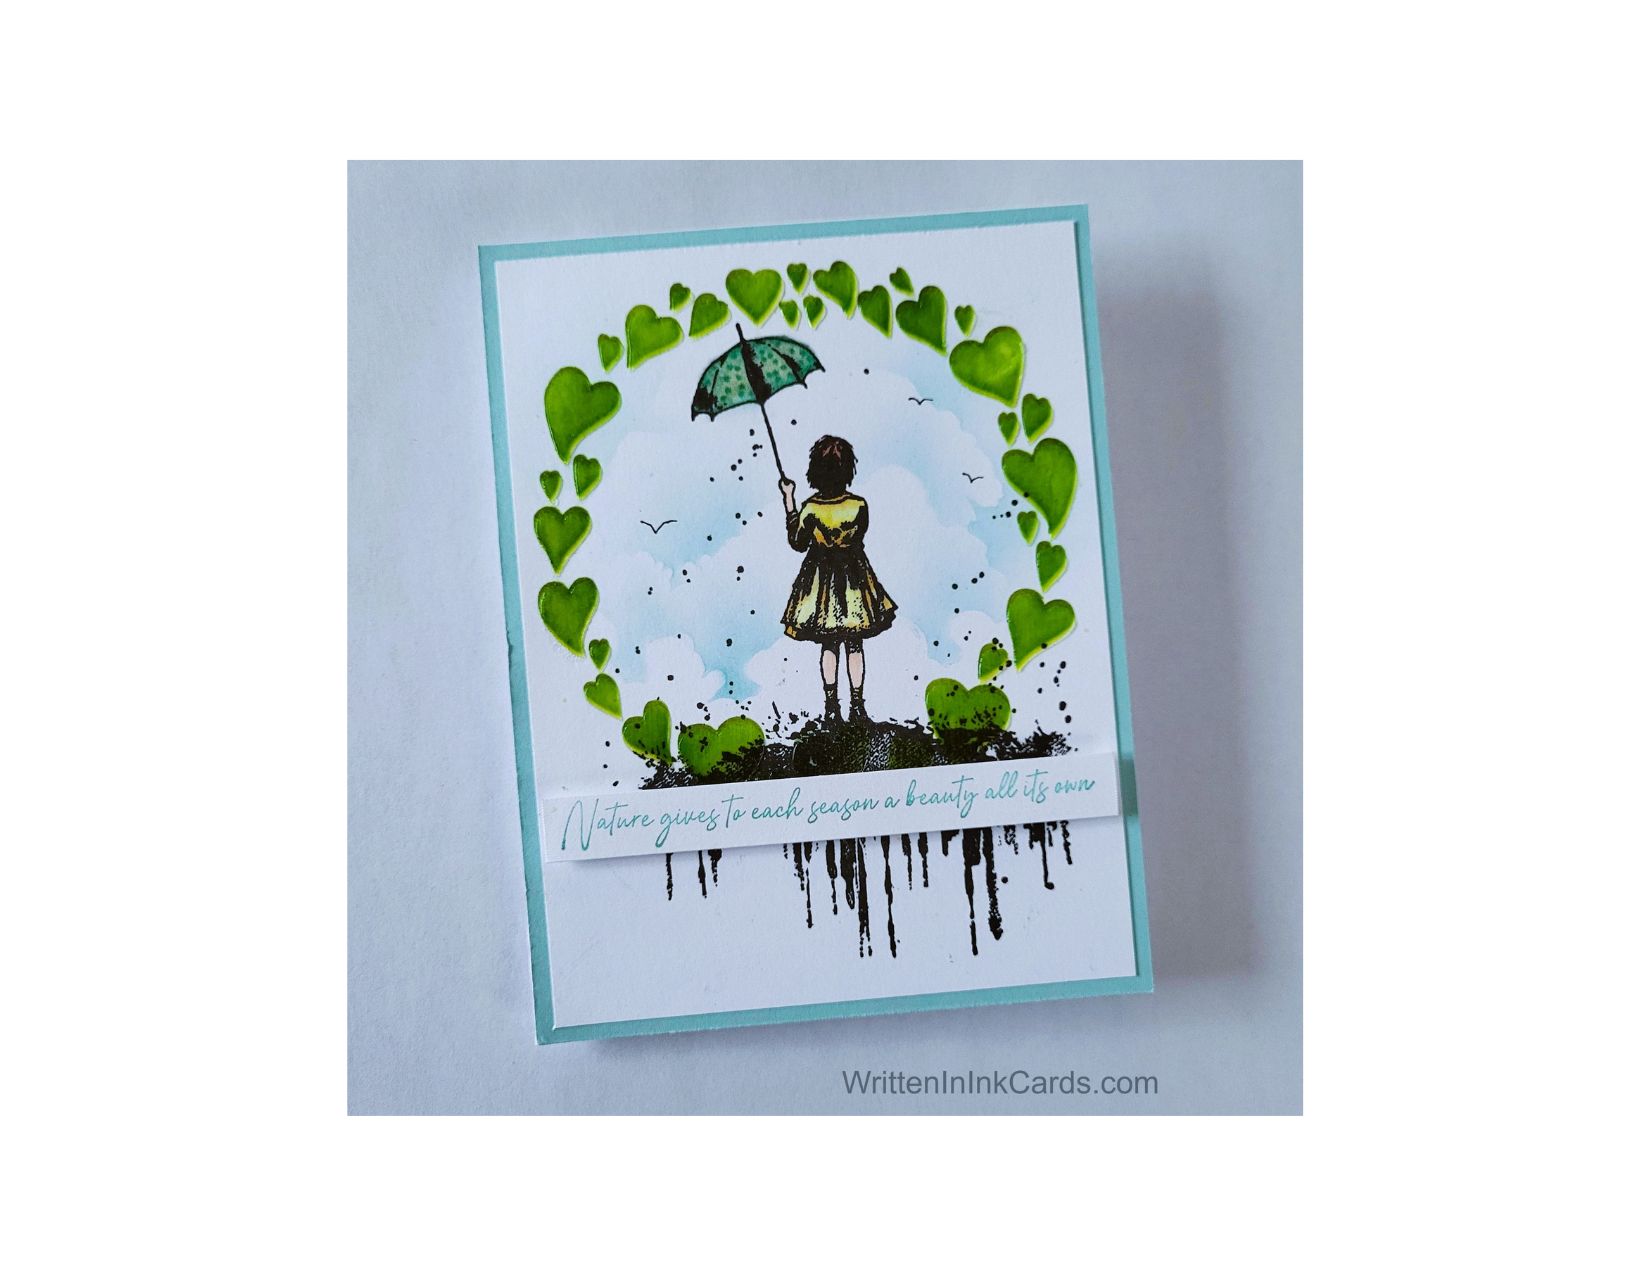
  • Elevate Your Card Making with Easy Stenciling Techniques

    Elevate Your Card Making with Easy Stenciling Techniques

    Would you like to experiment with a design like this? You’ll find a supply list below, including a link to the stencils I used from A Colorful Life Designs.  Follow the link and use discount code ChrisFan10 to save 10% on your entire order! (Master Creator Bundles are excluded as they already have a 20% discount built in.)

    A couple of simple stencilling techniques is a great way to make your card stand out.

    Let’s get Started:

    Card Base: 5.5 x 8.5, scored and folded at 4.25

    Border Layer: 5.5 x 4.25

    Card Face:  5.25 x 4

    Card Face:

    • I placed the card face onto my Grip Mat, and then positioned the stencil. I applied bright green ink to the exposed areas. As I had used a heavy hand, I had to put this aside until the ink was dry.
    • With the ink completely dry,  I put the stencil back in place but moved it slightly down and to the right.  This stencilling technique created the illusion of a shadow for each of the hearts.
    • I added translucent gel over the exposed areas, carefully removing the stencil once this was complete and putting it into water immediately.  I set the card face aside to dry once again.
    • Once the gel had dried, I put the card face into my stamp positioner and added the image in the center of the hearts with Versafine Onyx and sprinkled it with clear embossing powder.  I set this with my heat gun.
    • I coloured the image with alcohol markers.
    • I used the cloud edger stencil and blue ink to create the sky, being careful to stay inside the hearts. This stencilling technique created a scene in a very specific part of the card, and is very effective.
    • I added the birds using a black fineliner.

    Other:

    • I put a piece of scrap cardstock into the stamp positioner and stamped the sentiment two or three times with the same blue ink.  (I had used a soft blue,  and I needed to stamp several times to allow the sentiment to have enough presence.)
    • I trimmed the sentiment down to a narrow strip and added dimensional tape on the back.

    Assembly

    • I glued the border layer to the card base and then centered the card face on top of these.
    • I positioned the sentiment as shown.

    Final Thoughts:

    I quite like this offbeat combination of elements. 

    If I were to recreate this card,  I would select a different colour for the umbrella: I don’t feel that it works well with the other colours in the scene. Do you ever regret a colour choice when it’s too late to do anything about it?

    Supplies: (and links where possible)

       I have listed which products I have used, and where they may be purchased. It’s a huge marketplace and in most instances, there are multiple sources and many alternatives to choose from.

    Stencils:

       Cloud Edger:  A Colorful Life Designs

       Happy Thoughts Wreath:  A Colorful Life Designs
    Waffle Flower Grip Mat, 8.5 x 6.5, Scrapbook.com

    Stamps:   I’ll be Your Umbrella,  Andy Skinner,  Amazon

    Ink: Stampin’ Up!

    Blending Brushes: Stampin’ Up! 

    Versafine Onyx, Simon Says Stamp

    Clear Embossing Powder:  Wow,  R&R Scrapbooking

    Black Fine Liners: Amazon

    Alcohol Markers:

         Stampin’ Blends: Stampin’ Up!

         Copics:  Wallacks

    Adhesive: Tombow Aqua, Michaels

    Card Base & Card Face: Accent 100 lb., Amazon

    Do you have comments or thoughts to share on this design?  Drop me a line in the Comments Section below –  I’d love to hear from you!

    You can also use the Comments Section  to be added to the list, and notified when I release new work.