Category: Masculine

  • Using Foil and Ink Techniques for Cards for beautiful results

    Using Foil and Ink Techniques for Cards for beautiful results

    Would you like to experiment with a design like this? You’ll find a supply list below, including a link to the stencil I used from A Colorful Life Designs.  Follow the link and use discount code ChrisFan10 to save 10% on your entire order! (Master Creator Bundles are excluded as they already have a 20% discount built in.)

    Let’s get Started:

    Card Base: 5.5 x 8.5, scored and folded at 4.25

    Gold Foil Border Layer: 5.5 x 4.25

    Card Face:  5.25 x 4

    Transfer Foil:  5.5 x 4.25

    Card Face:

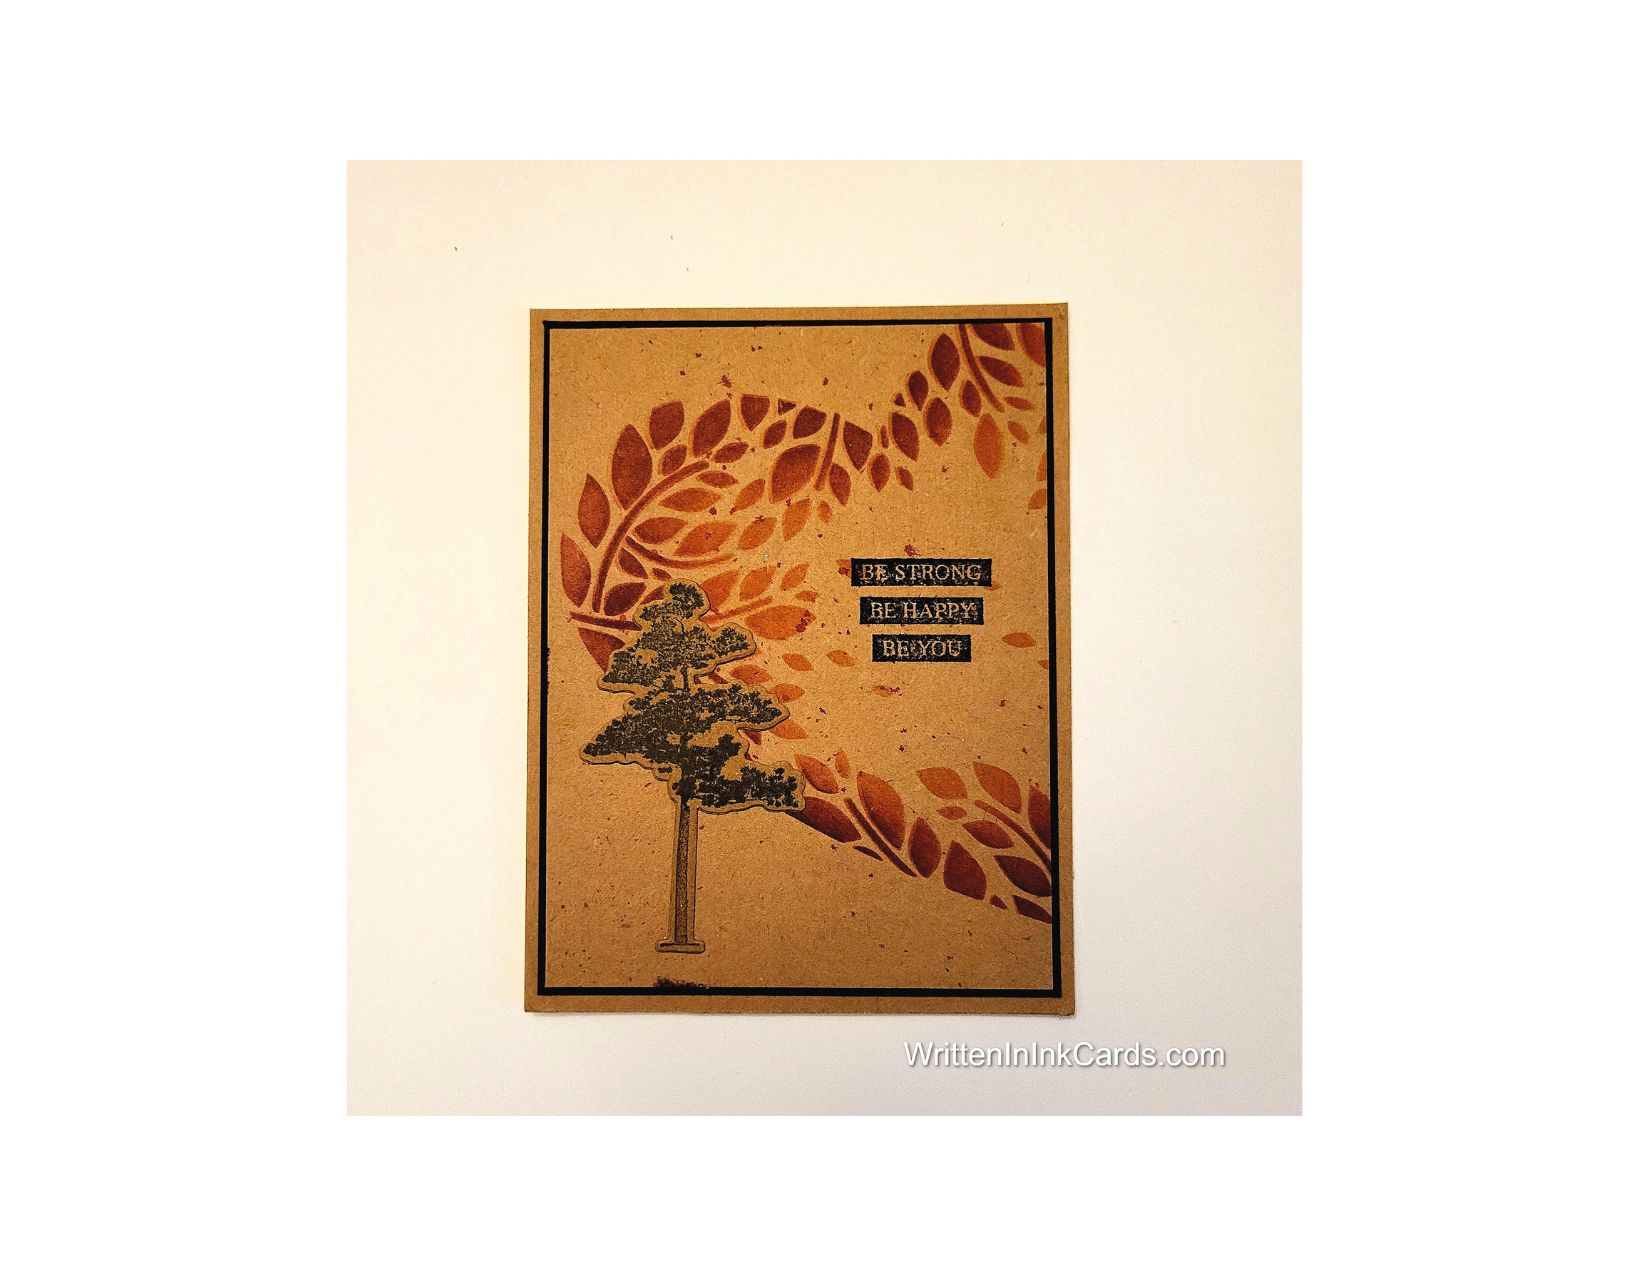
    • I laid my card face down on the Grip Mat and positioned the stencil.
    • I used medium-brown ink randomly across the exposed areas, varying pressure to control depth and skipping some areas completely.
    • Leaving the stencil in place,  I spread Duo Gel over some of the inked areas, allowing partial coverage even within some of the openings.
    • I removed the stencil and placed it in water immediately.   I set the card face down to dry (the gel is dry when it becomes transparent).
    • When the gel was dry, I placed the transfer foil on top and ran it through the Big Shot.
    • I removed the foil, and the dried gel (which had become an adhesive) left the foil on the card face.
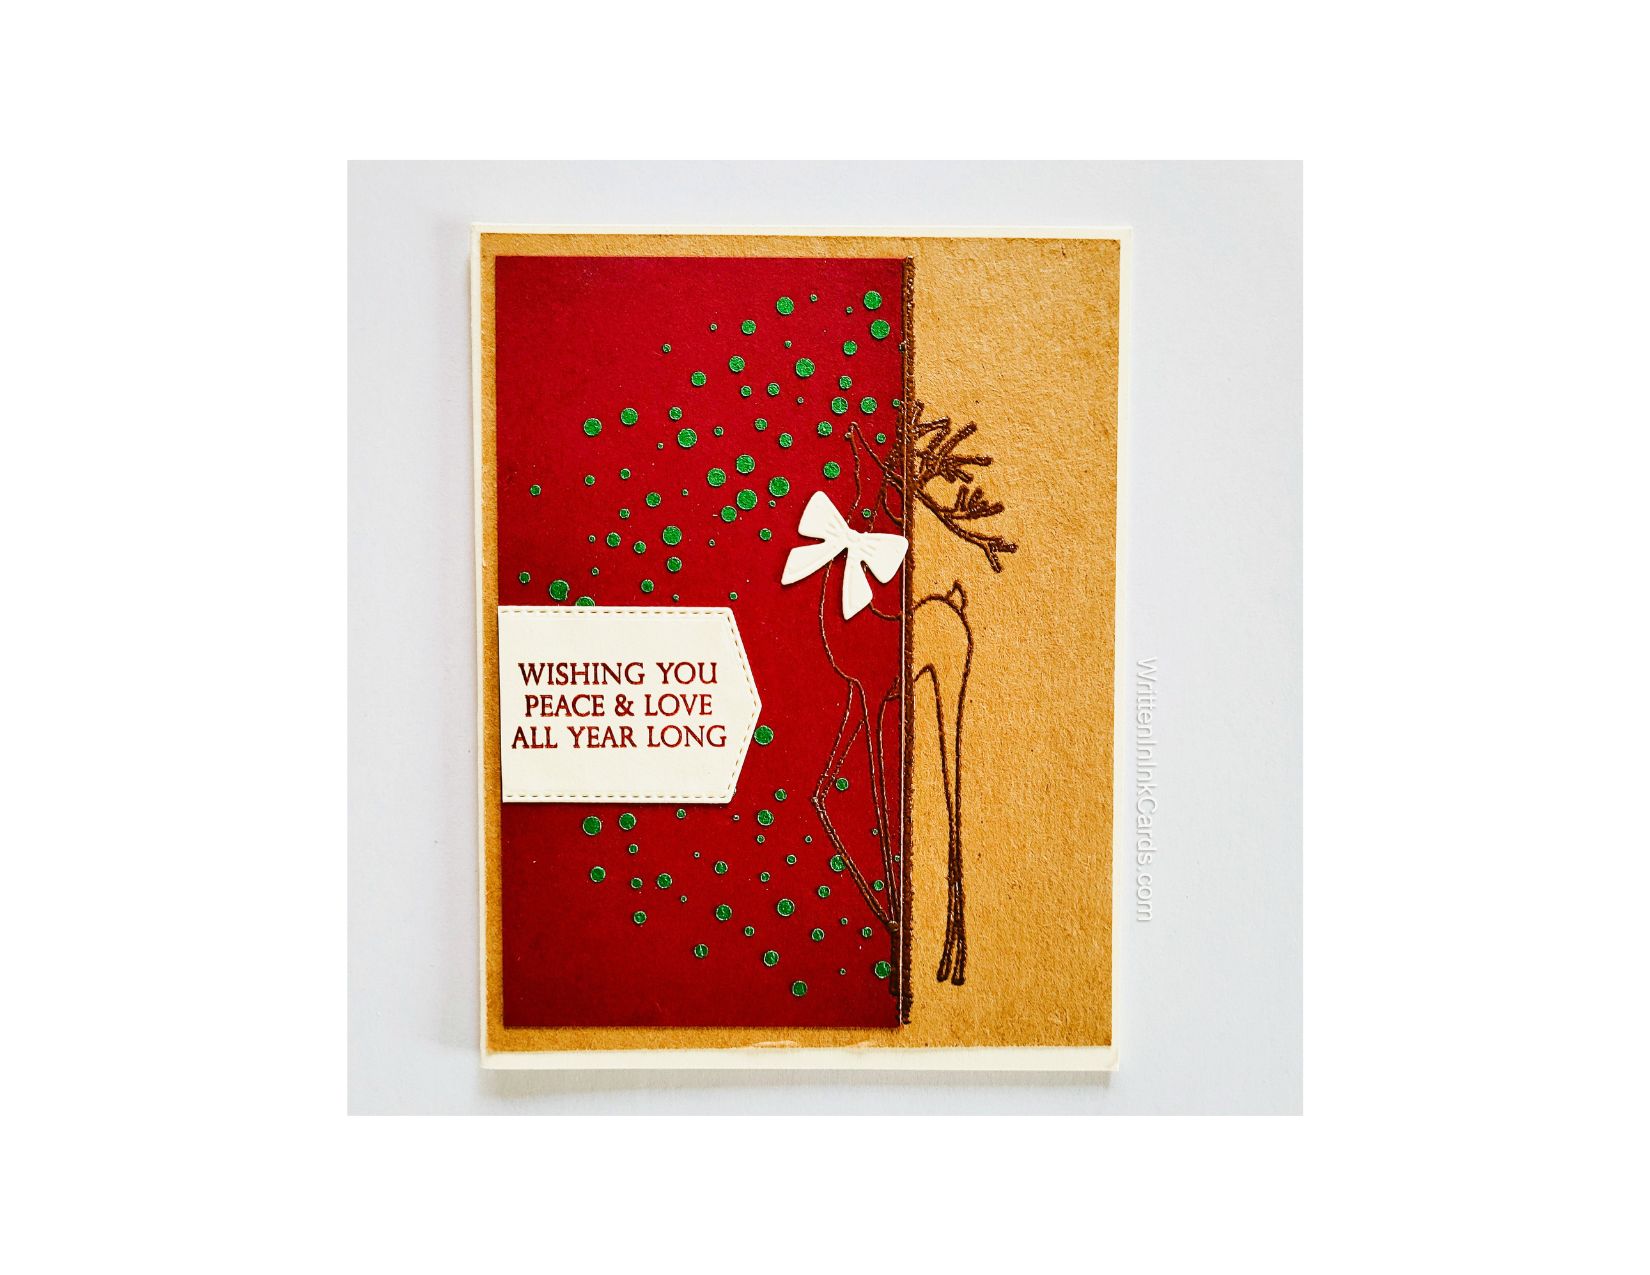
    • I placed the card face in my stamp positioner and used brown ink to stamp the trees on the left of the card face.
    • I used a darker brown ink and stamped the deer in front of the trees.  I stamped a couple of times to ensure that it was intense enough to grab attention.
    • I used a corner chomper punch on each corner of the card face.

    Other:

    • I grabbed the sentiment you see from my binder.

    Assembly

    • I glued the foil border layer to the card base,  and then centered the card face on top of that.
    • I applied dimensional foam to the back of the sentiment and added it as shown.

    Final Thoughts:

    I couldn’t decide if I liked this for a few days:  it sat on my desk as I considered it.  It bothered me that I had lost part of the deer’s face due to the foiling,  and I needed to decide if it was “too much”.  In the end, I decided that I still liked this card –  I like the play between foil and inked surfaces,  and between coloured and uncoloured parts of the surface.

    Supplies: (and links where possible)

       I have listed which products I have used, and where they may be purchased. It’s a huge marketplace and in most instances, there are multiple sources and many alternatives to choose from.

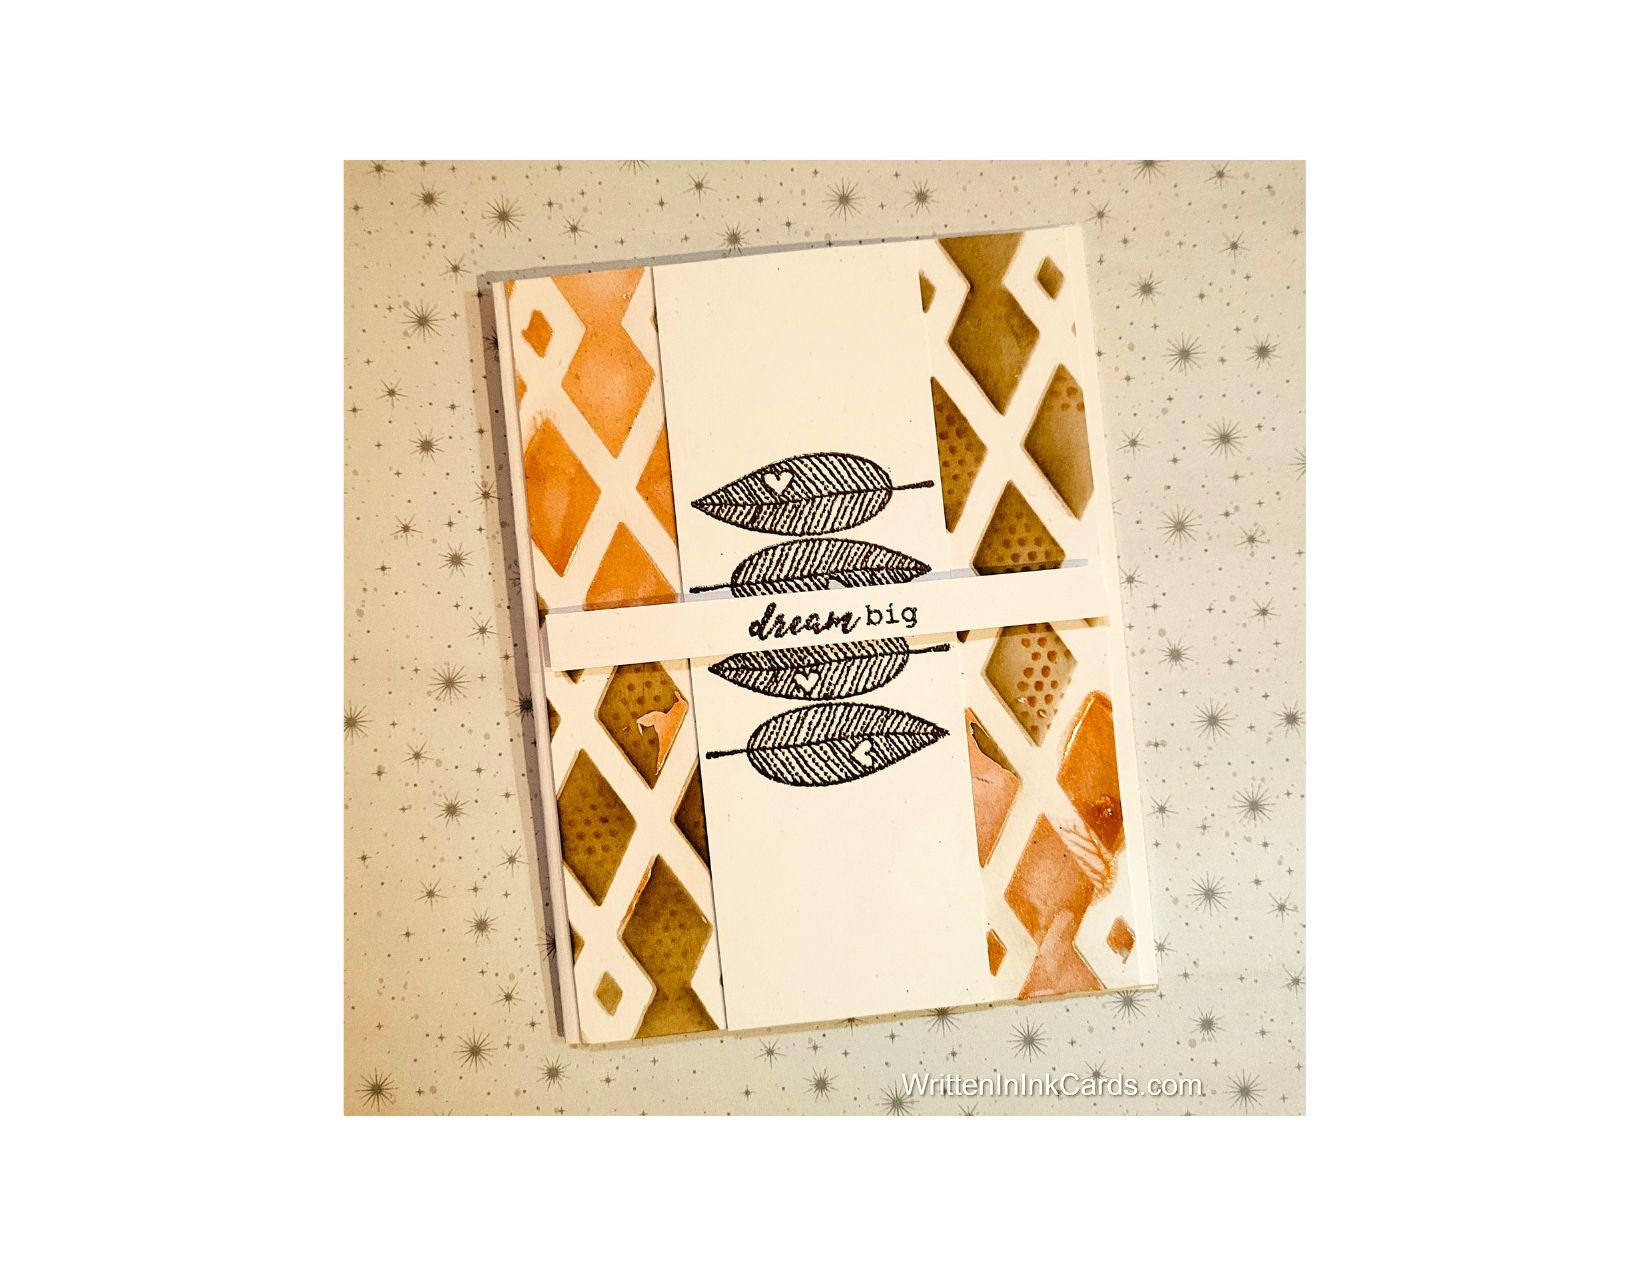
    Stencil: Triangle Fade,  A Colorful Life Designs

    Waffle Flower Grip Mat, 8.5 x 6.5, Scrapbook.com

    Versamark Embossing Ink: Simon Says Stamp

    Clear Embossing Powder,  Wow,  Simon Says Stamp

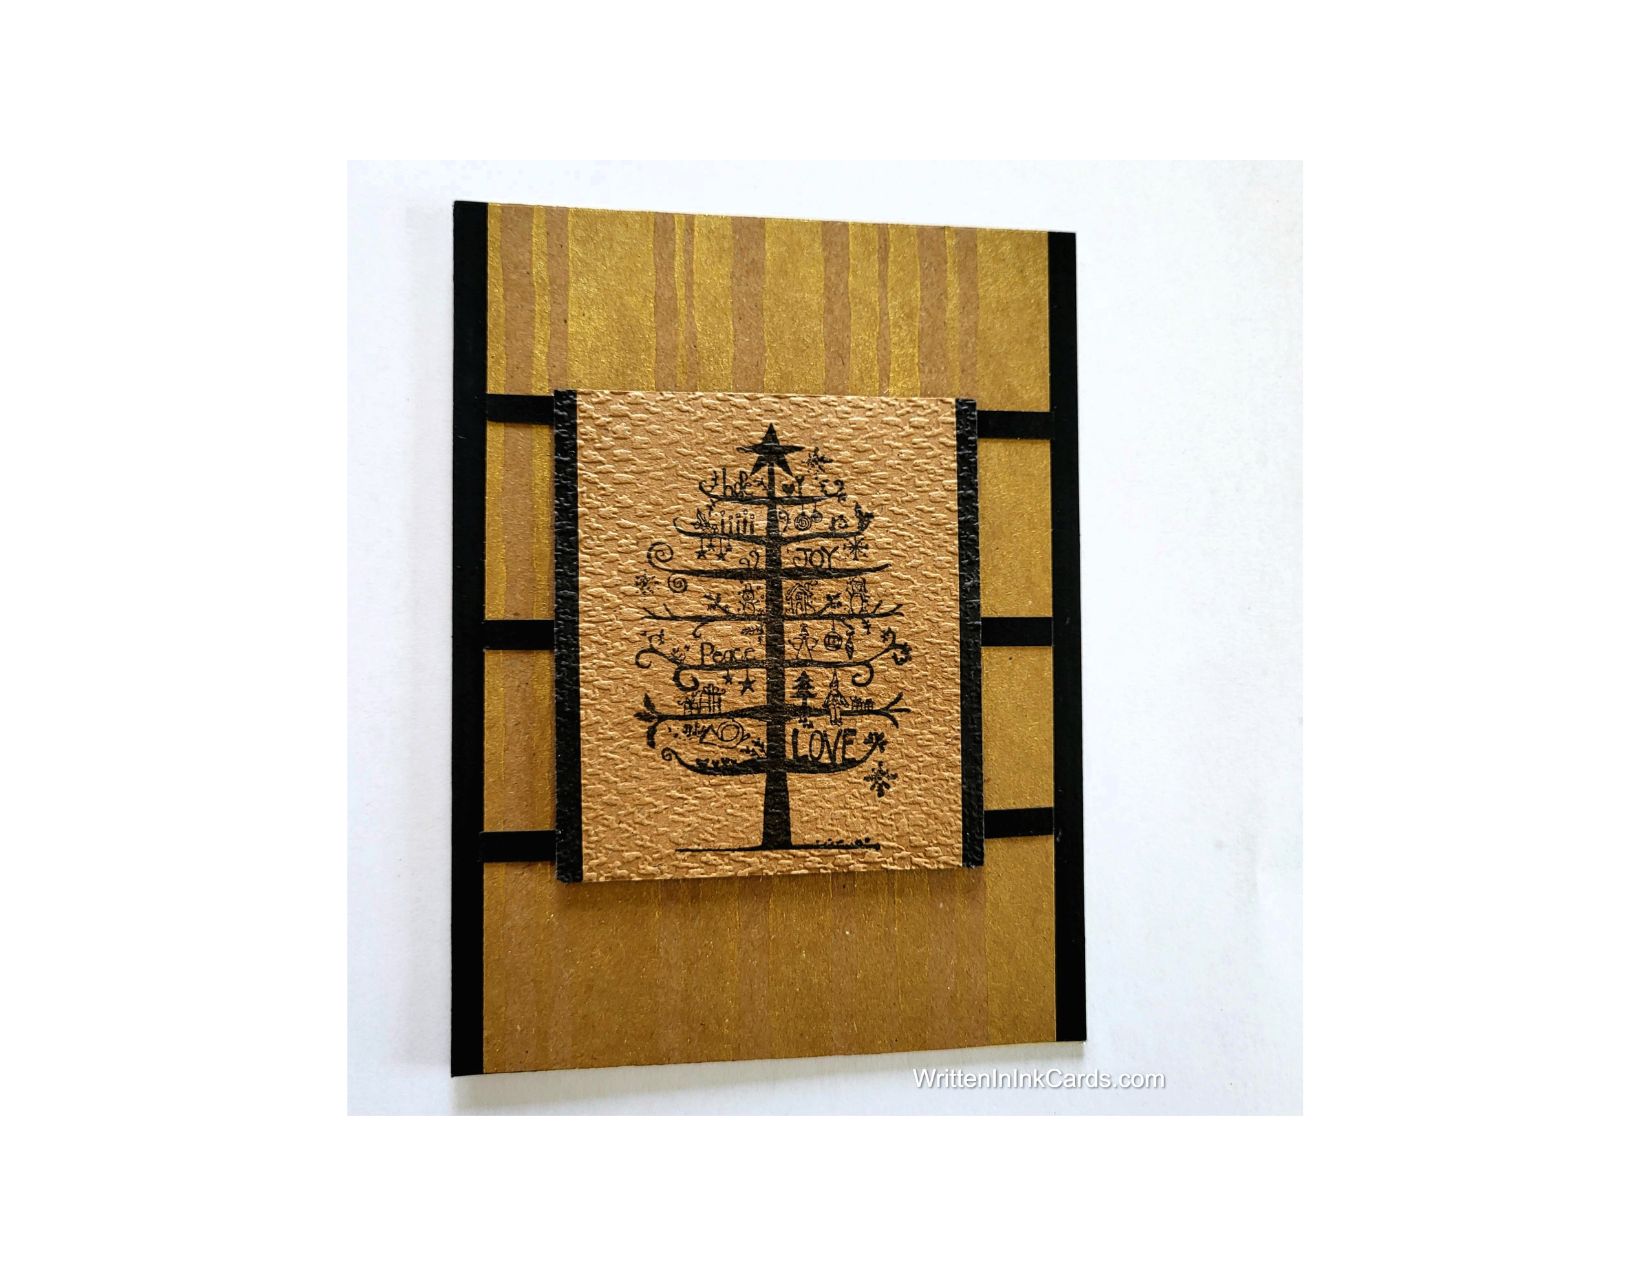
    Stamps: Natures Beauty & Winter Wood, both Stampin’ Up  (retired)

    Ink: Stampin’ Up!

    Blending Brushes: Stampin’ Up! 

    Duo Gel:  Decofoil, R&R Scrapbooking

    Transfer Foil: Decofoil, R&R Scrapbooking

    Adhesive: Tombow Aqua, Michaels

    Card Base & Card Face: Accent 100 lb., Amazon  or  Recollections 110 lb., Michaels

    Do you have comments or thoughts to share on this design?  Drop me a line in the Comments Section below –  I’d love to hear from you!

    You can also use the Comments Section  to be notified when I release new work.

    Triangle Fade by A Colorful Life Designs

  • Create Stunning Cards with Stencils & Embossing Paste

    Create Stunning Cards with Stencils & Embossing Paste

    Would you like to experiment with a design like this? You’ll find a supply list below, including a link to the stencil I used from A Colorful Life Designs.  Follow the link and use discount code ChrisFan10 to save 10% on your entire order! (Master Creator Bundles are excluded as they already have a 20% discount built in.)

    Let’s get Started:

    Card Base: 5.5 x 8.5, scored and folded at 4.25

    Card Face:  5.5 x 4

    Focal Image Strip:  5.5 x 1.75”

    Sentiment strip: .25” x 4

    Card Face:

    • I laid the card face onto the Grip Mat and positioned the Diamond Lattice stencil.  
    • I applied brown ink across all exposed areas, allowing variation in tone to provide depth and visual interest.
    • I applied DIY embossing paste randomly over the card face.  I carefully removed the stencil and put the card face aside to dry.  

    When I use embossing paste the stencil goes into water immediately to prevent the paste from drying on the stencil. This makes clean-up much faster and easier.

    • Once the paste had dried, I used the Grunge Dots stencil to add dots here and there in the remaining inked portions of the pattern.

    Other:

    • I placed the Focal Image strip into my stamp positioner and added the leaves with dark brown ink,  stamping several times to get an intense image.
    • I sprinkled clear embossing powder over the image,  setting it with my heat gun.
    • Next I placed the narrow sentiment strip in the stamp positioner and stamped the sentiment with the same dark brown ink,  again stamping multiple times to get intense colour.
    • I sprinkled this with clear embossing powder too, and set it with my heat gun.

    Although I used a dye based ink for both of these,  stamping several times created enough saturation that the ink was wet enough for me to use the embossing powder successfully. Stamping only once wouldn’t have worked, as the ink would have dried too quickly.

    Assembly

    • I glued the card face onto the card base, and then added the strip with the leaves, centering both vertically.
    • I put dimensional foam on the back of the sentiment and then added it to the card face, centering horizontally.

    Final Thoughts:

    The combination of ink and embossing paste work well with this design,  and the addition of the dots provided additional depth and visual interest.

    Supplies: (and links where possible)

       I have listed which products I have used, and where they may be purchased. It’s a huge marketplace and in most instances, there are multiple sources and many alternatives to choose from.

    Stencil: 

    Diamond Lattice,  A Colorful Life Designs

    Grunge Dots,  A Colorful Life Designs

    Waffle Flower Grip Mat, 8.5 x 6.5, Scrapbook.com

    Versamark Embossing Ink: Simon Says Stamp

    Clear Embossing Powder,  Wow,  Simon Says Stamp

    Stamps: Falling Hearts,  Unity Stamps  (retired)

    Ink: Stampin’ Up!

    Blending Brushes: Stampin’ Up! 

    Adhesive: Tombow Aqua, Michaels

    Card Base & Card Face: Accent 100 lb., Amazon

    Do you have comments or thoughts to share on this design?  Drop me a line in the Comments Section below –  I’d love to hear from you!

    You can also use the Comments Section  to be notified when I release new work.

    Diamond Lattice by A Colorful Life Designs

    Grunge Dots by A Colorful Life Designs

  • How to Make a Gorgeous Card with Dotted Wreath Stencil

    How to Make a Gorgeous Card with Dotted Wreath Stencil

    Would you like to experiment with a design like this? You’ll find a supply list below, including a link to the stencil I used from A Colorful Life Designs.  Follow the link and use discount code ChrisFan10 to save 10% on your entire order! (Master Creator Bundles are excluded as they already have a 20% discount built in.)

    Let’s get Started:

    Card Base: 5.5 x 8.5, scored and folded at 4.25

    Border Layer: 5.5 x 4.25

    Cranberry Card Face: 5.25 x 5.25

    Card Face:

    • I laid my card face on a piece of scrap paper and positioned the stencil.  I applied green embossing paste through the stencil, then removed the stencil very carefully so I didn’t smudge the paste.
    • The stencil went into water immediately,  and the card face was put aside to dry.
    • Once dry the card face was cut in half, and became 5.25 x 2.75.
    • I also cut ⅛” off the top and bottom of this piece.

    Other:

    • I glued the card face (or rather, half of it!)  to the kraft border layer on the left, ensuring equal spacing on the top, bottom and left-hand sides.
    • I placed this newly created combination into my stamp positioner and stamped the reindeer image with Versamark embossing ink.  I stamped several times to get a good impression.
    • I removed this from the stamp positioner, added copper embossing powder, and set it with my heat gun.
    • I drew a narrow line snugly against the right-hand edge of the cranberry cardstock,  added copper embossing powder and set it with my heat gun.  

    This was necessary because of the raised cranberry layer:  no ink transferred immediately beside it,  so I used the embossing pen to draw a line and fill in the narrow gap.

    • I stamped the sentiment on a scrap of cardstock in cranberry ink and cut it with a die.
    • I die cut a tiny bow out of the same cardstock.

    Assembly:

    • I glued the sentiment to the card face, allowing part of it to hang off the left-hand edge.  I cut this off flush.
    • I glued the card face to the card base.
    • I added the tiny bow to the reindeer as shown.

    Final Thoughts:

    I wasn’t at all sure about this design when I tried it,  but I quite like it in the end.

    This is such a great stencil to play with –  and I still  have half of it to work into a card.

    Supplies: (and links where possible)

       I have listed which products I have used, and where they may be purchased. It’s a huge marketplace and in most instances, there are multiple sources and many alternatives to choose from.

    Stencil: Dotted Wreath : A Colorful Life Designs

    Waffle Flower Grip Mat, 8.5 x 6.5, Scrapbook.com

    Versamark Embossing Ink:  Ecstasy Crafts

    Embossing Pen: Versamark, Ecstasy Crafts

    Copper Embossing Powder: Wow,  R&R Scrapbooking

    Embossing Paste: Later Gater, Simon Hurley,  R&R Scrapbooking

    Stamps:  Cheerful Prancing, Unity Stamps  (retired,  but there are still similar stamps     available!)

    Dies: 

         Sentiment: Stampin’ Up! (retired)

         Bow Topper:  Scrapbook.com

    Ink: Stampin’ Up!

    Adhesive: Tombow Aqua, Michaels

    Card Base & Card Face: Accent 100 lb., Amazon

    Do you have comments or thoughts to share on this design?  Drop me a line in the Comments Section below –  I’d love to hear from you!

    You can also use the Comments Section  to be notified when I release new work.

    Dotted Wreath by A Colorful Life Designs

  • Create Stunning a Card for Your Special Guy

    Create Stunning a Card for Your Special Guy

    Would you like to experiment with a design like this? You’ll find a supply list below, including a link to the stencil I used from A Colorful Life Designs.  Follow the link and use discount code ChrisFan10 to save 10% on your entire order! (Master Creator Bundles are excluded as they already have a 20% discount built in.)

    Let’s get Started:

    Card Base: 5.25 x 10.5,  scored at 5.25

    Border Layer: 5 x 5

    Card Face:  5 x 5

    Frame: 5 x 5 (before die cutting)

    I had stamped and coloured this image, then set it aside in my “someday” pile.  This stencil gave me the perfect opportunity (and the inspiration)  to put this handsome fellow to use.

    Card Face:

    • I laid the card face down on the Grip Mat and positioned the stencil.  I applied brown ink with a light, careful hand – avoiding the pre-coloured figure.
    • Using the frame die as a guide,  I cut the card face down to a size slightly smaller than the finished frame would be.

    Other:

    • I put the border layer onto the Grip Mat and positioned the stencil once again.  I used the same brown ink with a heavier hand on this piece, covering all exposed areas.
    • Next, I worked on the piece for the frame: I started with white cardstock, positioned the die, and ran it through the Big Shot.
    • After removing the cardstock from the die, I used a medium brown ink over the entire frame, allowing a random variation in the depth of tone. 
    • I finished this off by bringing in a dark brown ink and using it here and there on the frame, increasing the variation in tone.
    • I selected a sentiment from my Sentiment binder (I love having them ready and waiting when I need one).

    Assembly

    • I glued the border layer to the card base, centering it on all sides.
    • I glued the frame on top of the cut-down card face.
    • I glued this new combination on top of the border layer, centering carefully.
    • I put dimensional foam on the back of the sentiment, and put it in place as shown.

    Final Thoughts:

    This is so far from my first thoughts about how to use this stencil – but how perfect is this for a masculine card?

    I’m really happy with the way this turned out.

    Supplies: (and links where possible)

       I have listed which products I have used, and where they may be purchased. It’s a huge marketplace and in most instances, there are multiple sources and many alternatives to choose from.

    Stencil: Close Up Branches, A Colorful Life Designs

    Waffle Flower Grip Mat, 8.5 x 6.5, Scrapbook.com

    Stamps: Zeke Guy,  Unity Stamps

    Dies: Oval Woodgrain Frame,  Hero Arts, Amazon

    Ink: Stampin’ Up!

    Blending Brushes: Stampin’ Up! 

    Versafine Onyx, Simon Says Stamp

    Memento Ink: Stampin’ Up!

    Alcohol Markers:

         Stampin’ Blends: Stampin’ Up!

         Copics:  Wallacks

    Adhesive: Tombow Aqua, Michaels

    Card Base & Card Face: Accent 100 lb., Amazon

    Do you have comments or thoughts to share on this design?  Drop me a line in the Comments Section below –  I’d love to hear from you!

    You can also use the Comments Section  to be notified when I release new work.

    Close Up Branches by A Colorful Life Designs

  • Make a Christmas card with a masculine twist

    Make a Christmas card with a masculine twist

    Would you like to experiment with a design like this? You’ll find a supply list below, including a link to the stencil I used from A Colorful Life Designs.  Follow the link and use discount code ChrisFan10 to save 10% on your entire order! (Master Creator Bundles are excluded as they already have a 20% discount built in.)

    Let’s get Started:

    Card Base: 5.5 x 8.5, scored and folded at 4.25

    Black Border Layer: 5.5 x  4.25

    Card Face:  5.5 x 4

    Scrap of Kraft Cardstock 3 x 2

    Small Black border layer: 3 x 2 3/16

    Black Strips:  4 x 3/19  (three of them)

    This stencil has long strands which are unsecured between the top and bottom – a recipe for unwanted movement while applying ink. Before starting I sprayed the back of the stencil with Pixie Spray, and waited about 30 seconds before proceeding.

    Card Face:

    • I laid the card face on my Grip Mat and positioned the stencil.  I applied metallic gold ink across the exposed areas.

    Other:

    • I placed the scrap of kraft cardstock into my stamp positioner and added the tree with Versafine Onyx.  I stamped a couple of times to ensure a very bold image.
    • Once the ink had dried,  I placed this in an embossing folder and ran it through the Big Shot.

    Assembly

    • I glued the black border to the card base.
    • I glued the card face to the border layer, centering vertically.
    • I glued the three narrow strips to the card face, evenly spaced.
    • I glued the embossed/stamped layer to the smaller black border, centering vertically.
    • I put dimensional foam on the back of this smaller piece,  and positioned it in the center of the card face.

    Final Thoughts:

    This is clearly a masculine card:  this is determined by the shapes and colours used.  There is nothing in the design or the focal image that indicates that this has to be for a male… and yet that is the only real choice.

    Supplies: (and links where possible)

       I have listed which products I have used, and where they may be purchased. It’s a huge marketplace and in most instances, there are multiple sources and many alternatives to choose from.

    Stencil: Drizzled Lines,  A Colorful Life Designs

    Waffle Flower Grip Mat, 8.5 x 6.5, Scrapbook.com

    Stamps:  Christmas Tree of Hope, Joy and Love, Unity Stamps (retired)

    Lisa Horton Metallic Gold Ink: Glitter & Ink

    Blending Brushes: Stampin’ Up! 

    Versafine Onyx, Simon Says Stamp

    Adhesive: Tombow Aqua, Michaels

    Card Base & Card Face: Accent 100 lb., Amazon

    Do you have comments or thoughts to share on this design?  Drop me a line in the Comments Section below –  I’d love to hear from you!

    You can also use the Comments Section  to be notified when I release new work.

    Drizzled Lines by A Colorful Life Designs

  • Autumn Card Design Tips with A Colorful Life Stencils

    Autumn Card Design Tips with A Colorful Life Stencils

    Snuggling up and getting cozy when autumn bring chilly winds … bliss!

    Would you like to experiment with a design like this? You’ll find a supply list below, including a link to the stencils I used from A Colorful Life Designs.  Follow the link and use discount code ChrisFan10 to save 10% on your entire order! (Master Creator Bundles are excluded as they already have a 20% discount built in.)

    Let’s get Started:

    Card Base: 5.5 x 8.5, scored and folded at 4.25

    Card Face:  5.5 x 4.25

    Card Face:

    • I laid this piece on the Grip Mat and then positioned the stencil. 
    •  Using a soft hand, I applied a mixture of brown, yellow and green inks across the open areas.  
    •    Tip: Adding just a touch of extra colour to the edges created the look of a shadow and provided additional dimension.
    • I decided to add the Windy Day stencil to represent the chilly winds of autumn: I positioned this stencil so that it would extend from the left-hand side of the focal image, and applied light blue ink to create the pattern.
    • I selected a different portion of the stencil and added the pattern after positioning it to be added to the bottom right-hand corner of the card.
    • I added spatter to the card face using both plain water and metallic copper watercolour paint.

    Other:

    • I stamped the image using Memento ink, and coloured it with alcohol markers.
    • Once the colouring was complete, I fussy cut the image with my snips.
    • I stamped the sentiment using brown ink, and cut it out with a small oblong die.

    Assembly

    • I glued the card face to the card base.
    • I glued the focal image into the center of the card face.
    • I added the sentiment as shown.

    Final Thoughts:

    I love House Mouse stamps –  they are so deliciously whimsical.   I loved spending time colouring this one and then using it on a card. I decided to colour the leaf in the bright colours of autumn, despite the fact that this  kind of leaf would not actually have those colours in real life.  Artistic licence!

    Supplies: (and links where possible)

       I have listed which products I have used, and where they may be purchased. It’s a huge marketplace and in most instances, there are multiple sources and many alternatives to choose from.

    Stencils:

        Windy Day,  A Colorful Life Designs

        Fall Leaves, A Colorful Life Designs

    Waffle Flower Grip Mat, 8.5 x 6.5, Scrapbook.com

    Stamps:   Snuggle Up- House Mouse, Spellbinders, Frantic Stamper

    Dies: Ornate Labels, Sizzix, Amazon

    Metallic Watercolour:  Amazon

    Ink: Stampin’ Up!

    Blending Brushes: Stampin’ Up! 

    Memento Ink: Stampin’ Up!

    Alcohol Markers:

         Stampin’ Blends: Stampin’ Up!

         Copics:  Wallacks

    Adhesive: Tombow Aqua, Michaels

    Card Base & Card Face: Accent 100 lb., Amazon

    Do you have comments or thoughts to share on this design?  Drop me a line in the Comments Section below –  I’d love to hear from you!

    You can also use the Comments Section  to be notified when I release new work

    Fall Leaves by A Colorful Life Designs

    Windy Day by A Colorful Life Designs

  • Stencils and Diecuts -making masculine cards just got easy

    Stencils and Diecuts -making masculine cards just got easy

    An elegant masculine card – ready in a snap!

    Would you like to experiment with a design like this? You’ll find a supply list below, including a link to the stencil I used from A Colorful Life Designs.  Follow the link and use discount code ChrisFan10 to save 10% on your entire order! (Master Creator Bundles are excluded as they already have a 20% discount built in.)

    Let’s get Started:

    Card Base: 5.5 x 8.5, scored and folded at 4.25

    Kraft Border: 5.5 x 4.25

    Black Card Face:  5.25 x 4

    Scrap of Kraft Cardstock: .75 x 4

    Card Face:

    • I laid the card face onto my Grip Mat , positioned the stencil and applied metallic gold ink across the exposed surfaces.
    • After allowing the gold ink to dry (it is a very saturated pigment ink) I put the card face into an embossing folder and ran it through the Big Shot to add texture.

    Other:

    • I stamped the sentiment in gold ink on a piece of black cardstock,  and then cut it down to ⅝ x 3
    • I looked through my Bits & Pieces binder and found the tree, previously cut out of kraft and waiting to be used.

    Assembly

    • I glued the black sentiment strip to the kraft strip.
    • I glued the kraft border layer to the card base, and then centered the black card face on both.
    • I glued the tree in place on the right hand side as shown.
    • I glued the sentiment strip in place over the tree, just below the center of the card.
    • I added a metallic embellishment on either side of the sentiment.

    Final Thoughts:

    This was a fast & easy card to put together; it has a very masculine feel due to the colours used.

    I love the way gold and kraft play off of each other.

    Supplies: (and links where possible)

       I have listed which products I have used, and where they may be purchased. It’s a huge marketplace and in most instances, there are multiple sources and many alternatives to choose from.

    Stencil: Fine Snowflakes,  A Colorful Life Designs

    Waffle Flower Grip Mat, 8.5 x 6.5, Scrapbook.com

    Dies:  Woodlands,  Tim Holtz, Amazon

    Ink: Lisa Horton Metallic Ink,  Glitter & Ink

    Blending Brushes: Stampin’ Up! 

    Adhesive: Tombow Aqua, Michaels

    Card Base & Card Face: Accent 100 lb., Amazon

    Do you have comments or thoughts to share on this design?  Drop me a line in the Comments Section below –  I’d love to hear from you!

    You can also use the Comments Section  to be notified when I release new work

    Fine Snowflakes by A Colorful Life Designs

  • Touch his heart with a card he is sure to treasure

    Touch his heart with a card he is sure to treasure

    Would you like to experiment with a design like this? You’ll find a supply list below, including a link to the stencil I used from A Colorful Life Designs.  Follow the link and use discount code ChrisFan10 to save 10% on your entire order! (Master Creator Bundles are excluded as they already have a 20% discount built in.)

    Let’s get Started:

    Card Base: 5.5 x 8.5, scored and folded at 4.25

    Kraft Border:  5.5 x 4.25

    Black Border:  5.25 x 4

    Kraft Card Face:  5 ⅛ x 3 7/8

    Card Face:

    • I laid the card face onto my grip mat and positioned the stencil at an angle, extending off  the right-hand side.
    • I went over the exposed areas with red ink and then added another layer of ink to the outer edges, using a darker cranberry red.  
    • I placed the card face into my stamp positioner and added the sentiment with Versafine Onyx, stamping it two or three times to achieve a dark, clear image.

    Other:

    • I used a separate scrap of kraft cardstock for the tree. After placing it in the stamp positioner, I stamped the green leaves on the tree, carefully masking off the trunk.  I stamped twice to get the depth of colour I wanted,  masking both times to protect the trunk.
    • I repeated these steps to stamp the trunk, using brown ink,  stamping twice for the desired saturation and protecting the leaves both times by masking.
    • I used the matching die to cut this out.

    Assembly

    • I glued the kraft border to the card base.
    • I added the black border and the card face on top of these, centering both times.
    • I glued the tree in place.

    Final Thoughts:

    I really like this combination:  kraft cardstock produces such a different “feel”,  and the elements in this card work well with that.

    This masculine card would work for birthdays, a graduation, a new job – almost any occasion.

    Supplies: (and links where possible)

       I have listed which products I have used, and where they may be purchased. It’s a huge marketplace and in most instances, there are multiple sources and many alternatives to choose from.

    Stencil:  Leafy Heart Frame, A Colorful Life Designs

    Waffle Flower Grip Mat, 8.5 x 6.5, Scrapbook.com

    Stamps & Die:  Rooted in Nature, Stampin’ Up!  (retired)

    Ink: Stampin’ Up!

    Blending Brushes: Stampin’ Up! 

    Versafine Onyx, Simon Says Stamp

    Adhesive: Tombow Aqua, Michaels

    Card Base & Card Face: Accent 100 lb., Amazon

    Do you have comments or thoughts to share on this design?  Drop me a line in the Comments Section below –  I’d love to hear from you!

    You can also use the Comments Section  to be notified when I release new work

    Leafy Heart Frame by A Colorful Life Designs

  • Simple Moments Become Treasured Memories

    Simple Moments Become Treasured Memories

    Would you like to experiment with a design like this? You’ll find a supply list below, including a link to the stencil I used from A Colorful Life Designs.  Follow the link and use discount code ChrisFan10 to save 10% on your entire order! (Master Creator Bundles are excluded as they already have a 20% discount built in.)

    Let’s get Started:

    Card Base: 5.5 x 8.5, scored and folded at 4.25

    Card Face:  5 3/8 x 4 1/8

    Card Face:

    • I laid the card face onto the Grip Mat and applied green and blue ink with a soft hand. 
    • I placed the stencil over the card face and used a variety of dark and medium green inks over the exposed areas.
    • I moved the card face to the stamp positioner and added the image with Versafine Onyx.
    • I intensified the blue around the edges, which adds to the sense of looking into a scene.
    • I spattered the card face with white metallic watercolour .

    Other:

    • I stamped the sentiment on a piece of scrap cardstock and cut it out with a punch.
    • I cut two additional “blanks” with the punch.

    Assembly

    • I glued the three punched shapes together,  with the sentiment on top.
    • I glued the card face to the card base, and added the sentiment as shown.

    Final Thoughts:

    I love the soft colours with the gentle feel and sentiment used on this card.  

    Supplies: (and links where possible)

       I have listed which products I have used, and where they may be purchased. It’s a huge marketplace and in most instances, there are multiple sources and many alternatives to choose from.

    Stencil: Falling Leaves,  A Colorful Life Designs

    Stamp:  Stampin’ Up! (retired)

    Waffle Flower Grip Mat, 8.5 x 6.5, Scrapbook.com

    Metallic Watercolour: Amazon 

    Ink: Stampin’ Up!

    Blending Brushes: Stampin’ Up! 

    Versafine Onyx, Simon Says Stamp

    Adhesive: Tombow Aqua, Michaels

    Card Base & Card Face: Accent 100 lb., Amazon

    Do you have comments or thoughts to share on this design?  Drop me a line in the Comments Section below –  I’d love to hear from you!

    You can also use the Comments Section  to be notified when I release new work

    Falling Leaves by A Colorful Life Designs

    cc

  • Gotta tackle that To-Do list… but first COFFEE

    Gotta tackle that To-Do list… but first COFFEE

    “gotta have my coffee!” – the morning anthem of much of the world

    Would you like to experiment with a design like this? You’ll find a supply list below, including a link to the stencil I used from A Colorful Life Designs.  Follow the link and use discount code ChrisFan10 to save 10% on your entire order! (Master Creator Bundles are excluded as they already have a 20% discount built in.)

    Let’s get Started:

    Card Base: 5.5 x 8.5, scored and folded at 4.25

    Border Layer 5.5  x 4 1/8

    Card Face:  5.5 x 4 

    Card Face:

    • I laid the card face onto my Grip Mat and then positioned the stencil, offsetting the design to the left.
    • I used brown ink and a light hand to go over all exposed areas.
    • Working one row at a time, I masked half of each circle with a piece of paper, and once again went over exposed areas with brown ink and a light hand.  This made each circle two-toned, and provided additional visual interest.
    • I put the card face into my stamp positioner and added the focal sentiment with the coffee cups.  I used navy blue ink for this –  although it looks black in the picture, it’s navy, honest!
    • I placed the card face on my desktop and added coffee rings and spatter using the brown ink used earlier.
    •  I lightly spattered the card face with water, adding additional texture.

    Assembly

    • I glued the black border layer to the card base,  and then centered the card face on top of both.

    Final Thoughts:

    The stencil provides a great backdrop for this fun stamp:  just enough for visual interest without being a distraction.

    Supplies: (and links where possible)

       I have listed which products I have used, and where they may be purchased. It’s a huge marketplace and in most instances, there are multiple sources and many alternatives to choose from.

    Stencil: Quarter Moon,  A Colorful Life Designs

    Waffle Flower Grip Mat, 8.5 x 6.5, Scrapbook.com

    Versamark Embossing Ink: Simon Says Stamp

    Clear Embossing Powder,  Wow,  Simon Says Stamp

    Ink: Stampin’ Up!

    Blending Brushes: Stampin’ Up! 

    Adhesive: Tombow Aqua, Michaels

    Card Base & Card Face: Recollections 110 lb., Michaels

    Do you have comments or thoughts to share on this design?  Drop me a line in the Comments Section below –  I’d love to hear from you!

    You can also use the Comments Section  to be notified when I release new work

    Quarter Moons by A Colorful Life Designs