Category: Gal Pals

  • Sunny Days and Dragonflies are Excellent Reasons to Smile

    Sunny Days and Dragonflies are Excellent Reasons to Smile

    Would you like to experiment with a design like this? You’ll find a supply list below, including a link to the stencils I used from A Colorful Life Designs.  Follow the link and use discount code ChrisFan10 to save 10% on your entire order! (Master Creator Bundles are excluded as they already have a 20% discount built in.)

    Let’s get Started:

    Card Base: 5.5 x 8.5, scored and folded at 4.25

    Card Face:  5.5 x 4.25 before cutting down

    Scrap of black cardstock for the sentiment

    Card Face:

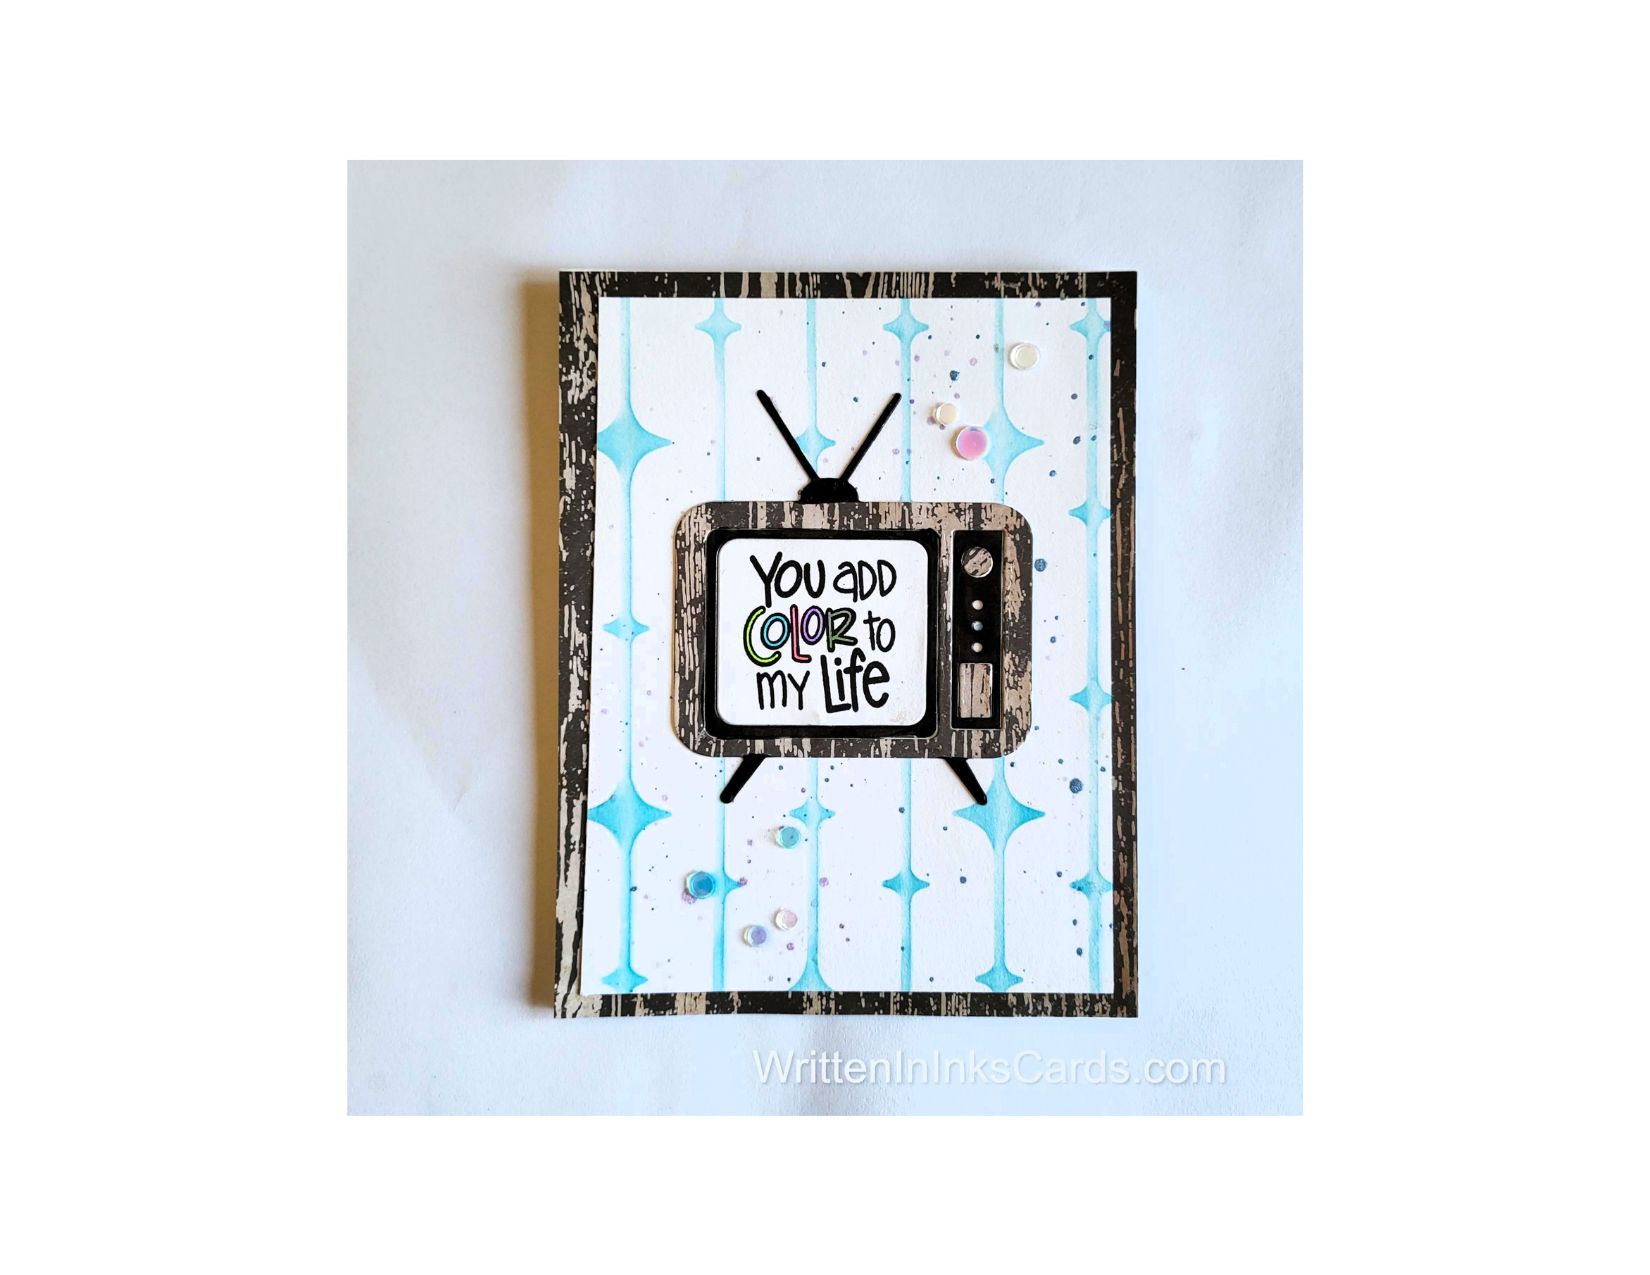
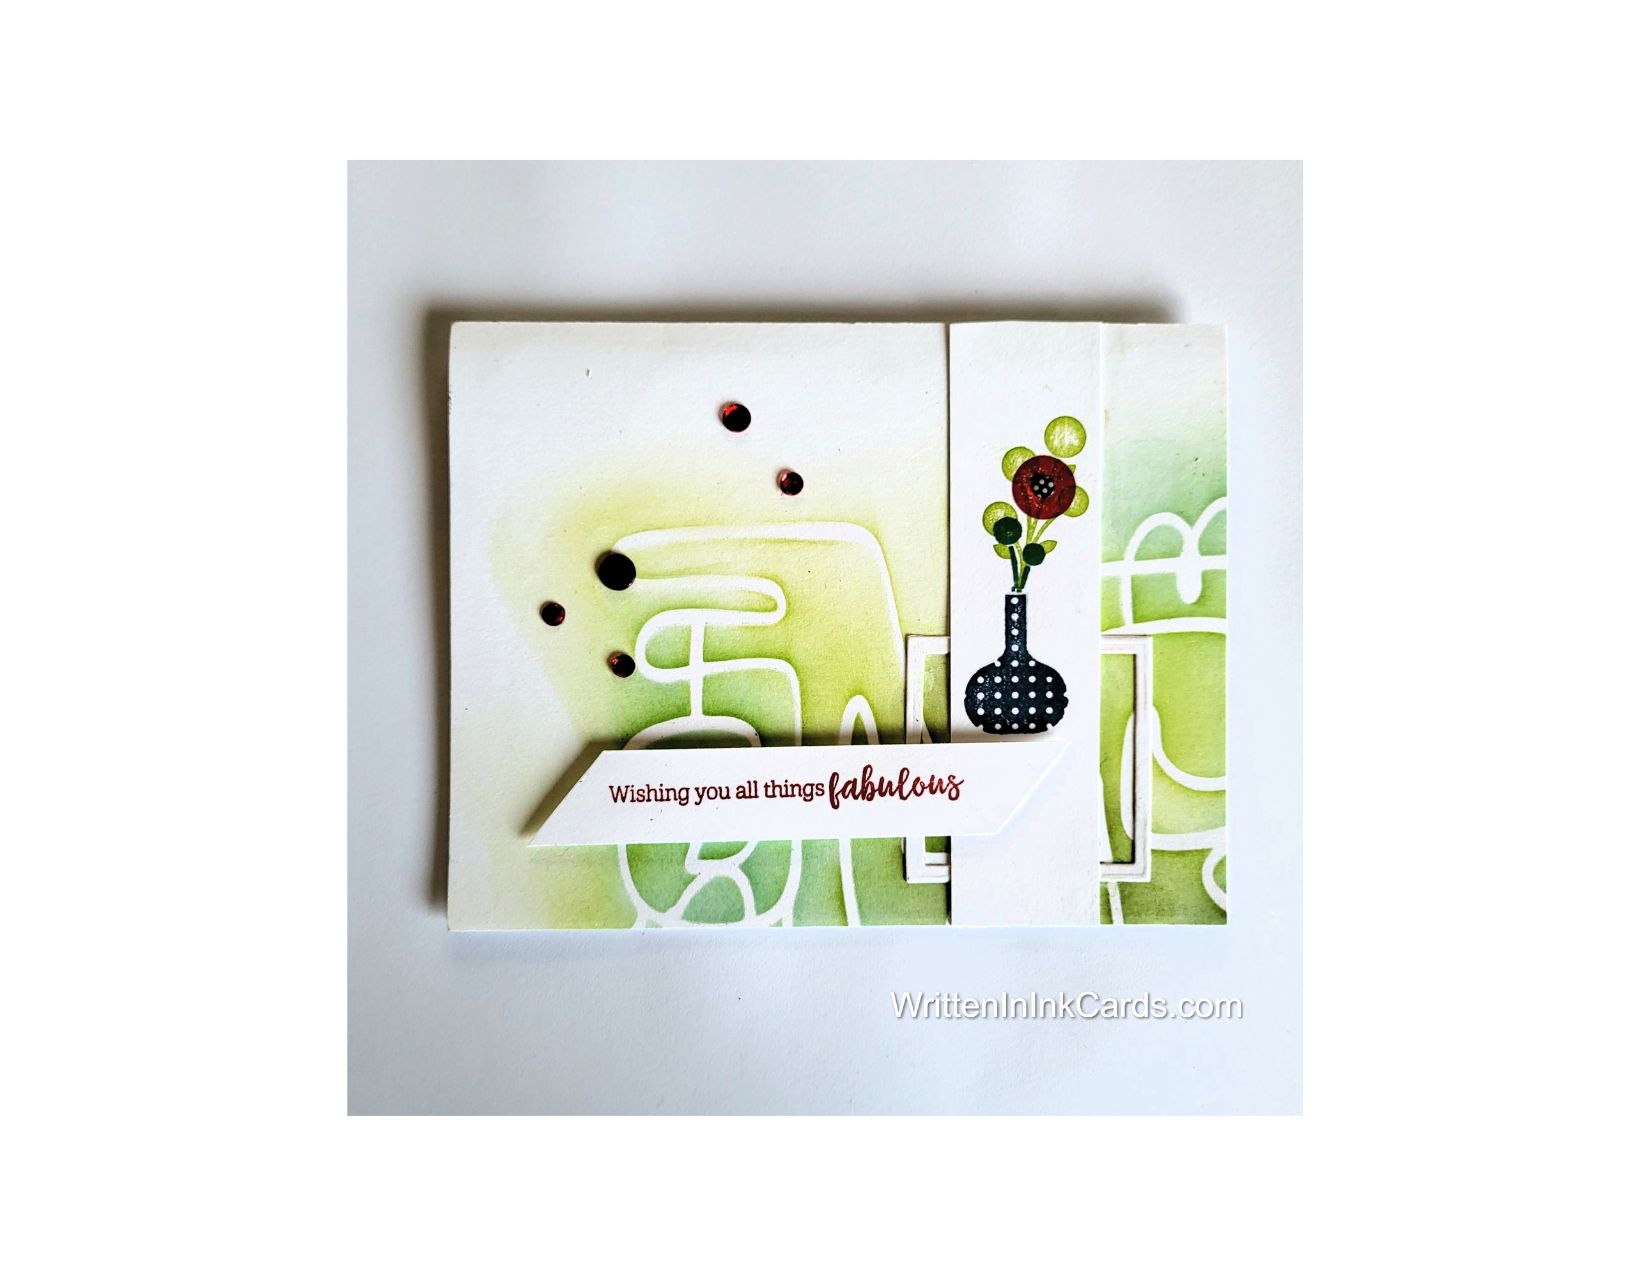
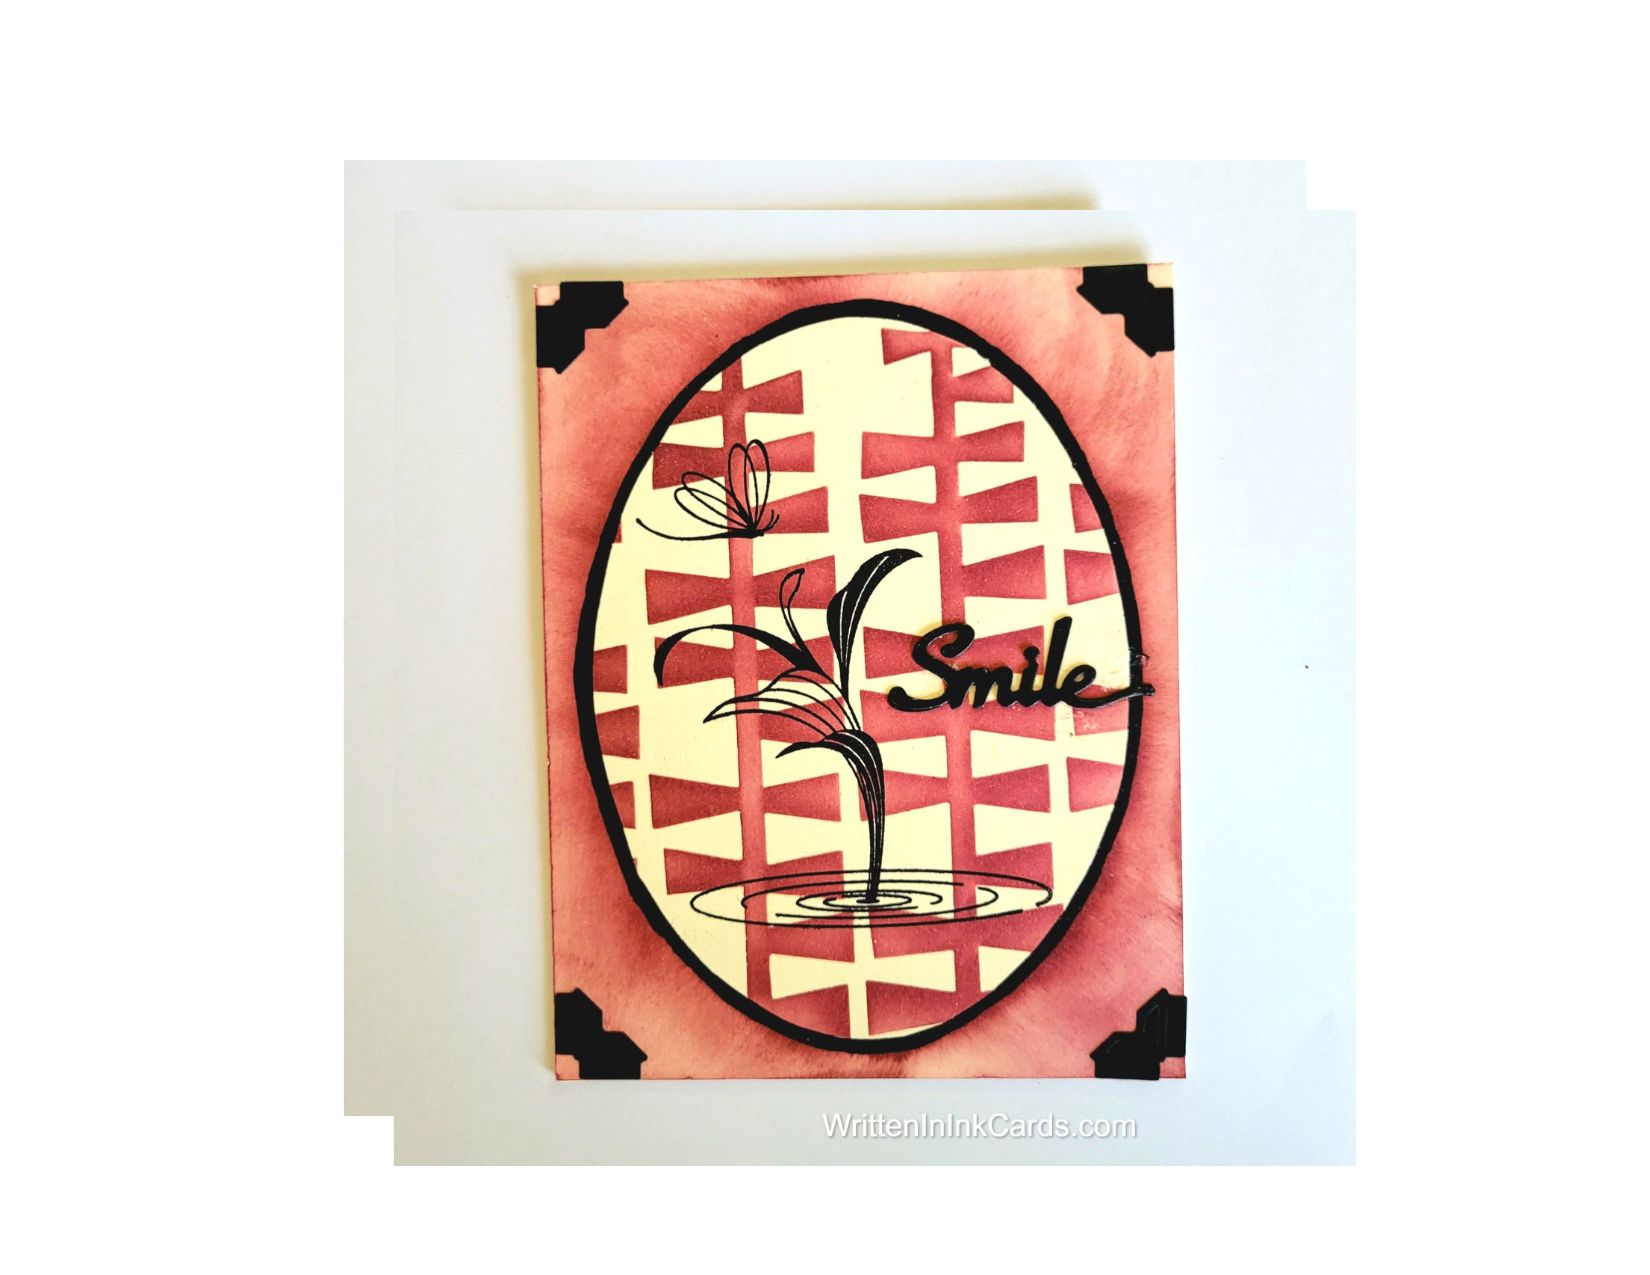
    • I laid the card face onto the grip mat,  and positioned the oval stencil in the center of the paper.  On top of that I positioned the banners stencil and used pink ink across the exposed areas.  By putting the oval stencil down first I controlled the area that the pattern could cover on the card face.
    • I removed both stencils and (after ensuring that the ink was completely dry)  placed the card face into my stamp positioner and used Versafine Onyx to stamp the silhouette images.  The ink needed to be dry so that the embossing powder wouldn’t stick to the background pattern.  An easy way to check is to sprinkle the embossing powder over the piece and then tip it off: if any sticks it needs more dry time.
    • I sprinkled clear embossing powder over the wet black ink and set it with my heat gun.

    Other:

    • I centered the matching oval mask on the card base and brushed pink ink on, radiating out from the borders of the mask.
    • Using a die, I cut “smile” out 3X from black cardstock, and glued them together.  I pressed this into Versamark embossing ink, sprinkled it with clear powder, and set it with my heat gun.
    • I cut four photo corners from black cardstock using a die.
    • I carefully cut around the oval image on  the card face.

    Assembly

    • I glued the oval cutout to the card base,  placing it into the oval “blank” created with the ink.
    • I used a black marker to create a border around the oval.
    • I glued the photo corners into the corners of the card base.
    • I glued the “Smile” onto the card face as shown.

    Final Thoughts:

    My original plan for this design was to have a flat card face, with the oval inked into the center: I ended up with a blob of ink in the outer edges,  and had to reimagine the card mid-design, fussy cutting the oval and creating a brand new card base. (haste makes waste – and  “grrr” moments!)

    I wish I had used a lighter hand on the background pattern in the oval: of course by the time I realized what I wanted, it was too late.

    Supplies: (and links where possible)

       I have listed which products I have used, and where they may be purchased. It’s a huge marketplace and in most instances, there are multiple sources and many alternatives to choose from.

    Stencils:

          Mid Century Banners, A Colorful Life Designs

          Marvellous Masks Ovals, A Colorful Life Designs

    Waffle Flower Grip Mat, 8.5 x 6.5, Scrapbook.com

    Versamark Embossing Ink: Simon Says Stamp

    Clear Embossing Powder,  Wow,  Simon Says Stamp

    Stamps:  Stampin’ Up (retired)

    Dies: Diagonal Stripe, Frantic Stamper

    Ink: Stampin’ Up!

    Blending Brushes: Stampin’ Up! 

    Versafine Onyx, Simon Says Stamp

    Adhesive: Tombow Aqua, Michaels

    Card Base & Card Face: Recollections  110 lb, Michaels

    Do you have comments or thoughts to share on this design?  Drop me a line in the Comments Section below –  I’d love to hear from you!

    You can also use the Comments Section  to be notified when I release new work.

    Mid Century Banners by A Colorful Life Designs

  • Craft a Card that will
Melt a Heart

    Craft a Card that will Melt a Heart

    Would you like to experiment with a design like this? You’ll find a supply list below, including a link to the stencil I used from A Colorful Life Designs.  Follow the link and use discount code ChrisFan10 to save 10% on your entire order! (Master Creator Bundles are excluded as they already have a 20% discount built in.)

    Let’s get Started:

    Card Base: 5.5 x 8.5, scored and folded at 4.25

    Stenciled Border Layer: 1 x 4 strips,  4 ea

    Focal Image: 3 x 2

    Small Black Border:  3 ⅛ x 2 1/8

    Border Layer Strips

    • I laid the first strip on the grip mat and positioned the stencil so that the square section was in aligned.  I applied blue ink with a soft hand.
    • I repositioned the stencil so that the circular sections were contained within the squares and applied the same blue ink with a heavier hand.
    • I  repeated these steps with pink, yellow and green inks.

    Other:

    • I stamped the bunny image onto the small piece of white cardstock using Memento ink: I coloured the image with alcohol markers.

    Assembly

    • I glued the strips onto the card base, spacing evenly.
    • I spattered the strips lightly with white acrylic.
    • I put the card base into the stamp positioner and added the sentiment with Versafine Onyx: I sprinkled this with clear embossing powder immediately, and set the powder with my heat gun.
    • I glued the coloured bunny image onto the black border layer, and then glued these into the upper left section of the card.

    Final Thoughts:

    I love how this fun, summery card turned out.

    I had initially coloured the bunny grey,  but that felt dark and heavy, so I redid that in white, and the end result was worth the time.

    Supplies: (and links where possible)

       I have listed which products I have used, and where they may be purchased. It’s a huge marketplace and in most instances, there are multiple sources and many alternatives to choose from.

    Stencil: Bauhaus Poster, A Colorful Life Designs

    Waffle Flower Grip Mat, 8.5 x 6.5, Scrapbook.com

    Versamark Embossing Ink: Simon Says Stamp

    Clear Embossing Powder,  Wow,  Simon Says Stamp

    Stamps:

        Bunny: Sundae Funday,  Colorado Craft Company

        Sentiment:   Stampin’ Up!  (retired)

    Ink: Stampin’ Up!

    White Acrylic Spatter: Dr Ph Martin’s bleedproof White, Taylored Expressions

    Blending Brushes: Stampin’ Up! 

    Versafine Onyx, Simon Says Stamp

    Memento Ink: Stampin’ Up!

    Alcohol Markers:

         Stampin’ Blends: Stampin’ Up!

         Copics:  Wallacks

    Adhesive: Tombow Aqua, Michaels

    Card Base & Card Face: Accent 100 lb., Amazon

    Do you have comments or thoughts to share on this design?  Drop me a line in the Comments Section below –  I’d love to hear from you!

    You can also use the Comments Section  to be notified when I release new work

    Bauhaus Poster by A Colorful Life Designs

  • Translate fond thoughts into a great card – and share!

    Translate fond thoughts into a great card – and share!

    Would you like to experiment with a design like this? You’ll find a supply list below, including a link to the stencil I used from A Colorful Life Designs.  Follow the link and use discount code ChrisFan10 to save 10% on your entire order! (Master Creator Bundles are excluded as they already have a 20% discount built in.)

    Let’s get Started:

    Card Base: 5.25 X 10.5, scored and folded at 5.25

    Green Border Layer: 4.75 x 4.75

    White Embossed Border Layer:  4.5 x 4.5

    Small Green Border Layer:  3 x 3

    Card Face: 2.75 x 2.75

    This is a 6 x 6 stencil:  the pattern created on this card is a small portion of the whole.

    Card Face:

    • I laid the card face onto the grip mat, positioned the stencil and used light green ink over all exposed areas.
    • Leaving the stencil in place,  I used a green gel pen to trace around each opening, and then to add wavy lines in various directions.

    Other:

    • I put the white border layer into an embossing folder and ran it through the Big Shot.
    • I looked through my sentiment binder and found one that worked for the card.

    Assembly

    • I glued the card face to the smaller of the two green borders.
    • I glued the larger green border layer to the card base, and then glued the embossed white layer on top of these.
    • I added the layered-up card face on top, centering carefully.
    • I glued the sentiment in place as shown.

    Final Thoughts:

    • This card could be for any occasion,  and could easily become very masculine by changing the colour.
    • I really like the added interest created with the gel pen.
    • The ink and the cardstock are the same colour:  although I most often like strong contrast in my pieces,  I really like the homogenous look created here.

    Supplies: (and links where possible)

       I have listed which products I have used, and where they may be purchased. It’s a huge marketplace and in most instances, there are multiple sources and many alternatives to choose from.

    Stencil: Bauhaus Poster, A Colorful Life Designs

    Waffle Flower Grip Mat, 8.5 x 6.5, Scrapbook.com

    Ink: Stampin’ Up!

    Blending Brushes: Stampin’ Up! 

    Gel Pen: Sakura,   Amazon

    Versafine Onyx, Simon Says Stamp

    Adhesive: Tombow Aqua, Michaels

    Card Base & Card Face: Accent 100 lb., Amazon

    Do you have comments or thoughts to share on this design?  Drop me a line in the Comments Section below –  I’d love to hear from you!

    You can also use the Comments Section  to be notified when I release new work

  • Craft a cute retro card to say “I appreciate you”

    Craft a cute retro card to say “I appreciate you”

    Would you like to experiment with a design like this? You’ll find a supply list below, including a link to the stencil I used from A Colorful Life Designs.  Follow the link and use discount code ChrisFan10 to save 10% on your entire order! (Master Creator Bundles are excluded as they already have a 20% discount built in.)

    Let’s get Started:

    Card Base: 5.5 x 8.5, scored and folded at 4.25

    Patterned Paper: 5.5 x 4.25

    Card Face:  5.25 x 4

    Card Face:

    • I laid the card face onto the Grip Mat,  positioned the stencil and applied turquoise ink to all exposed areas.  As usual,  I allowed a variation in the intensity of the ink to provide visual interest.
    • I spattered the card face with blue and purple metallic watercolour.

    Other:

    • I cut the TV out twice: once with patterned paper and once with white cardstock.  I glued the patterned paper on top of the cardstock for most pieces.  In a few of the areas I decided to colour the white cardstock with a black marker,  to provide contrast and interest.
    • I stamped the sentiment into the center of the TV,  and added colour where shown.

    Assembly

    • I glued the patterned paper onto the card base,  and centered the card face on top of these.
    • I glued the TV in place on the center of the card face.
    • I added several colours of card bling randomly to the card face.

    Final Thoughts:

    This is such a fun card with a very retro feel:  that stenciled pattern  created the perfect complimentary backdrop.

    Supplies: (and links where possible)

       I have listed which products I have used, and where they may be purchased. It’s a huge marketplace and in most instances, there are multiple sources and many alternatives to choose from.

    Stencil: Mid Century Atomic Strands, A Colorful Life Designs

    Waffle Flower Grip Mat, 8.5 x 6.5, Scrapbook.com

    Metallic Watercolour: Amazon

    Stamps:

    Dies:  Retro TV,  The Frantic Stamper

    Ink: Stampin’ Up!

    Blending Brushes: Stampin’ Up! 

    Versafine Onyx, Simon Says Stamp

    Card Bling: A Colorful Life Designs

    Adhesive: Tombow Aqua, Michaels

    Card Base & Card Face: Accent 100 lb., Amazon

    Do you have comments or thoughts to share on this design?  Drop me a line in the Comments Section below –  I’d love to hear from you!

    You can also use the Comments Section  to be notified when I release new work

  • DIY a card that loves
summer almost as much as you

    DIY a card that loves summer almost as much as you

    Would you like to experiment with a design like this? You’ll find a supply list below, including a link to the stencil I used from A Colorful Life Designs.  Follow the link and use discount code ChrisFan10 to save 10% on your entire order! (Master Creator Bundles are excluded as they already have a 20% discount built in.)

    Let’s get Started:

    Card Base: 5.5 x 8.5, scored and folded at 4.25

    Card Face:  5.5 x 4.25

    Card Face:

    • I laid the card face on the Grip Mat and positioned the stencil.
    • I applied pink and yellow inks alternately,  allowing the inks to overlap and create orange.
    • I spattered water randomly over the card face, which created depth and visual interest.
    • I placed the card face into the stamp positioner and added the sentiment using Versafine Onyx.

    Other:

    • I stamped the sun, added the face,  and used the coordinating die to cut it out.
    • I stamped the flip flops and fussy cut around them.
    • I stamped the components of the sunglasses,  and used the coordinating dies to cut them out.

    Assembly

    • I glued the card face to the card base.
    • I glued the sunglasses and flip flops in place.
    • I put dimensional foam on the back of the sun and put it in place, slightly overlapping the flip flops.
    • I added some fun card bling, scattering randomly over the card face.

    Final Thoughts:

    This became such a fun, cheerful summertime card.

    Supplies: (and links where possible)

       I have listed which products I have used, and where they may be purchased. It’s a huge marketplace and in most instances, there are multiple sources and many alternatives to choose from.

    Stencil:   Drizzled Lines,  A Colorful Life Designs

    Waffle Flower Grip Mat, 8.5 x 6.5, Scrapbook.com

    Stamps:

        Here Comes the Sun, Taylored Expressions

        Flip Flops:   a stamp I got from a friend –  I have no idea where it was purchased

        Shades of Summer, Taylored Expressions

    Dies:

        Here Comes the Sun, Taylored Expressions

        Shades of Summer,  Taylored Expressions

    Ink: Stampin’ Up!

    Blending Brushes: Stampin’ Up! 

    Versafine Onyx, Simon Says Stamp

    Card Bling,   A Colorful Life Designs

    Adhesive: Tombow Aqua, Michaels

    Card Base & Card Face: Accent 100 lb., Amazon

    Do you have comments or thoughts to share on this design?  Drop me a line in the Comments Section below –  I’d love to hear from you!

    You can also use the Comments Section  to be notified when I release new work

  • Send Big Love with a Handmade Card

    Send Big Love with a Handmade Card

    Would you like to experiment with a design like this? You’ll find a supply list below, including a link to the stencil I used from A Colorful Life Designs.  Follow the link and use discount code ChrisFan10 to save 10% on your entire order! (Master Creator Bundles are excluded as they already have a 20% discount built in.)

    Let’s get Started:

    Card Base: 5.5 x 8.5, scored and folded at 4.25

    Border Layer: 5.5 x 4.25

    Card Face: 5.5 x 4.25

    Card Face:

    • I put the card face into the stamp positioner and stamped the bunny a couple of times with black Memento ink, centering the image.
    • I coloured her in with alcohol markers  (Memento ink doesn’t react to alcohol, making it perfect for this purpose).
    • I put the card face onto the grip mat and positioned the stencil:  I used pink ink to create the pattern around the bunny –  using more ink/ more pressure around the edges and allowing the ink to fade as I neared the center.
    • I added a rectangular stitched die to the card face, centering carefully.  This die creates a pattern in the paper; \it is not a cutting die.
    • I returned the card face to the stamping platform and added the sentiment with Versafine Onyx.  This is actually one stamp: to create the separation, I had to mask off the appropriate section, and stamp the other.
    • I used a punch on all four corners to create the peek-a-boo pattern.

    Assembly

    • I glued the black border layer to the card base, and then added the card face on top of that.
    • I thought this card needed one final detail,  so I added a clear heart shaped gem to the card face to finish it off.

    Final Thoughts:

    • This bunny is absolutely adorable,  and that sentiment suits perfectly.
    • If I were to re-do this card,  I would position the “sending” a little further to the right –  but by the time I saw the problem on this card it was too late to fix!

    Supplies: (and links where possible)

       I have listed which products I have used, and where they may be purchased. It’s a huge marketplace and in most instances, there are multiple sources and many alternatives to choose from.

    Stencil: Droplet Grid,  A Colorful Life Designs

    Waffle Flower Grip Mat, 8.5 x 6.5, Scrapbook.com

    Stamps:

         Cuddly Girl, Nellie’s Choice, Ecstasy Crafts  (out of stock)

          Sentiment:  Technique Junkies  (out of business)

    Dies: Stitched with Whimsy, Stampin’ Up!  (retired)

    Ink: Stampin’ Up!

    Blending Brushes: Stampin’ Up! 

    Versafine Onyx, Simon Says Stamp

    Memento Ink: Stampin’ Up!

    Alcohol Markers:

         Stampin’ Blends: Stampin’ Up!

         Copics:  Wallacks

    Adhesive: Tombow Aqua, Michaels

    Card Base & Card Face: Accent 100 lb., Amazon

    Do you have comments or thoughts to share on this design?  Drop me a line in the Comments Section below –  I’d love to hear from you!

    You can also use the Comments Section  to be notified when I release new work

    Droplet Grid by A Colorful Life Designs

  • Make a card full of summertime fun

    Make a card full of summertime fun

    Would you like to experiment with a design like this? You’ll find a supply list below, including a link to the stencil I used from A Colorful Life Designs.  Follow the link and use discount code ChrisFan10 to save 10% on your entire order! (Master Creator Bundles are excluded as they already have a 20% discount built in.)

    Let’s get Started:

    Card Base: 5.5 x 8.5, scored and folded at 4.25

    Border Layer: 5.25 x 4

    Card Face:  5 ⅛ x 3 ⅞

    Scraps of black and white cardstock for the letters, and the two children

    Card Face:

    • I laid the card face on the Grip Mat,  and then positioned the stencil over top.  
    • I went over the exposed areas with light pink ink.
    • Leaving the stencil in place,  I added platinum coloured embossing paste here and there.
    • I carefully removed the stencil,  putting it immediately into water. 
    • I set the card face aside to dry, and then used a corner chomper on each of the four corners.

    Other:

    • I stamped the two kiddies with black memento ink, and coloured them with alcohol markers
    • I used a corresponding die to cut them out.
    • I stamped “summer”  with Versafine onyx, I immediately coated the wet ink with clear embossing powder, setting this with my heat gun.  I used my snips to fussy cut around this word, creating an irregular border.
    • I die cut F, U and N  from heavy white card stock, twice.  I used translucent green and blue embossing powder  on one set of these letters ( they are very pale pastel colours,  but pretty with card in hand).  I glued the two sets of letters together.
    • I cut a third set of the letters from black cardstock and glued them under the white ones, offsetting them down and to the right just slightly

    Assembly

    • I glued the black border layer to the card base and then added the card face on top of these, centering both layers.
    • I glued the F,U and N in place as shown,  and then nestled the “summer” into the spot created by the natural shape of the word.
    • I glued the two children in the lower right-hand section.

    Final Thoughts:

    The embossing paste has a beautiful sheen: although it isn’t visible in the image it adds a very pretty detail to the card.  This sheen is echoed in the embossing powder used on “FUN”.

    Supplies: (and links where possible)

       I have listed which products I have used, and where they may be purchased. It’s a huge marketplace and in most instances, there are multiple sources and many alternatives to choose from.

    Stencil: Maelstrom,  A Colorful Life Designs

    Waffle Flower Grip Mat, 8.5 x 6.5, Scrapbook.com

    Versamark Embossing Ink: Simon Says Stamp

    Clear Embossing Powder,  Wow,  Simon Says Stamp

    Stamps & Dies:  Mini Boy,  Hampton Arts,  Amazon

    Ink: Stampin’ Up!

    Embossing Paste:  DIY

    Blending Brushes: Stampin’ Up! 

    Versafine Onyx, Simon Says Stamp

    Memento Ink: Stampin’ Up!

    Alcohol Markers:

         Stampin’ Blends: Stampin’ Up!

         Copics:  Wallacks

    Adhesive: Tombow Aqua, Michaels

    Card Base & Card Face: Accent 100 lb., Amazon

    Do you have comments or thoughts to share on this design?  Drop me a line in the Comments Section below –  I’d love to hear from you!

    You can also use the Comments Section  to be notified when I release new work

    Maelstrom by A Colorful Life Designs

  • Make a card that includes good vibes and sunshine

    Make a card that includes good vibes and sunshine

    Would you like to experiment with a design like this? You’ll find a supply list below, including a link to the stencil I used from A Colorful Life Designs.  Follow the link and use discount code ChrisFan10 to save 10% on your entire order! (Master Creator Bundles are excluded as they already have a 20% discount built in.)

    Let’s get Started:

    Card Base: 5.5 x 8.5, scored and folded at 4.25

    Card Face: 5.5 x 4.25

    Card Face:

    • I placed the card face into my stamp positioner and stamped the image with Memento ink. 
    • I coloured the image with alcohol markers.
    • I moved the card face onto my Grip Mat and positioned the stencil.
    • I applied yellow ink across all exposed areas, coming close to the coloured image, but not overlapping .(I varied intensity in the ink to create visual interest.)
    • I put the card face back into the stamp positioner and added the cheery sentiment with Versafine Onyx.  I sprinkled this with clear embossing powder and set it with my heat gun.
    • I positioned a scalloped rectangular die around the focal image and ran the card face through the Big Shot.
    • I darkened the edges of the card face with brownish-yellow ink.
    • I added red and white spatter with metallic watercolour paint.

    Assembly

    • I glued the card face to the card base.
    • I added dimensional foam to the back of the die cut rectangle and put it back in place in the card face.

    Final Thoughts:

    The darkened edges on the card face bring a lot of dimension.

    I love the varied pattern in this stencil: it adds so much interest.

    Supplies: (and links where possible)

       I have listed which products I have used, and where they may be purchased. It’s a huge marketplace and in most instances, there are multiple sources and many alternatives to choose from.

    Stencil: Zentangle Dots, A Colorful Life Designs

    Waffle Flower Grip Mat, 8.5 x 6.5, Scrapbook.com

    Clear Embossing Powder,  Wow,  Simon Says Stamp

    Stamps:

        Flowers:  Your Next Stamp  (no longer in business)

        Sentiment: Photoplay, Positive vibes Only  (retired)

    Ink: Stampin’ Up!

    Blending Brushes: Stampin’ Up! 

    Versafine Onyx, Simon Says Stamp

    Memento Ink: Stampin’ Up!

    Alcohol Markers:

         Stampin’ Blends: Stampin’ Up!

         Copics:  Wallacks

    Metallic Watercolour: Amazon

    Adhesive: Tombow Aqua, Michaels

    Card Base & Card Face: Accent 100 lb., Amazon

    Do you have comments or thoughts to share on this design?  Drop me a line in the Comments Section below –  I’d love to hear from you!

    You can also use the Comments Section  to be notified when I release new work

  • Surprise someone with
 a card with a  Crisp, Fun Mid Century Vibe

    Surprise someone with a card with a Crisp, Fun Mid Century Vibe

    xxx

    Would you like to experiment with a design like this? You’ll find a supply list below, including a link to the stencil I used from A Colorful Life Designs.  Follow the link and use discount code ChrisFan10 to save 10% on your entire order! (Master Creator Bundles are excluded as they already have a 20% discount built in.)

    Let’s get Started:

    Card Base: 5.5 x 8.5, scored and folded at 4.25

    Card Face:  5.5 x 4.25

    Scraps of white cardstock for the floral image, the sentiment and the square

    To Begin:

    Four-for-One Technique:

    • I centered this 6 x 9 stencil on a piece of 8.5 x 11 cardstock. After securing it with Mint Tape, I used a mixture of yellow and green ink randomly across the exposed areas,  extending slightly past the edge of the stencil,  but not going to the edge of the paper.
    • I cut the cardstock into four equal pieces and selected one to use for this project.

    Finishing Details:

    • I placed a piece of scrap cardstock into my stamp positioner and stamped the vase in black. I changed stamps and stamped the green leaves.   Finally I positioned the flower and stamped it in bright red.  I trimmed this strip down to approximately 1 x 4.5
    • I put another piece of scrap into the stamp positioner and stamped the sentiment in red.   I trimmed this down to approximately .5 x 3, and put dimensional foam on the back.
    • I used a final piece of scrap to create the small square:  I positioned two square dies on the paper; one inside the other, ensuring equal spacing on all sides.  I ran this through the Big Shot to create the hollow square shown in the image. 

    Assembly

    • I glued the card face to the card base.
    • I glued the square to the card face as shown,  and then positioned the strip with the vase over top.
    • I removed the backing from the foam on the sentiment and put it in place.
    • I scattered red card bling randomly in the upper left of the card face.

    Final Thoughts:

    I’m really happy with the graphic feel of this card.

    Supplies: (and links where possible)

       I have listed which products I have used, and where they may be purchased. It’s a huge marketplace and in most instances, there are multiple sources and many alternatives to choose from.

    Stencil: Mid Century Mask,  A Colorful Life Designs

    Stamps:  Stampin’ Up!  (retired)

    Dies:  Everlasting Square,  Spellbinders,  R&R Scrapbooking

    Ink: Stampin’ Up!

    Card Bling:  A Colorful Life Designs

    Adhesive: Tombow Aqua, Michaels

    Card Base & Card Face: Accent 100 lb., Amazon

    Do you have comments or thoughts to share on this design?  Drop me a line in the Comments Section below –  I’d love to hear from you!

    You can also use the Comments Section  to be notified when I release new work

    Mid Century Mask by A Colorful Life Designs

  • Create a card just to share a smile

    Create a card just to share a smile

    xxxx

    Would you like to experiment with a design like this? You’ll find a supply list below, including a link to the stencil I used from A Colorful Life Designs.  Follow the link and use discount code ChrisFan10 to save 10% on your entire order! (Master Creator Bundles are excluded as they already have a 20% discount built in.)

    Let’s get Started:

    Card Base: 5.5 x 8.5, scored and folded at 4.25

    Card Face:  5.5 x 4.25

    First Steps:

    • I planned to work with Shimmer Sprays for this project,  so before starting, I sprayed the back of the stencil generously with Pixie Spray so that I would get a crisp result.
    • I waited about 30 seconds and then positioned the stencil in the center of a full piece of paper  (8.5 x 11).  I used a brayer to ensure good contact between the stencil and the paper.
    • I sprayed  Lindy’s Shimmer Sprays generously over the stencil,  covering the entire sheet of paper.  While still wet,  I added several colours of Lindy’s Magicals powders to the mix.
    • I left this to dry for a while before removing the stencil.
    • I cut the paper into four pieces,  5 x 4.25.

    Card Face:

    • I selected one of the pieces, placed it in my stamp positioner and stamped the giraffes with Versafine Onyx.  
    • I removed the card face from the positioner and sprinkled clear embossing powder over the stamping:  I set this with my heat gun.
    • I repeated this step with the sentiment, making the decision to run it vertically rather than horizontally.

    Assembly

    • I glued the card face to the card base.
    • I added three small black embellishments to the upper left.

    Final Thoughts:

    Although I didn’t get the perfectly crisp result I was hoping for (probably too much spray),  I felt that it worked with this pattern.  The irregular lines really don’t bother me here.

       I love this end result.

    Supplies: (and links where possible)

       I have listed which products I have used, and where they may be purchased. It’s a huge marketplace and in most instances, there are multiple sources and many alternatives to choose from.

    Stencil: Mid Century Mask,  A Colorful Life Designs

    Stamps: Altenew  (retired)

    Versafine Onyx, Simon Says Stamp

    Lindy’s Shimmer Spray:  Starburst,  Glitter & Ink

    Lindy’s Magicals:  Under the Sea:  Glitter and Ink

    Clear Embossing Powder:  Wow, Simon Says Stamp

    Adhesive: Tombow Aqua, Michaels

    Card Base & Card Face: Accent 100 lb., Amazon

    Do you have comments or thoughts to share on this design?  Drop me a line in the Comments Section below –  I’d love to hear from you!

    You can also use the Comments Section  to be notified when I release new work.

    Mid Century Mask by A Colorful Life Designs