Category: Fixing Blunders

  • Explore Musical Stencils for Unique Card Creations

    Explore Musical Stencils for Unique Card Creations

    Would you like to experiment with a design like this? You’ll find a supply list below, including a link to the stencils I used from A Colorful Life Designs.  Follow the link and use the discount code ChrisFan10 to save 10% on your entire order! (Master Creator Bundles are excluded as they already have a 20% discount built in.)

    Let’s get Started:

    Card Base: 5.25 x 10.5,  scored and folded at 5.25

    Card Face:  5 x 5

    Focal Image:  2.25 x 2.25
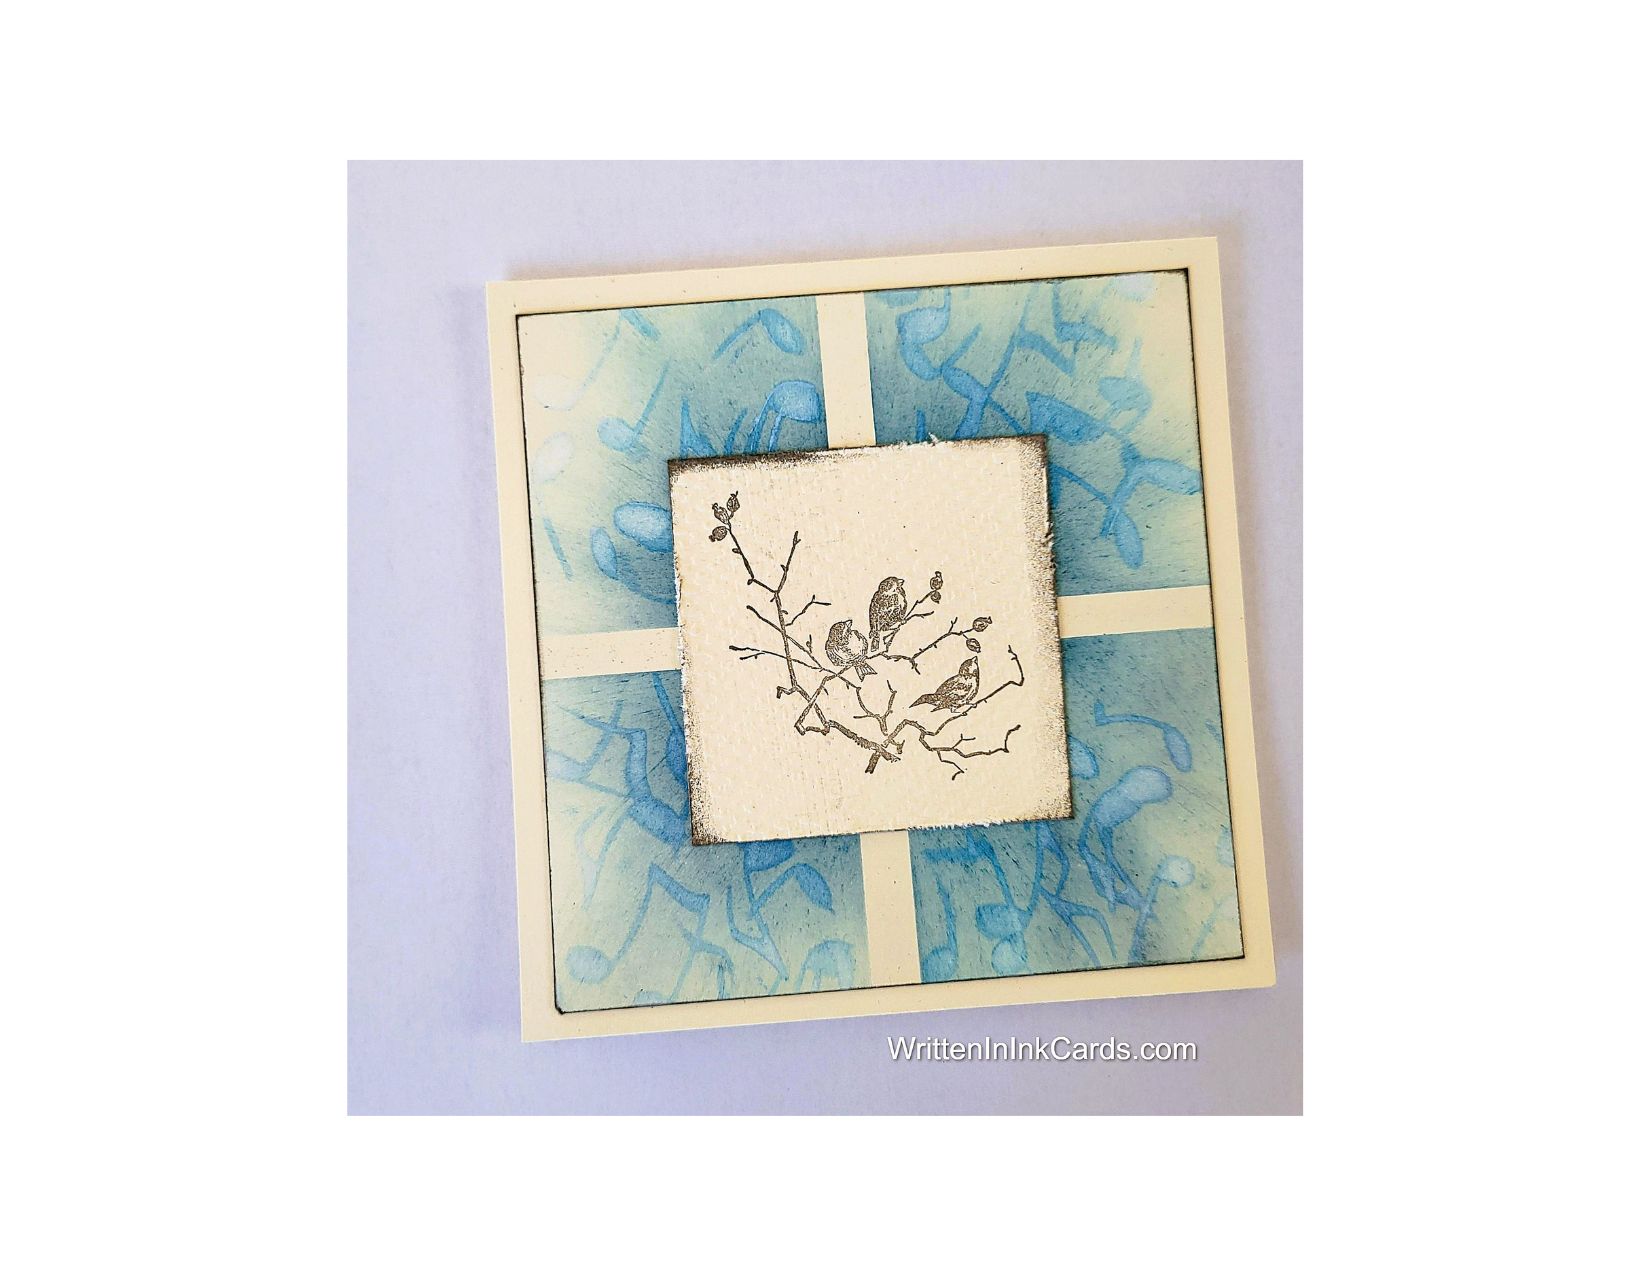
    Card Face:

    • I placed the card face onto the Grip Mat and centered the Square Cut Out stencil.
    • I brushed medium blue ink into the open areas,  starting at the lower inside corner of each quadrant and moving outward on a diagonal with the ink.
    • I removed the first stencil and masked off the dividing lines for the top right square.
    • I used the Music Elements stencil and a brighter blue ink to add musical notes to this area.  I rotated the stencil and inked more notes into this space,  allowing them to overlap.
    • I repeated this in each of the other three quadrants.

    Focal Image:

    • I placed this piece in my stamp positioner and stamped the image with brown ink.
    • I placed this into an embossing folder and ran it through the Big Shot to create subtle texture.
    • I added ink to the edges of this piece by running them lightly over the brown ink pad, allowing the ink to extend into the piece as shown.
    • I roughened the edges of the piece with my scissors,  creating a slightly distressed look.
    • I also ran the edges of the card face over this ink pad,  but taking care to create crisp, clean lines in this instance.

    Assembly

    • I glued the card face onto the card base, centering carefully.
    • I glued the focal piece on top of these, again centering carefully.

    Final Thoughts:

    When I was creating the upper left quadrant the stencil slipped and blurred the image. Rather than give up on the design, I moved the stencil and deliberately created a layered set of musical notes in each quadrant. I like the end result – today’s lesson is don’t be afraid to play!

    I like the contrast between crisp outline on the card face and the slightly distressed look of the focal image.  I also like the way the two stencils work together, and the blue and brown combination.   I am happy with this card!

    Supplies: (and links where possible)

       I have listed the products I have used and where they can be purchased. It’s a huge marketplace, and in most instances, there are multiple sources and many alternatives to choose from.

    Stencils:

    Music Elements,  A Colorful Life Designs

    Square Cut Out,  A Colorful Life Designs

    Waffle Flower Grip Mat, 8.5 x 6.5, Scrapbook.com

    Versamark Embossing Ink: The Scrapbook Cottage

    Clear Embossing Powder,  Wow,  R&R Scrapbooking

    Stamps: Getting Cozy,  Unity Stamps

    Ink: Stampin’ Up!

    Blending Brushes: Stampin’ Up! 

    Adhesive: Tombow Aqua, Michaels

     Recollections 110 lb., Michaels

    Do you have any comments or thoughts on this design?  Drop me a line in the Comments Section below –  I’d love to hear from you!

    You can also use the Comments Section to be notified when I release new work.

    Music Elements

    Square Cut Out

  • Create Beautiful Christmas Cards with Cardinals

    Create Beautiful Christmas Cards with Cardinals

    Would you like to experiment with a design like this? You’ll find a supply list below, including a link to the stencil I used from A Colorful Life Designs.  Follow the link and use discount code ChrisFan10 to save 10% on your entire order! (Master Creator Bundles are excluded as they already have a 20% discount built in.)

    Let’s get Started:

    Card Base: 5.25 x 10.5,  scored and folded at 5.25

    Cream Border Layer: 5. X 5

    Red Border Layer  4 x 4

    Card Face: 3.75 x 3.75

    Scraps of cream and red cardstock for the banner and birds

    Card Face:

    • I laid the card face down onto scrap paper and positioned the stencil.  I applied green embossing paste to all exposed areas.
    • I removed the stencil carefully and put it into water immediately (to prevent the paste from drying on the surface).  
    • I put the card face aside to dry.  Once dry,  I used a corner punch on each corner, which created both the rounded edge and the peek-a-boo slot in the card face.

    Other:

    • I die-cut the banner 2x from cream cardstock and once from red.
    • I glued the two cream banners together, then added the red one behind, offsetting it just slightly.
    • I die-cut the tiny cardinals from the same red cardstock.
    • I put the banner in my stamp positioner and stamped Merry Christmas in red ink.
    • I put the cream border into an embossing folder and ran it through my Big Shot.

    Assembly

    • I glued the embossed, cream border to the card base, centering it on all sides.
    • I glued the card face to the red border layer, again centering it on all sides.
    • I glued these two layers together, again (of course!) centering on all sides.
    • I glued the banner into the center of the wreath.
    • I added the tiny cardinals as shown.

    Final Thoughts:

    I had such a time with that banner!   The first time I tried to glue it down I hadn’t allowed enough time for the ink to dry and smudged the red in the process.  The second attempt, I had glue on my finger, touched the red ink … and of course smudged it again.   At that point I put it aside for a couple of days –  I was tired of looking at it!

    When I returned to it I once again die cut a banner and stamped it, and very carefully glued it on top of what was there …  and I finally managed to get the task done without smudging it!

    Luckily,  I like the result, LOL.  The embossing paste has a lovely gleam and creates a wonderful backdrop for the banner and birds.

    Supplies: (and links where possible)

       I have listed which products I have used, and where they may be purchased. It’s a huge marketplace and in most instances, there are multiple sources and many alternatives to choose from.

    Stencil: Leaf Frame,  A Colorful Life Designs

    Waffle Flower Grip Mat, 8.5 x 6.5, Scrapbook.com

    Embossing Paste:  Later Gator Lunar Paste, Glitter & Ink

    Stamp & Die: Banner Sentiments, Penny Black, Teaspoon of Fun

    Ink: Stampin’ Up!

    Adhesive: Tombow Aqua, Michaels

    Cream Card Base & Card Face: Recollections 110 lb., Michaels

    Do you have comments or thoughts to share on this design?  Drop me a line in the Comments Section below –  I’d love to hear from you!

    You can also use the Comments Section  to be notified when I release new work.

    Leafy Frame by A Colorful Life Designs

  • All I need for Christmas is endless coffee, and a great card design

    All I need for Christmas is endless coffee, and a great card design

    Alternate title: A guide to surviving errors and still ending up with a card!

    Would you like to experiment with a design like this? You’ll find a supply list below, including a link to the stencils I used from A Colorful Life Designs.  Follow the link and use discount code ChrisFan10 to save 10% on your entire order! (Master Creator Bundles are excluded as they already have a 20% discount built in.)

    Let’s get Started:

    Card Base: 5.5 x 8.5, scored and folded at 4.25

    Card Face:  5.25 x 4

    Card Face:

    • Using Memento black ink, I stamped the image in the upper right of the card face, and then coloured it with alcohol markers.
    • I placed the card face down on the Grip Mat and positioned the coffee cup portion of the stencil in the lower-left corner.  I masked off open areas on the stencil near the mug, then used red ink over the exposed area.
    • When I removed the stencil, I was dismayed to see that I had been too energetic with my brush between the mug and the handle—and I had ink between the two, instead of a lovely, clean page.  What to do?
    • I cut very carefully along the outline of the mug, removing it completely from the card face.  Then I laid it on a scrap piece of cardstock and traced it.  I carefully cut this piece out and then tested it in the opening on the card face.  Once I saw that I had a good fit, I glued the card face to a piece of scrap copy paper (cut down to 5.25 x 4”)  and glued the blank “mug” into the opening.
    • I used my snips to remove the paper between the mug and the handle, cutting carefully along the lines.   Once that was done, I was able to glue that piece back in place directly over the blank.
    •  I repositioned the stencil and placed the sentiment I wanted to use in the upper-left corner, then applied black ink to the open areas.
    • I put the other stencil in place:  I used yellow ink and a light hand to create the pattern around the mouse.

    Rather than grab my yellow ink pad,  I simply used the residual ink on the yellow brush.  Because I only wanted a subtle background, this worked well.  I learned this tip from my friend on YouTube – check out Amy’s Wares for some great tips.

    • I outlined the mug with silver gel pen:  while I was outlining the handle, the pen slipped and suddenly I had an unplanned streak of silver ink …. I dealt with that by adding additional lines to the handle, creating stripes.   I decided to add dots to the rest of the mug just for fun.
    • I ran the edges of the card face over my red ink pad., creating definition.

    Assembly

    • I glued the card face to the card base, centering all sides.

    Final Thoughts:

    I had coloured the mouse and lights (so adorable!) and didn’t know what I wanted to do next. A random hunt through my stencil binder resulted in my tripping over the Christmas Coffee stencil and a plan was born.  Serendipity is a wonderful thing!

    Supplies: (and links where possible)

       I have listed which products I have used, and where they may be purchased. It’s a huge marketplace and in most instances, there are multiple sources and many alternatives to choose from.

    Stencil:

    Christmas Coffee Stencil:  A Colorful Life Designs

    Connect the Dots,  A Colorful Life Designs

    Waffle Flower Grip Mat, 8.5 x 6.5, Scrapbook.com

    Stamps: Merry and Bright, House Mouse,  Spellbinders (retired)

    Ink: Stampin’ Up!

    Blending Brushes: Stampin’ Up! 

    Versafine Onyx, Simon Says Stamp

    Memento Ink: Stampin’ Up!

    Alcohol Markers:

         Stampin’ Blends: Stampin’ Up!

         Copics:  Wallacks

    Adhesive: Tombow Aqua, Michaels

    Card Base & Card Face: Accent 100 lb., Amazon

    Do you have comments or thoughts to share on this design?  Drop me a line in the Comments Section below –  I’d love to hear from you!

    You can also use the Comments Section  to be notified when I release new work.

    Connect the Dots by A Colorful Life Designs

    Christmas Coffee by A Colorful Life Designs

  • Create a stellar birthday card that is Out of this WORLD

    Create a stellar birthday card that is Out of this WORLD

    Would you like to experiment with a design like this? You’ll find a supply list below, including a link to the stencil I used from A Colorful Life Designs.  Follow the link and use discount code ChrisFan10 to save 10% on your entire order! (Master Creator Bundles are excluded as they already have a 20% discount built in.)

    Let’s get Started:

    Card Base: 5.25 x 10.5, scored and folded at 5.25

    Border:  5 ⅛ x 5 1/8

    Card Face:  5 x 5

    Card Face:

    • I laid the card face onto my Grip Mat and positioned the stencil.
    • Avoiding the center,  I used light blue-gray ink on the inner circles of dots,  and black on the outer circles.
    • I filled in the opening in the center with very pale yellow ink to create the moon.
    • I repositioned the stencil and added the landmasses on the moon with the blue ink used earlier in the process.
    • I added the stars with yellow ink,  and then used the same colour to create a fine spatter over the surface of the card.  (to represent stars in far away galaxies.)
    • I added the rocket with black ink.
    • I realized that I had failed to protect my moon, and this now had yellow spatter on it.  I didn’t care for that,  so I went over the moon with the yellow ink,  until I had equalized the colour and the spatter was no longer visible.
    • BUT –  I didn’t want my moon to be that bright, so I went over this area with white pigment ink (4 or 5 times)  to soften the colour again.
    • I put the card face into my Stamp Positioner and stamped the sentiment.

    Assembly

    I glued the border layer to the card base, and centered the card face on both.

    Final Thoughts:

    This is a super fun stencil –  making this card for a girl or boy interested in space was quick and easy.

    Supplies: (and links where possible)

       I have listed which products I have used, and where they may be purchased. It’s a huge marketplace and in most instances, there are multiple sources and many alternatives to choose from.

    Stencil: Circl Moon,  A Colorful Life Designs

    Waffle Flower Grip Mat, 8.5 x 6.5, Scrapbook.com

    Ink: Stampin’ Up!

    Blending Brushes: Stampin’ Up! 

    Versafine Onyx, Simon Says Stamp

    Adhesive: Tombow Aqua, Michaels

    Card Base & Card Face: Accent 100 lb., Amazon

    Do you have comments or thoughts to share on this design?  Drop me a line in the Comments Section below –  I’d love to hear from you!

    You can also use the Comments Section  to be notified when I release new work

    Circle Moon by A Colorful Life Designs

  • Craft Unique Kiddie Cards with *A Colorful Life* Stencils

    Craft Unique Kiddie Cards with *A Colorful Life* Stencils

    Would you like to experiment with a design like this? You’ll find a supply list below, including a link to the stencils I used from A Colorful Life Designs.  Follow the link and use discount code ChrisFan10 to save 10% on your entire order! (Master Creator Bundles are excluded as they already have a 20% discount built in.)

    Let’s get Started:

    Card Base: 5.5 x 8.5, scored and folded at 4.25

    Card Face:  5.5 x 4.25 before cutting down

    Card Face:

    • I laid my cardface on the Grip Mat and then centered the largest of the Squeezed Rectangle stencils on top.  
    • Over this, I laid the Grunge Dots Stencil.
    • I used blue ink on the top of this stencil and green on the bottom, creating the basics for a scene.  (having the Squeezed Rectangle stencil on the bottom meant that the ink was kept within it’s borders.
    • I removed the stencils and trimmed the card face along the border created by the ink.
    • I ran my ink pads along the newly cut edges,  matching the colours already used.

    Other:

    • I laid the Mid Century Banner stencil on the front half of the card base and applied blue ink with a light hand.
    • I brushed green ink in from the edges of this piece, again using a light hand.
    • I looked through my Ready to Go binder and found the wee elephants, the sun and the sentiment – all just waiting for a chance to shine.

    Assembly

    • I put dimensional tape on the back of the card face and centered it on the card base.
    • I glued the elephants and the sun in place as shown.
    • After experimenting a bit I decided that the sentiment would be best about halfway down on the right, and put it in place.

    Final Thoughts:

    I’ve had all of the components for this card for quite a while – except for the inked up card base.  I was delighted to put them into use, and to discover that they were willing to play nicely together.

    I initially intended this to be a flat cardface,  with the stencilled pattern inked directly onto the card base, however an inky glitch required the card face to be cut out – and after that dimensional tape seemed like a good idea to make it really stand out.

    I feel that the green ink applied to the card base is a bit too dominant:  if I were to recreate this card I would not apply it,  or I would use an even lighter hand.

    Supplies: (and links where possible)

       I have listed which products I have used, and where they may be purchased. It’s a huge marketplace and in most instances, there are multiple sources and many alternatives to choose from.

    Stencil:

         Marvellous Masks,  Squeezed Rectangle: A Colorful Life Designs

         Grunge Dots:  a Colorful Life Designs

         Mid Century Banners:  A Colorful Life Designs

    Waffle Flower Grip Mat, 8.5 x 6.5, Scrapbook.com

    Versamark Embossing Ink: Simon Says Stamp

    Clear Embossing Powder,  Wow,  Simon Says Stamp

    Stamps:

         Elephants:  Studio Light (retired)

         Sun:  Here Comes the Sun, Tayored Expressions

    Ink: Stampin’ Up!

    Blending Brushes: Stampin’ Up! 

    Versafine Onyx, Simon Says Stamp

    Adhesive: Tombow Aqua, Michaels

    Card Base & Card Face: Accent 100 lb., Amazon

    Do you have comments or thoughts to share on this design?  Drop me a line in the Comments Section below –  I’d love to hear from you!

    You can also use the Comments Section  to be notified when I release new work

    Mid Century Banners by A Colorful Life Designs

  • Unlock Your Creativity: Stenciled Card Ideas and Supplies

    Unlock Your Creativity: Stenciled Card Ideas and Supplies

    Would you like to experiment with a design like this? You’ll find a supply list below, including a link to the stencils I used from A Colorful Life Designs.  Follow the link and use discount code ChrisFan10 to save 10% on your entire order! (Master Creator Bundles are excluded as they already have a 20% discount built in.)

    Let’s get Started:

    Card Base: 5.5 x 8.5, scored and folded at 4.25

    Card Face:  5.5 x 4.25 before cutting down

    Card Face:

    • I laid my cardface on the Grip Mat and then centered the largest of the Squeezed Rectangle stencils on top.  
    • Over this, I laid the Grunge Dots Stencil.
    • I used blue ink on the top of this stencil and green on the bottom, creating the basics for a scene.  (having the Squeezed Rectangle stencil on the bottom meant that the ink was kept within it’s borders.
    • I removed the stencils and trimmed the card face along the border created by the ink.
    • I ran my ink pads along the newly cut edges,  matching the colours already used.

    Other:

    • I laid the Mid Century Banner stencil on the front half of the card base and applied blue ink with a light hand.
    • I brushed green ink in from the edges of this piece, again using a light hand.
    • I looked through my Ready to Go binder and found the wee elephants, the sun and the sentiment – all just waiting for a chance to shine.

    Assembly

    • I put dimensional tape on the back of the card face and centered it on the card base.
    • I glued the elephants and the sun in place as shown.
    • After experimenting a bit I decided that the sentiment would be best about halfway down on the right, and put it in place.

    Final Thoughts:

    I’ve had all of the components for this card for quite a while – except for the inked up card base.  I was delighted to put them into use, and to discover that they were willing to play nicely together.

    I initially intended this to be a flat cardface,  with the stencilled pattern inked directly onto the card base, however an inky glitch required the card face to be cut out – and after that dimensional tape seemed like a good idea to make it really stand out.

    I feel that the green ink applied to the card base is a bit too dominant:  if I were to recreate this card I would not apply it,  or I would use an even lighter hand.

    Supplies: (and links where possible)

       I have listed which products I have used, and where they may be purchased. It’s a huge marketplace and in most instances, there are multiple sources and many alternatives to choose from.

    Stencil:

         Marvellous Masks,  Squeezed Rectangle: A Colorful Life Designs

         Grunge Dots:  a Colorful Life Designs

         Mid Century Banners:  A Colorful Life Designs

    Waffle Flower Grip Mat, 8.5 x 6.5, Scrapbook.com

    Versamark Embossing Ink: Simon Says Stamp

    Clear Embossing Powder,  Wow,  Simon Says Stamp

    Stamps:

         Elephants:  Studio Light (retired)

         Sun:  Here Comes the Sun, Tayored Expressions

    Ink: Stampin’ Up!

    Blending Brushes: Stampin’ Up! 

    Versafine Onyx, Simon Says Stamp

    Adhesive: Tombow Aqua, Michaels

    Card Base & Card Face: Accent 100 lb., Amazon

    Do you have comments or thoughts to share on this design?  Drop me a line in the Comments Section below –  I’d love to hear from you!

    You can also use the Comments Section  to be notified when I release new work.

    Mid Century Banner by a Colorful Life Designs

  • Sunny Days and Dragonflies are Excellent Reasons to Smile

    Sunny Days and Dragonflies are Excellent Reasons to Smile

    Would you like to experiment with a design like this? You’ll find a supply list below, including a link to the stencils I used from A Colorful Life Designs.  Follow the link and use discount code ChrisFan10 to save 10% on your entire order! (Master Creator Bundles are excluded as they already have a 20% discount built in.)

    Let’s get Started:

    Card Base: 5.5 x 8.5, scored and folded at 4.25

    Card Face:  5.5 x 4.25 before cutting down

    Scrap of black cardstock for the sentiment

    Card Face:

    • I laid the card face onto the grip mat,  and positioned the oval stencil in the center of the paper.  On top of that I positioned the banners stencil and used pink ink across the exposed areas.  By putting the oval stencil down first I controlled the area that the pattern could cover on the card face.
    • I removed both stencils and (after ensuring that the ink was completely dry)  placed the card face into my stamp positioner and used Versafine Onyx to stamp the silhouette images.  The ink needed to be dry so that the embossing powder wouldn’t stick to the background pattern.  An easy way to check is to sprinkle the embossing powder over the piece and then tip it off: if any sticks it needs more dry time.
    • I sprinkled clear embossing powder over the wet black ink and set it with my heat gun.

    Other:

    • I centered the matching oval mask on the card base and brushed pink ink on, radiating out from the borders of the mask.
    • Using a die, I cut “smile” out 3X from black cardstock, and glued them together.  I pressed this into Versamark embossing ink, sprinkled it with clear powder, and set it with my heat gun.
    • I cut four photo corners from black cardstock using a die.
    • I carefully cut around the oval image on  the card face.

    Assembly

    • I glued the oval cutout to the card base,  placing it into the oval “blank” created with the ink.
    • I used a black marker to create a border around the oval.
    • I glued the photo corners into the corners of the card base.
    • I glued the “Smile” onto the card face as shown.

    Final Thoughts:

    My original plan for this design was to have a flat card face, with the oval inked into the center: I ended up with a blob of ink in the outer edges,  and had to reimagine the card mid-design, fussy cutting the oval and creating a brand new card base. (haste makes waste – and  “grrr” moments!)

    I wish I had used a lighter hand on the background pattern in the oval: of course by the time I realized what I wanted, it was too late.

    Supplies: (and links where possible)

       I have listed which products I have used, and where they may be purchased. It’s a huge marketplace and in most instances, there are multiple sources and many alternatives to choose from.

    Stencils:

          Mid Century Banners, A Colorful Life Designs

          Marvellous Masks Ovals, A Colorful Life Designs

    Waffle Flower Grip Mat, 8.5 x 6.5, Scrapbook.com

    Versamark Embossing Ink: Simon Says Stamp

    Clear Embossing Powder,  Wow,  Simon Says Stamp

    Stamps:  Stampin’ Up (retired)

    Dies: Diagonal Stripe, Frantic Stamper

    Ink: Stampin’ Up!

    Blending Brushes: Stampin’ Up! 

    Versafine Onyx, Simon Says Stamp

    Adhesive: Tombow Aqua, Michaels

    Card Base & Card Face: Recollections  110 lb, Michaels

    Do you have comments or thoughts to share on this design?  Drop me a line in the Comments Section below –  I’d love to hear from you!

    You can also use the Comments Section  to be notified when I release new work.

    Mid Century Banners by A Colorful Life Designs

  • A DIY card that says “I care”  Easy techniques for stunning results

    A DIY card that says “I care” Easy techniques for stunning results

    Unexpected adhesive residue proves to be a bit of serendipity in the design!

    Would you like to experiment with a design like this? You’ll find a supply list below, including a link to the stencil I used from A Colorful Life Designs.  Follow the link and use discount code ChrisFan10 to save 10% on your entire order! (Master Creator Bundles are excluded as they already have a 20% discount built in.)

    Let’s get Started:

    Card Base: 5.5 x 8.5, scored and folded at 4.25

    Card Face:  5.5 x 4.25

    Card Face:

    • I began by spraying the back of the stencil with Pixie Spray.   This is a temporary adhesive which I use to prevent movement in stencils that are delicate, or that have longer, unattached “strands” in the design.
    • With that complete,  I laid the card face on my Grip Mat,  and then positioned the stencil.  I rolled a brayer across the entire surface to ensure good contact between the adhesive and the paper.
    • Next I selected light aqua and yellow inks and applied them diagonally over the stencil, using a soft hand throughout the process.
    • I removed the stencil and placed the card face into my stamp positioner before adding the floral image with Versamark embossing ink.
    • I added gold embossing powder over this stamped image, and this is where the serendipity comes in –
    • During this step I realized that the stencil had left residue behind from the Pixie Spray,  and bits of embossing powder had stuck to this.  I could have brushed this off of the background, but decided to roll with it and allow it to add an unexpected touch to the background.
    • I used an embossing pen to add a few random lines and dots to the background,  and then added gold embossing powder.
    • After heat setting this,  I decided that one more thing was needed to finish the look: a gold border.  I used an embossing pen again, going around the border of the card and creating an irregular line (I could have used a ruler,  if I’d wanted precision).  After heat setting the gold powder added to this I was satisfied with presence of gold on the card face.
    • I used a rectangular stitched die to cut the floral image from the card face.

    An adhesive eraser can be used to remove residue from Pixie Spray. Just rub it over the paper as if you’re trying to remove a pencil mark.

    Other:

    • I looked through my sentiments binder and found a foiled  XOXOXOXOXO sentiment.
    • I cut three separate XO sections out of this.

    Assembly

    • I glued the card face to the card base.
    • I added dimensional foam to the back of the die-cut focal image and then set it in place on the card face.
    • I positioned the three XO sections as shown.

    Final Thoughts:

    I love the serendipity that is evidenced in the bits of gold embossing .  They are very tiny and and add a lovely, delicate detail to the card face.

    Initially I didn’t have the three sentiment sections on the card face:  I was going to keep the imaging very clean and simple:  after living with it that way for a couple of days I decided that the additional detail was needed.

    Supplies: (and links where possible)

       I have listed which products I have used, and where they may be purchased. It’s a huge marketplace and in most instances, there are multiple sources and many alternatives to choose from.

    Stencil: Glittering Hearts, A Colorful Life Designs

    Waffle Flower Grip Mat, 8.5 x 6.5, Scrapbook.com

    Versamark Embossing Ink: Simon Says Stamp

    Embossing Pen:  Tim Holtz, A Colorful Life Designs

    Gold Embossing Powder: Ranger,  PCW

    Stamps:  Words in Bloom,  Unity Stamps

    Dies: Stitched Rectangles, Stampin’ Up! (retired)

    Pixie Spray:  Michaels

    Ink: Stampin’ Up!

    Blending Brushes: Stampin’ Up! 

    Adhesive: Tombow Aqua, Michaels

    Card Base & Card Face: Accent 100 lb., Amazon

    Do you have comments or thoughts to share on this design?  Drop me a line in the Comments Section below –  I’d love to hear from you!

    You can also use the Comments Section  to be added to the list, and notified when I release new work.

    Glittering Hearts from A Colorful Life Designs

  • An easy creative solution to a BIG cardmaking Blunder

    An easy creative solution to a BIG cardmaking Blunder

    What to do when you’ve invested time and materials, but then it all goes sideways? When that happens to me I hate having to scrap the time and materials invested in the piece.

    Errors are opportunities for creativity! Read on to learn more ….

    Let’s get Started:

    Card Base: 5.5 x 8.5, scored and folded at 4.25

    Border Layer: 5.5 x 4.25

    Card Face:  5.5 x 4

    Card Face:

    I stamped the images in black Memento ink and colored them with alcohol markers. I was happy with the result, as coloring isn’t my strong suit.

      Then I put this aside for a period of time,  trying to decide how to finish the piece. When I picked it back up again I was dismayed to see that it had been sitting too close to something messy –  there was a fine blue spatter in the upper right.  (Probably from cleaning a stencil, and simple carelessness with my work!). How to salvage the time and materials…. ???

    I added both large and small drops of paint above the brush.  I used a fine liner to outline the drops and a blue alcohol marker to fill them in.  I also added small dots of blue marker here and there to bridge between the fine spatter and the larger drops.   It worked –  I was delighted with the result, I had successfully camouflaged my error!

    I carried this one step further by creating puddles of paint under the brush. (There were puddles around the paint pot,  but not under this paintbrush).

    I used a white gel pen to add accents here and there in the scene.

    I put the card face into my stamp positioner and added the sentiment.

    I cut the card face into three panels,  1 ⅓” each.

    Assembly

    I glued the border layer to the card base.

    I glued the three pieces of the card face onto this, spacing evenly.

    Final Thoughts:

    I love Anita Jeram’s work,  and was so happy with the images as placed and coloured. (I don’t pretend to be an expert with any form of colouring, so when I get something that I’m satisfied with, I’m happy!).   

    Then I was dismayed to notice the spatter,  and finally, happy again when the problem was resolved.

    Happy – dismayed – happy.  Sounds like a movie theme!   😆

    Of course if you want to avoid the need for a rescue operation, putting the card in a safe spot is definitely the way to go.

    Supplies: (and links where possible)

       I have listed which products I have used, and where they may be purchased. It’s a huge marketplace; in most instances, there are multiple sources and many alternatives.

    Stamps: Paint the Town, Colorado Craft Co., 

    Versafine Onyx, Simon Says Stamp

    Memento Ink: Stampin’ Up!

    Alcohol Markers:

         Stampin’ Blends: Stampin’ Up!

         Copics:  Wallacks

    Fineliners: Amazon

    White Gel Pen: Arteza,  Amazon

    Adhesive: Tombow Aqua, Michaels

    Card Base & Card Face: Accent 100 lb., Amazon

  • How to Rescue Your Card Designs from Mistakes

    How to Rescue Your Card Designs from Mistakes

    If you’re new, or experienced, or anything like me (!) you have run into situations where you need to rescue your card from a blunder.

    Let’s get Started:

    Card Base: 5.5 x 8.5, scored and folded at 4.25

    Border Layer: 5.5 x 4.25

    Card Face:  5.5 x 4

    Card Face:

    I stamped the images in black Momento ink and coloured them with alcohol markers.

      Then I put this aside for a period of time,  trying to decide how to finish the piece. When I picked it back up again I realized it had been sitting too close to something messy –  there was a fine blue spatter in the upper right.  (Probably from cleaning a stencil, and simple carelessness with my work!). How to salvage the time and materials…. ???

    I added both large and small drops of paint above the brush.  I used a fine liner to outline the drops and a blue alcohol marker to fill them in.  I also added small dots of blue marker here and there to bridge between the fine spatter and the larger drops.   It worked –  I had successfully camouflaged my error!

    I carried this one step further by creating puddles of paint under the brush. (There were puddles around the paint pot,  but not under this paintbrush).

    I used a white gel pen to add accents here and there in the scene.

    I put the card face into my stamp positioner and added the sentiment.

    I cut the card face into three panels,  1 ⅓” each.

    Assembly

    I glued the border layer to the card base.

    I glued the three pieces of the card face onto this, spacing evenly.

    Final Thoughts:

    I love Anita Jeram’s work,  and was so happy with the images as placed and coloured. (I don’t pretend to be an expert with any form of colouring, so when I get something that I’m satisfied with, I’m happy!).   

    Then I was dismayed to notice the spatter,  and finally, happy again when the problem was resolved.

    Happy – dismayed – happy.  Sounds like a movie theme!  

    I’m so happy that I decided to rescue this card.😆

    Supplies: (and links where possible)

       I have listed which products I have used, and where they may be purchased. It’s a huge marketplace; in most instances, there are multiple sources and many alternatives.

    Stamps: Paint the Town, Colorado Craft Co., 

    Versafine Onyx, Simon Says Stamp

    Memento Ink: Stampin’ Up!

    Alcohol Markers:

         Stampin’ Blends: Stampin’ Up!

         Copics:  Wallacks

    Fineliners: Amazon

    White Gel Pen: Arteza,  Amazon

    Adhesive: Tombow Aqua, Michaels

    Card Base & Card Face: Accent 100 lb., Amazon